
|
Unreal SDK
v1.3.0
|
|
|
Unreal SDK
v1.3.0
|
Welcome to the Weart Unreal SDK documentation.
The SDK allows to connect to the Weart middleware and perform various actions with the TouchDIVER devices:

The minimum setup to use the weart SDK consists of:
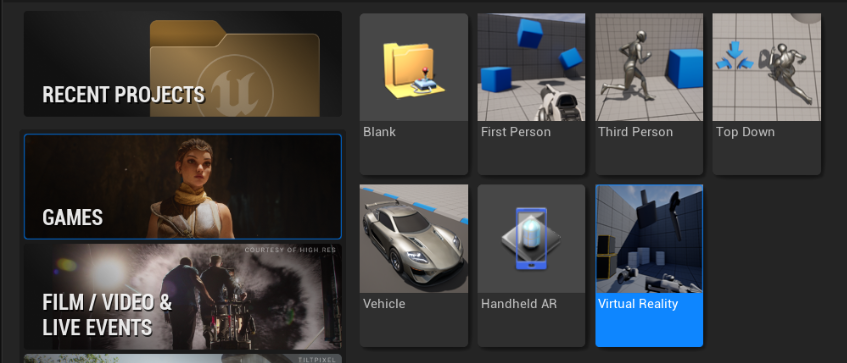
Create a new project by selecting Virtual Reality.
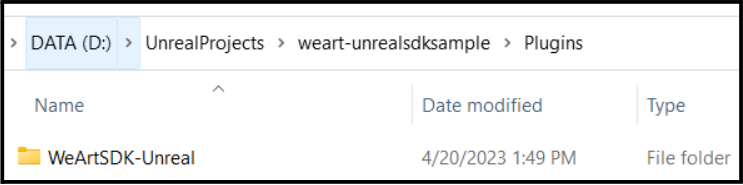
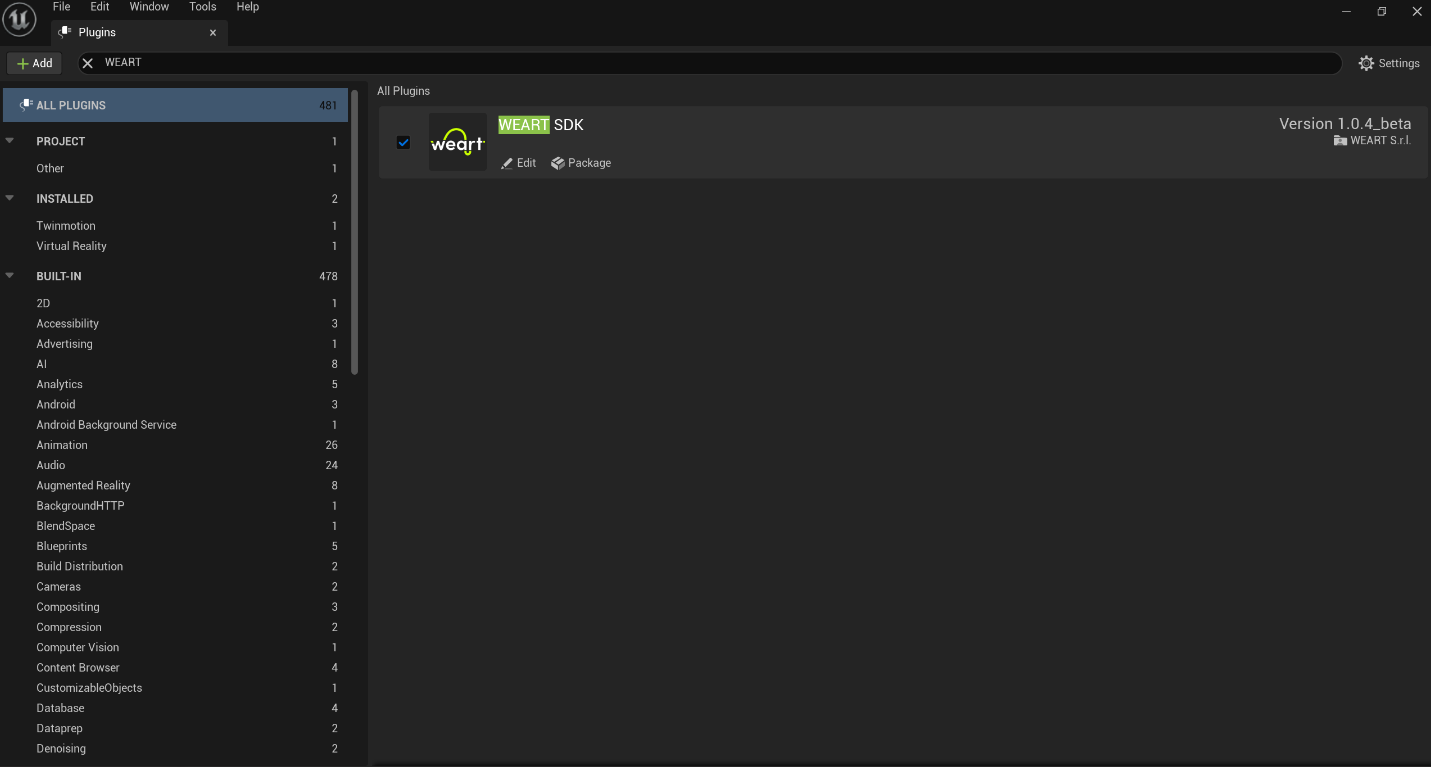
Copy the whole plugin folder either in $UE_LOCATION$/Engine/Plugins for global use or in $PROJECT_FOLDER$/Plugins to use in a specific project. Enable it inside the UE editor in Edit/Plugins.
Enable the plugin if it was placed globally
If the conversion fails, we recommend following the next steps.
Download and install Visual Studio 2022 Community.
Follow this guide for installing the correct tools Setting Up Visual Studio for Unreal Engine
If you still face difficulties continue doing the following.
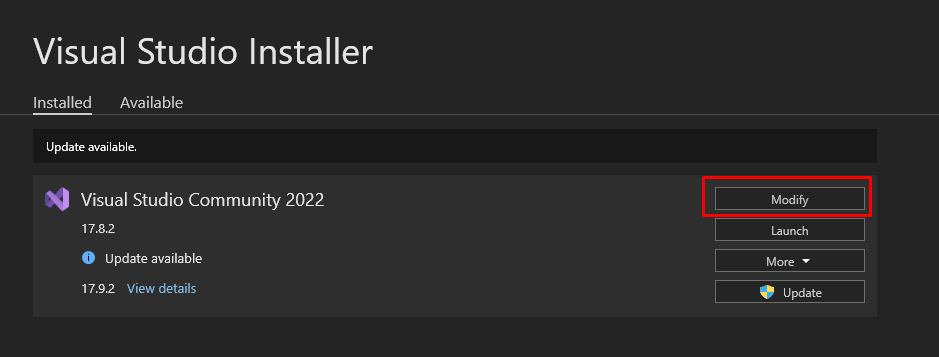
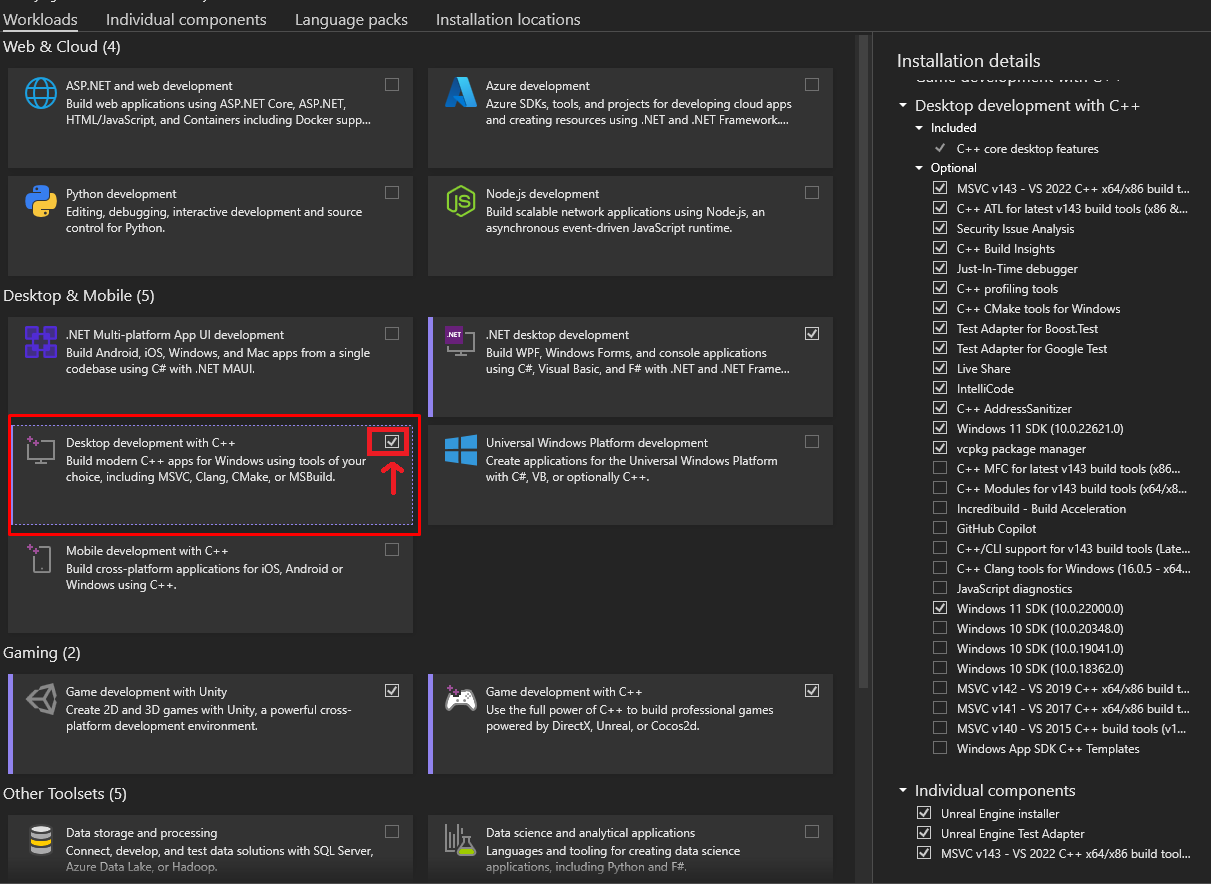
Open the search bar and look for "Visual Studio Installer", it is an application.
Next find the 2022 version and press "Modify"
Check if the next tools are enabled. Enable "Desktop development with C++" and make sure that it is enabled as by pressing it you can both enable and disable it ( you may want to use the Windows 10 sdk if you don't have Windows 11) The "Individual components" can be found in the tab called "Individual Components" near "Workloads".
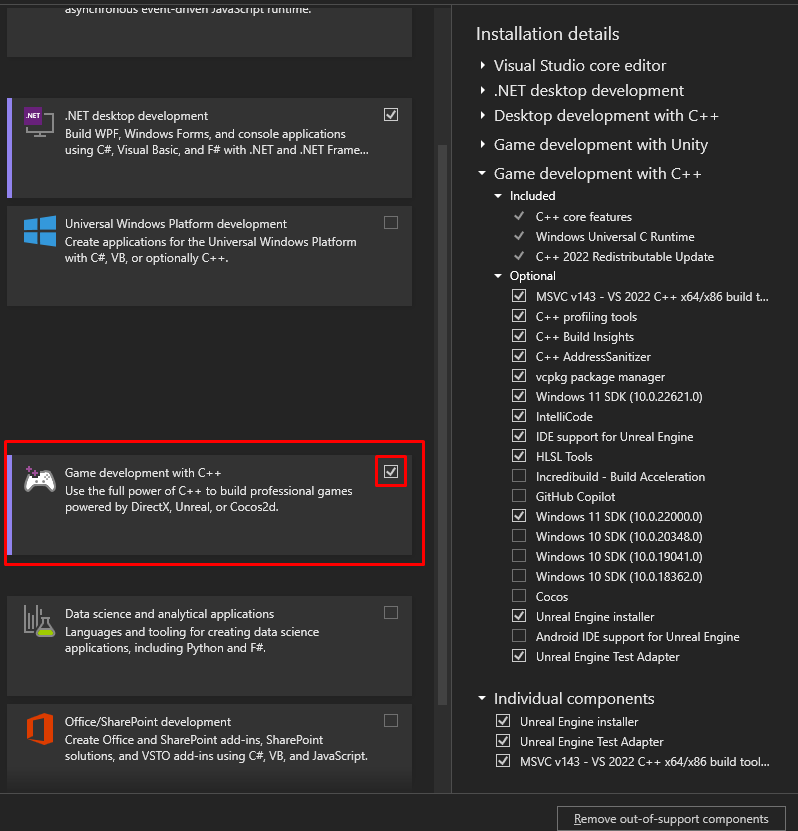
Enable "Game development with C++" and check the installed tools.
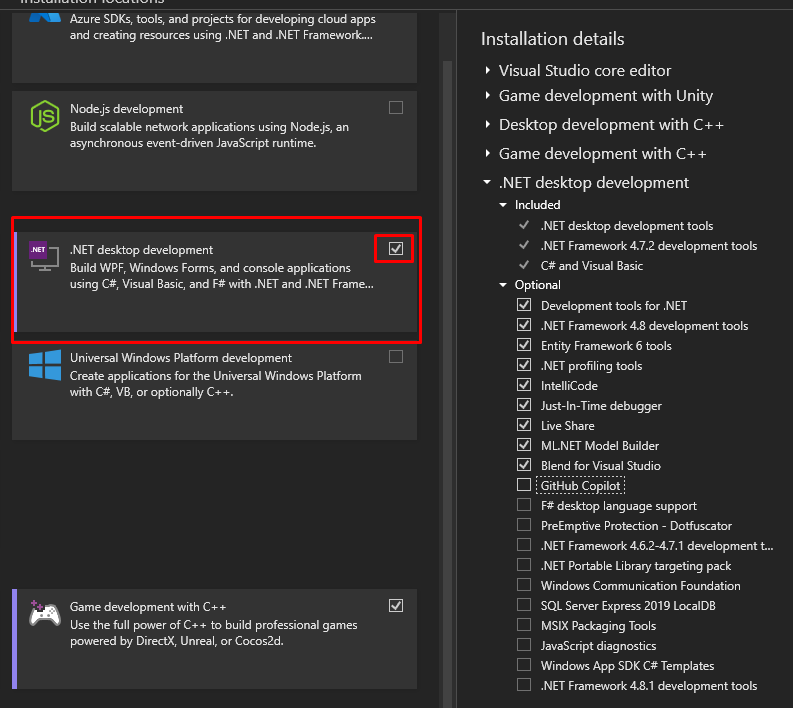
Enable ".NET desktop development" and check the tools installed.
Now you can add the c++ class to the project and open it.
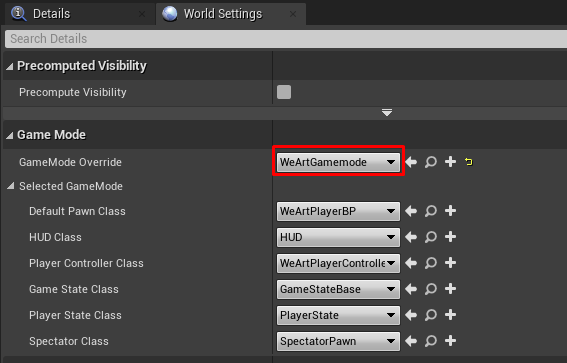
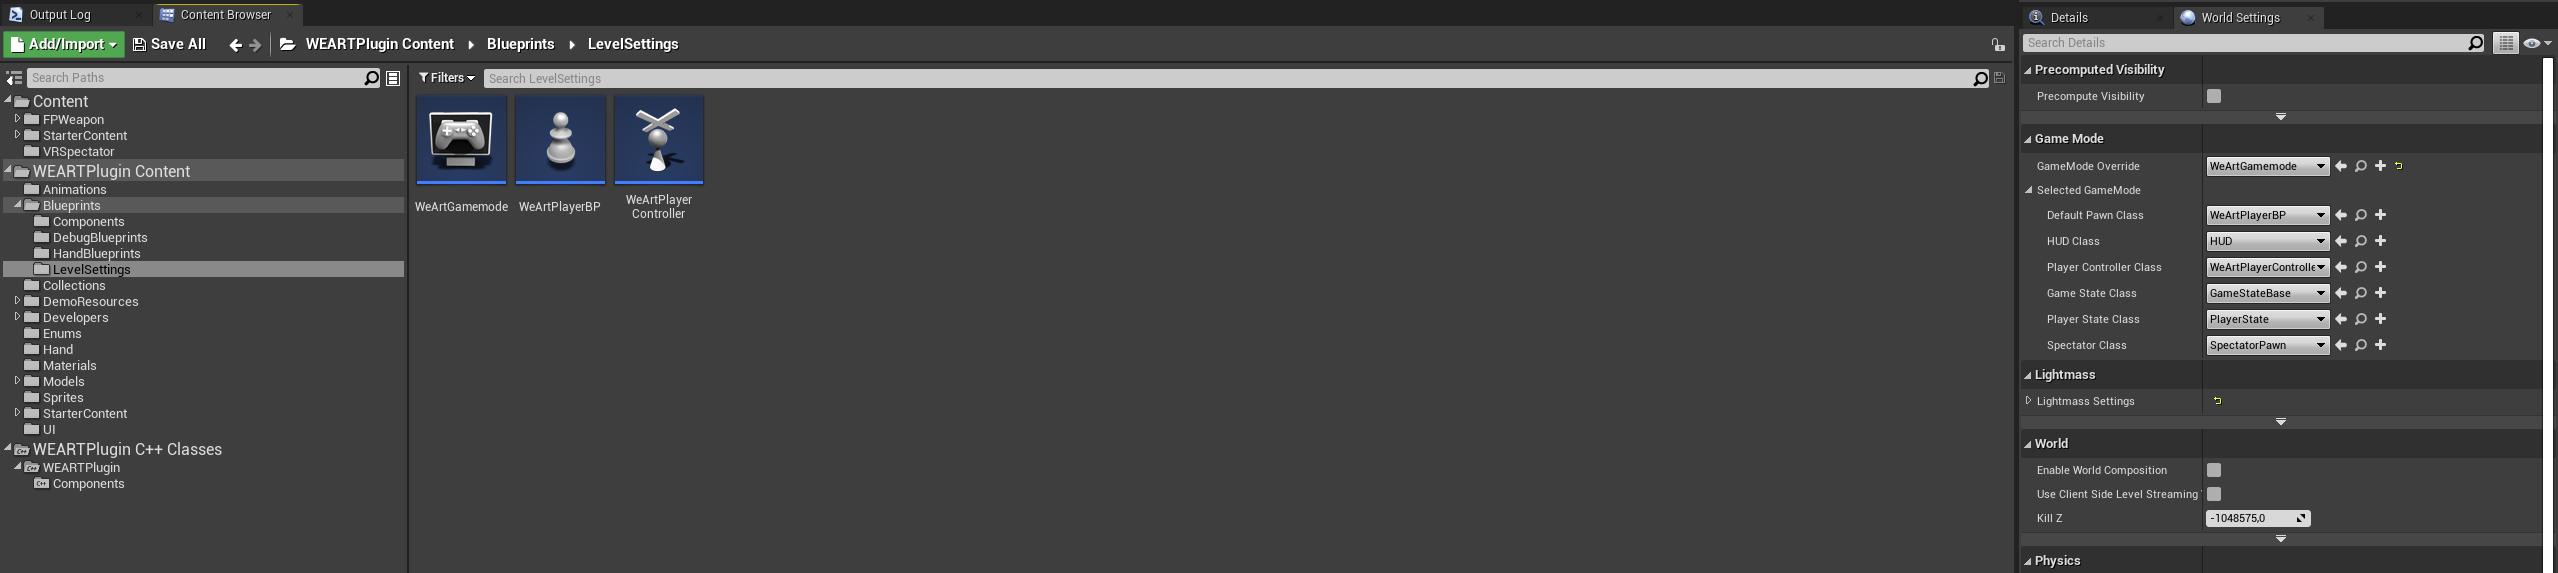
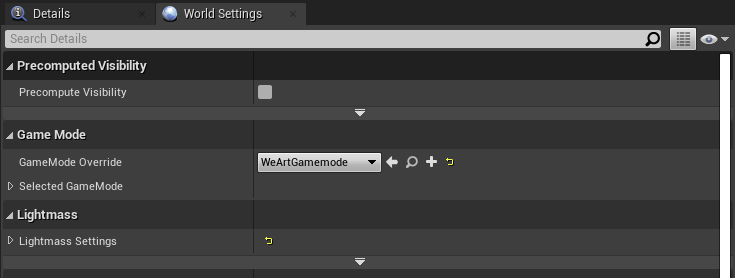
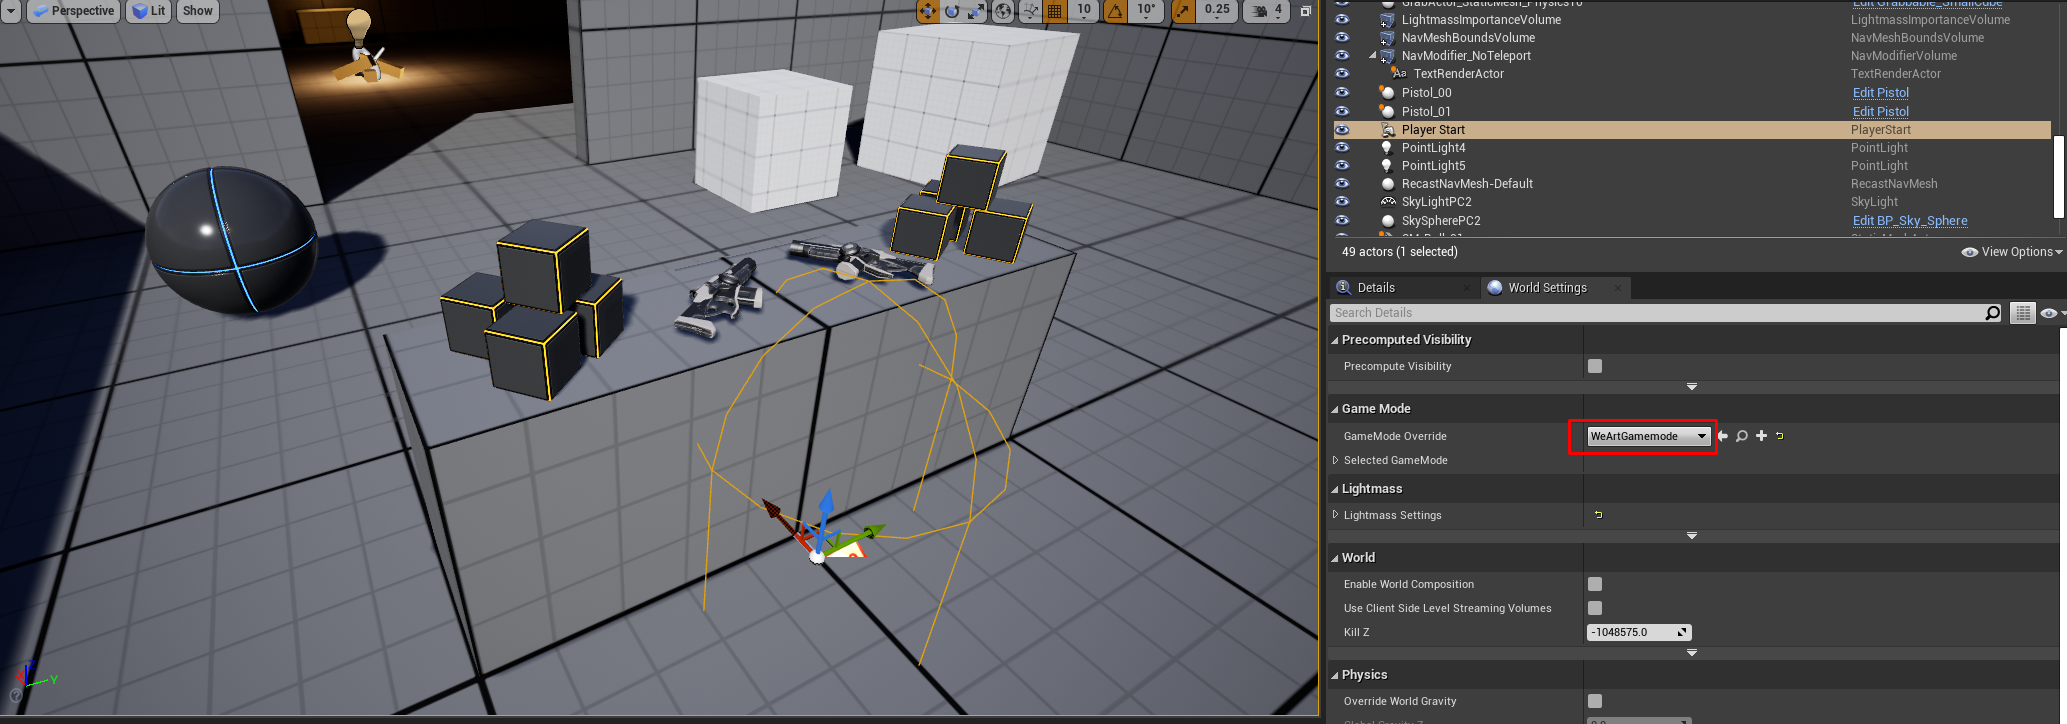
In the World Settings change the Default GameMode to WeArtGamemode.
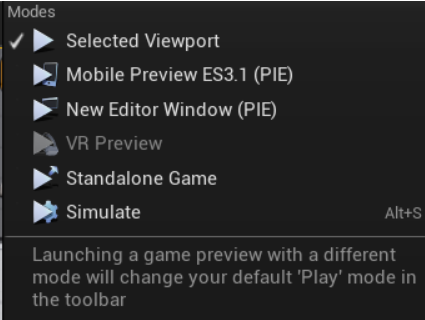
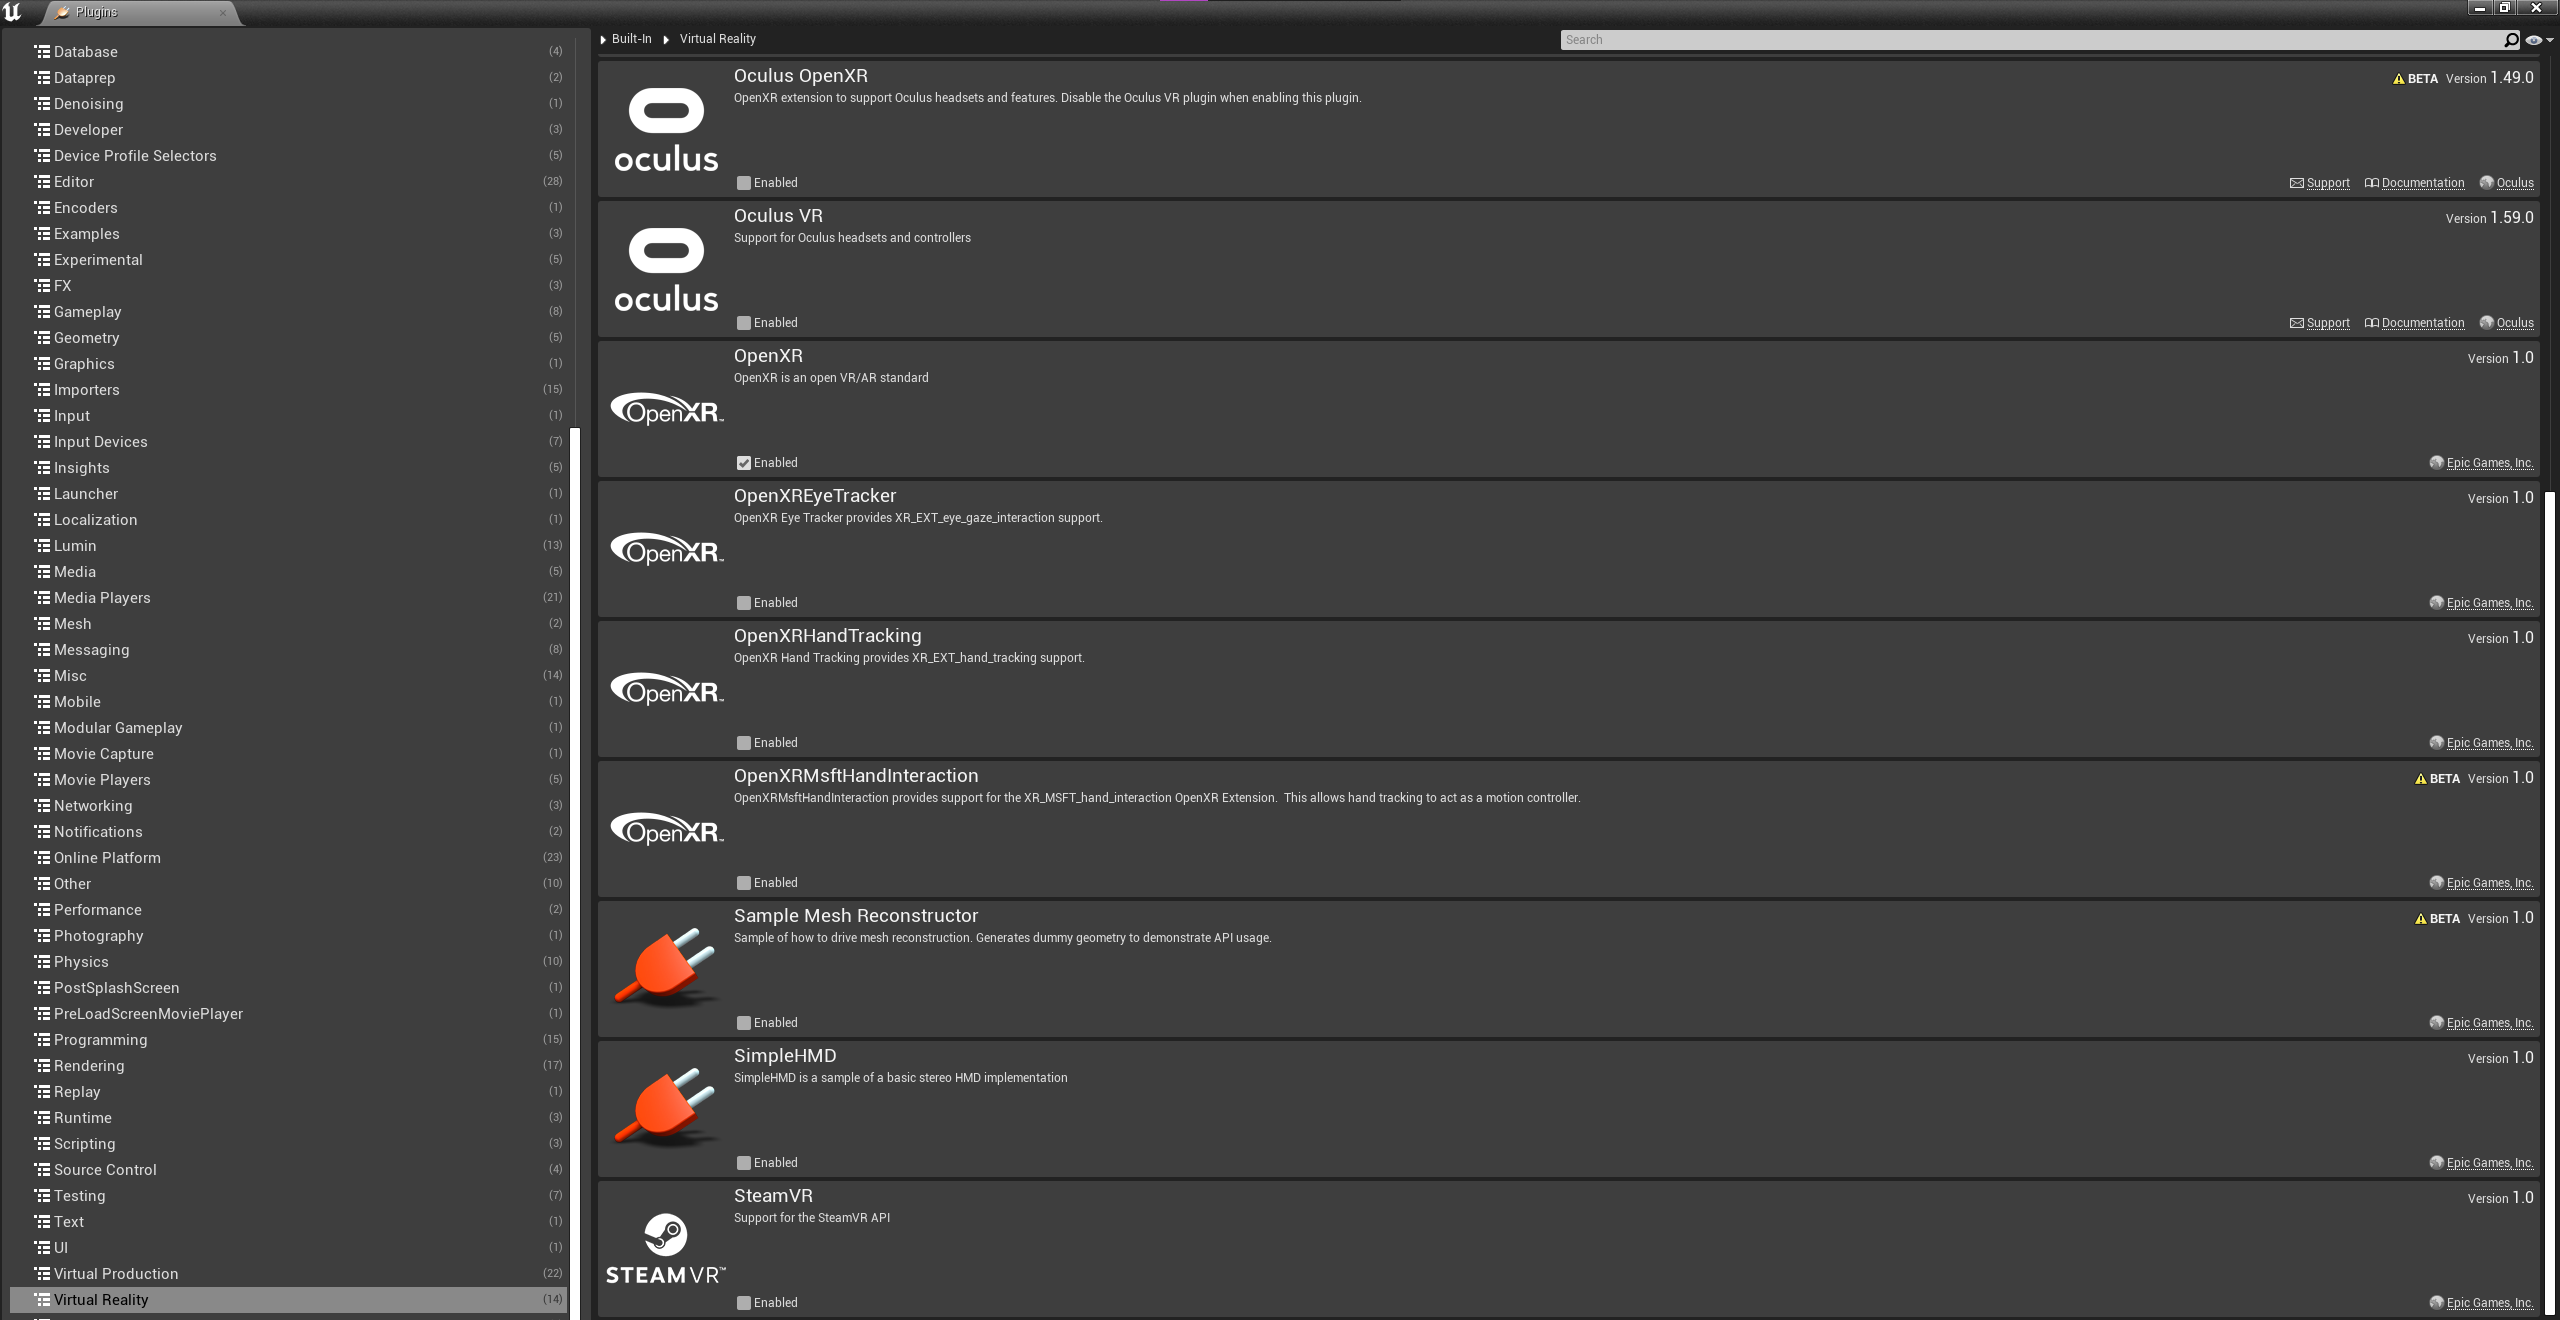
If the VR Preview is inactive make sure to install the plugin that corresponds to your headset. Make sure only OpenXR plugin is enabled from all public VR API.
It is actually created automatically as soon as you enable the plugin. But if you want access to data members etc, just create a Blueprint Class (Add->Blueprints->Blueprint Class) which inherits from WeArtController.
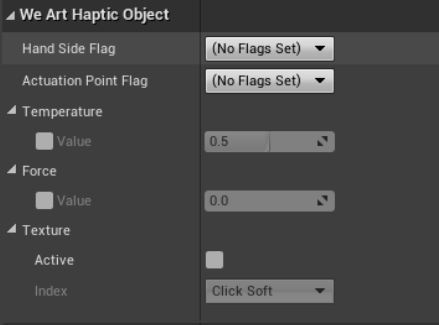
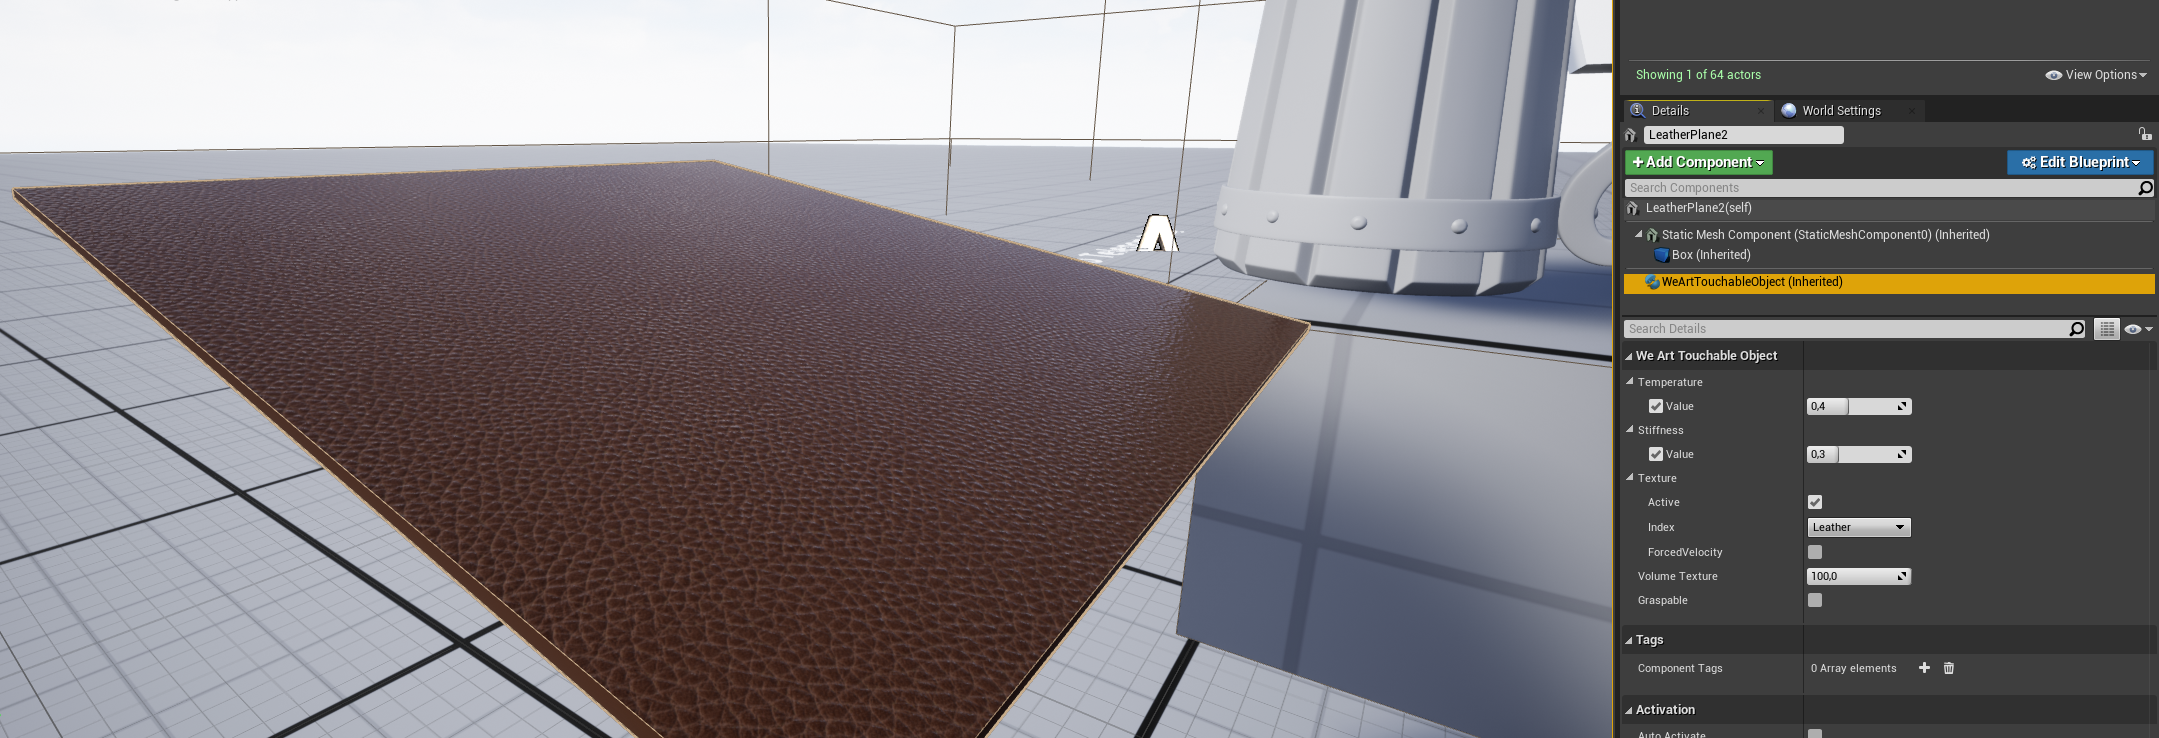
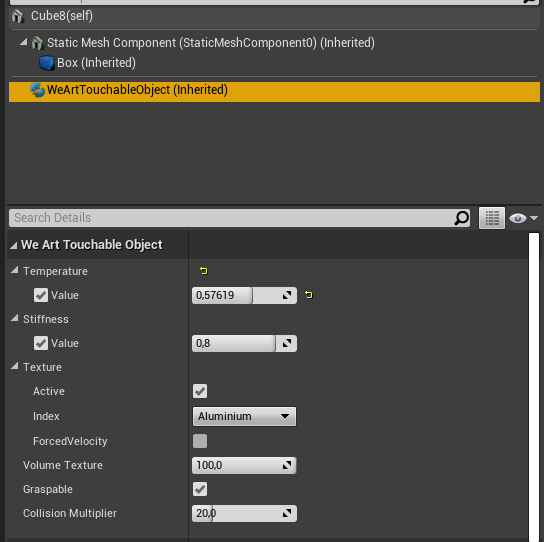
Component responsible for the description of the haptic effect to be applied in the event of a collision with the HapticObject actor.
Properties:
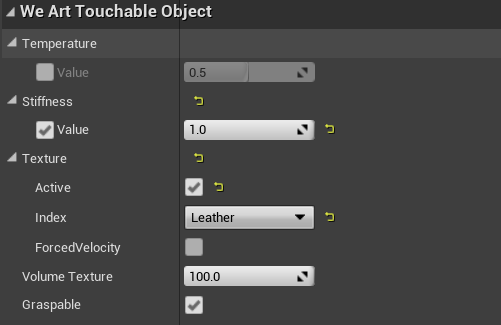
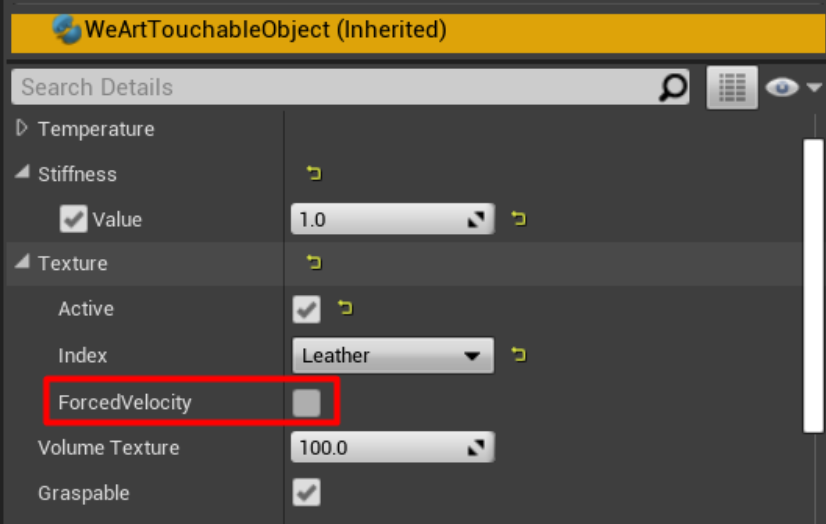
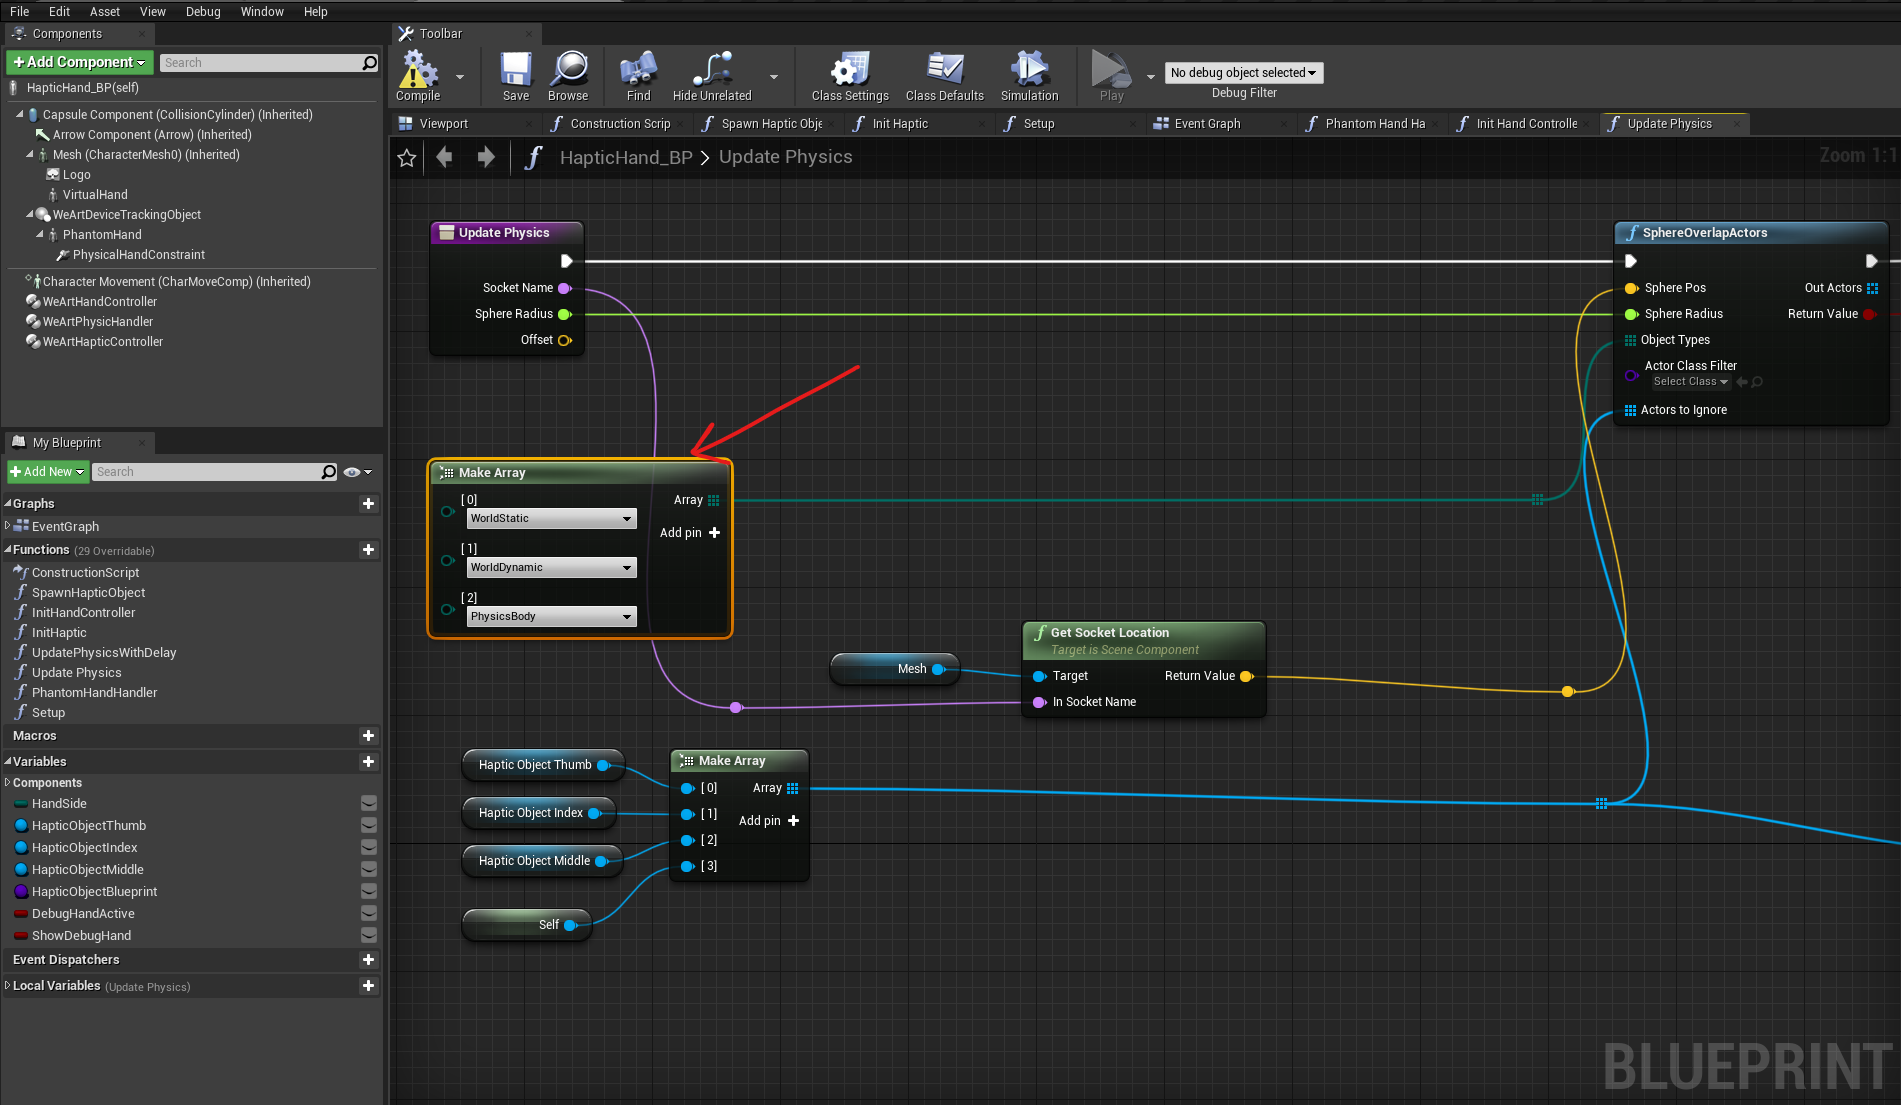
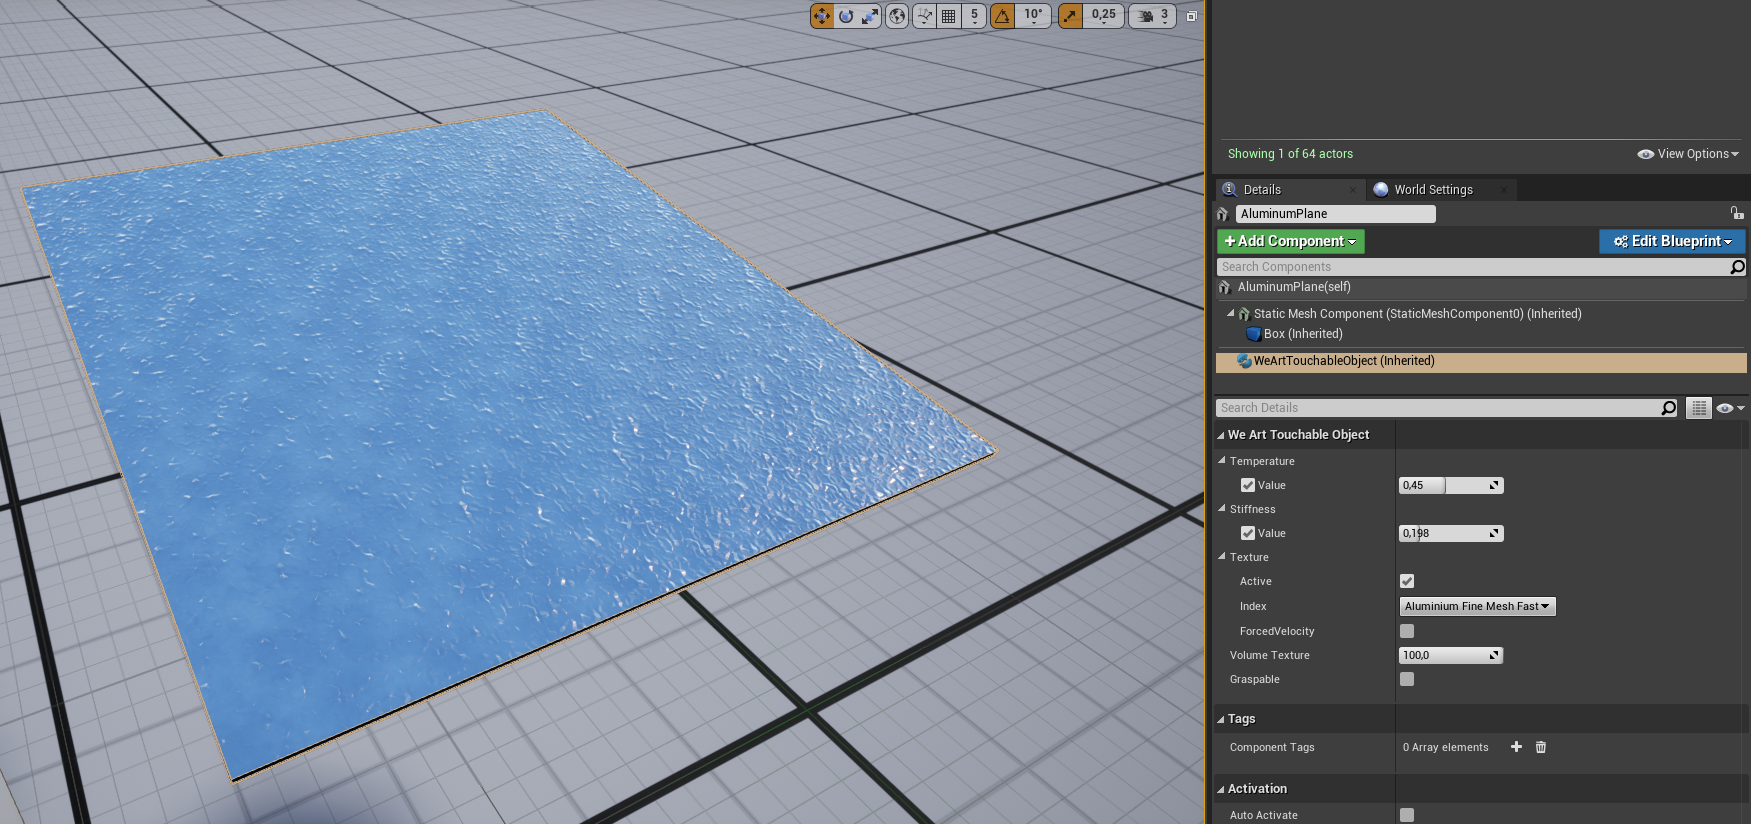
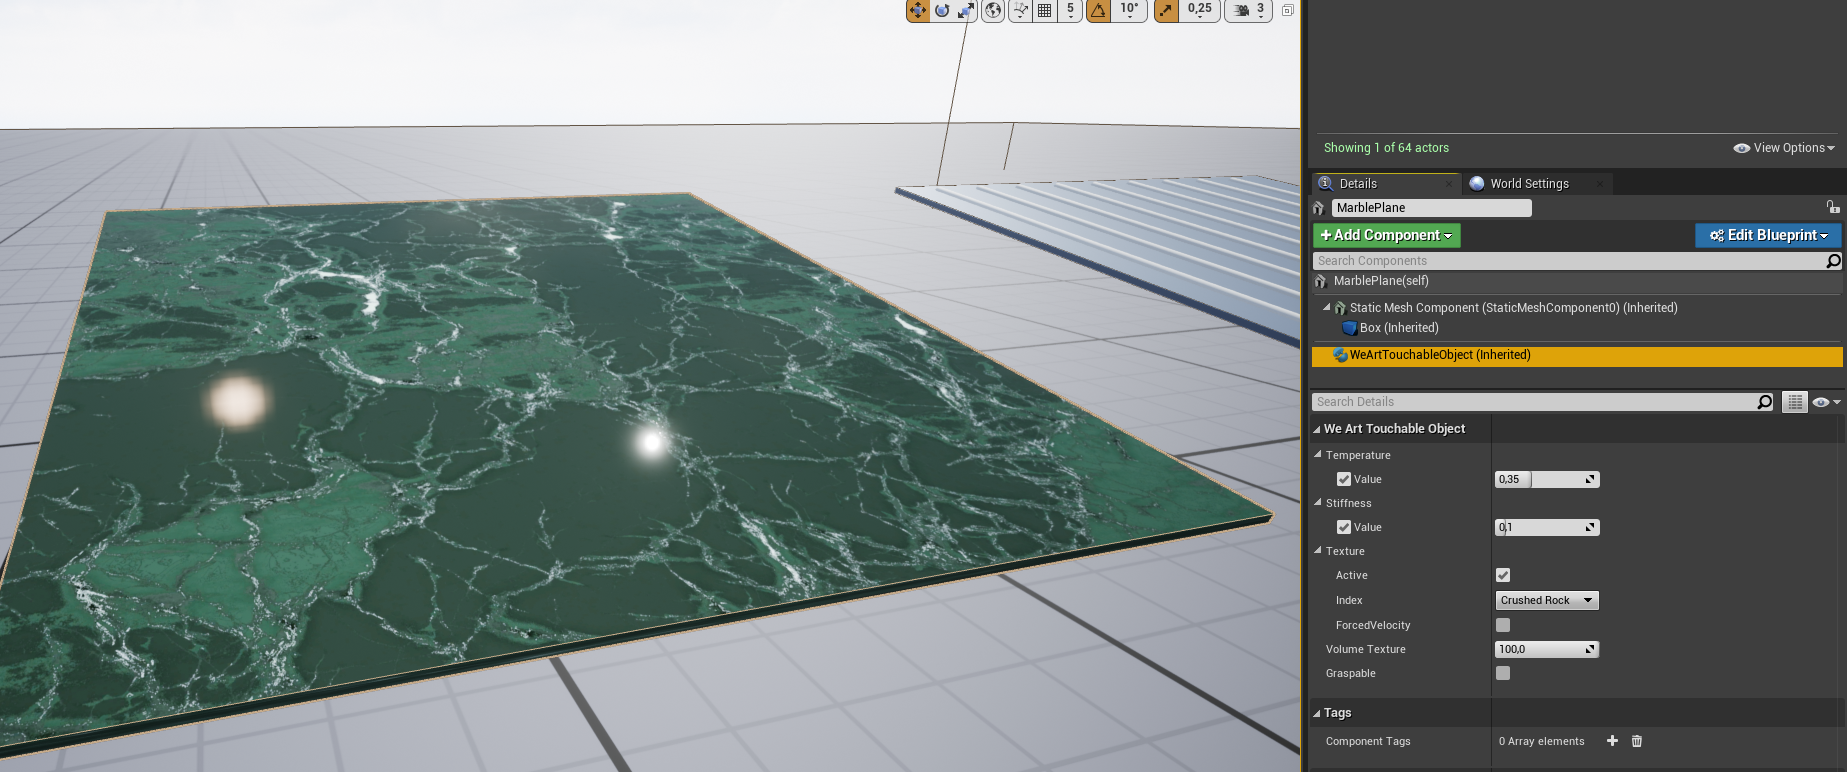
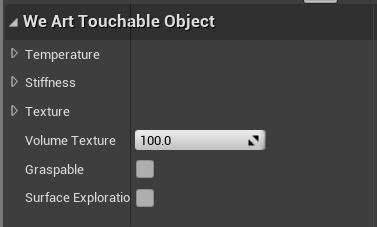
The WeArtTouchableObject component has a field called ForcedVelocity. if it is enabled, when the hand enters the touchable object, the texture feeling will run at maximum speed. It will not take in consideration the movement of the hand.
Touchable object must have one of these collision types: WorldStatic, WorldDynamic or PhysicsBody. This list can be modified in HapticHand_BP.
Component responsible for the haptic actuation of the individual digital devices belonging to the TouchDiver device.
Properties:
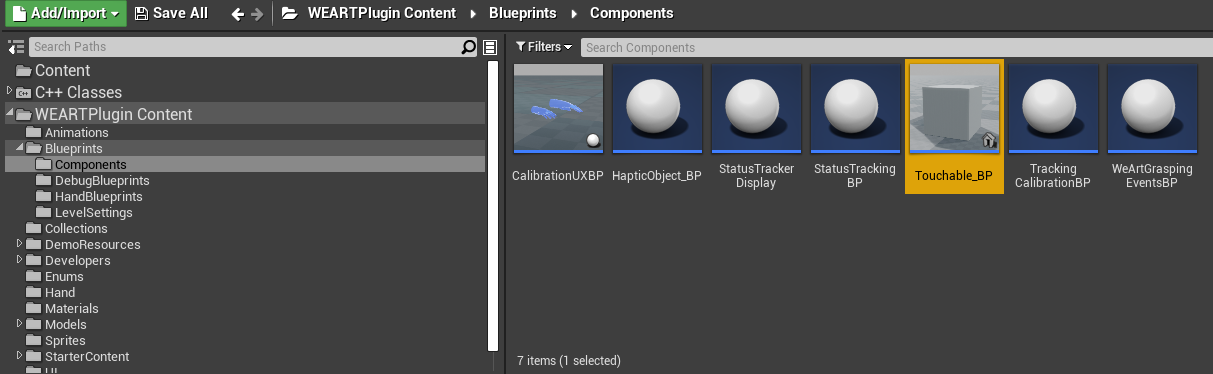
By adding actor components to existing actors. Either insert any actor in the map, and equip it with a Haptic/Touchable component and a collision, or create a blueprint actor class which you can then reuse anytime you want. In the details panel, you should have access to all the modifiable variables.
Component responsible for tracking of thimble's movements for quantifying its closed state and animating virtual hands. Properties:
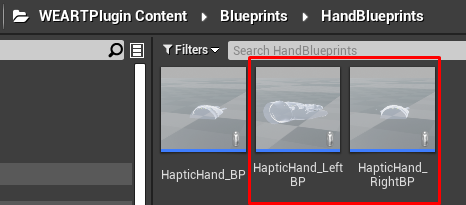
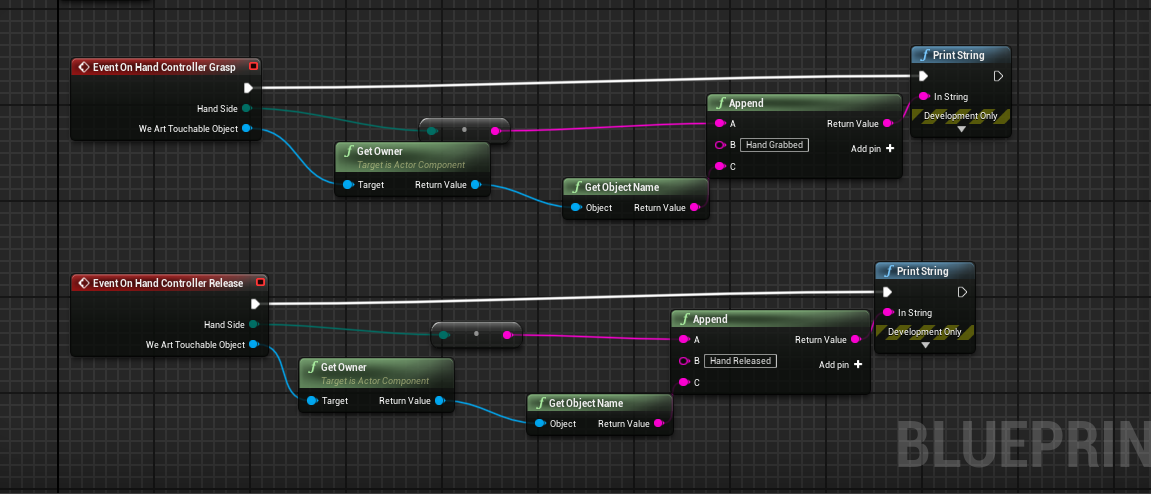
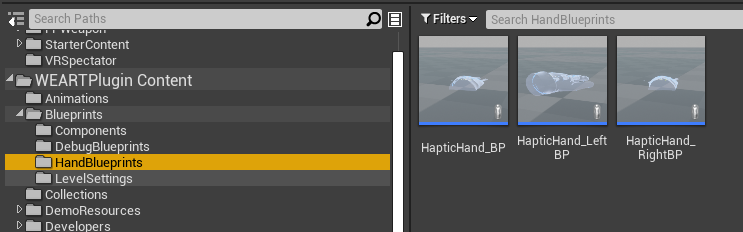
These are the two blueprints for the hands:
In order to enable the events to be called, drag this blueprint into the level.
The blueprint contains the following events inside it. Each event returns the hand side that grabbed the object and the object that was grabbed as a WeArtTouchableObject.
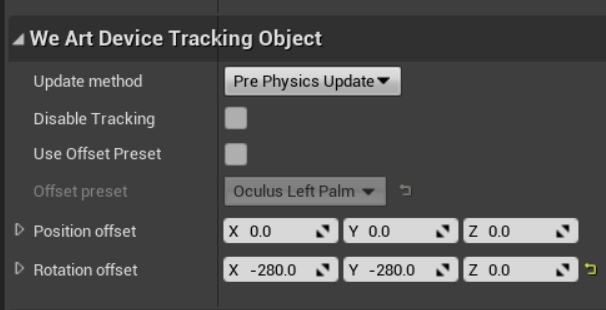
The two hands blueprints contain the component called WeArtDeviceTrackingObject.
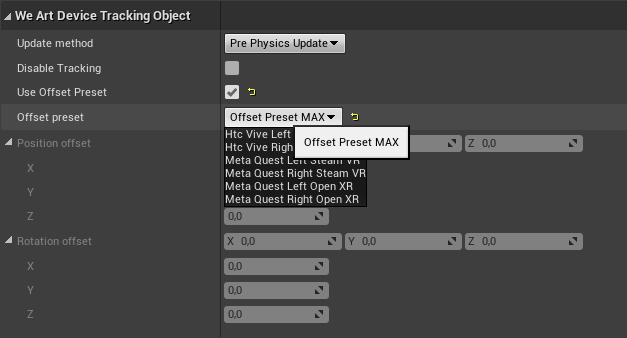
This component has a flag called UseOffsetPreset. If it is enabled, the hand will use the offset present in the field OffsetPreset.
These are the presets available:
Component responsible for the tracking of the wrist on which the TouchDiver device is placed Properties:
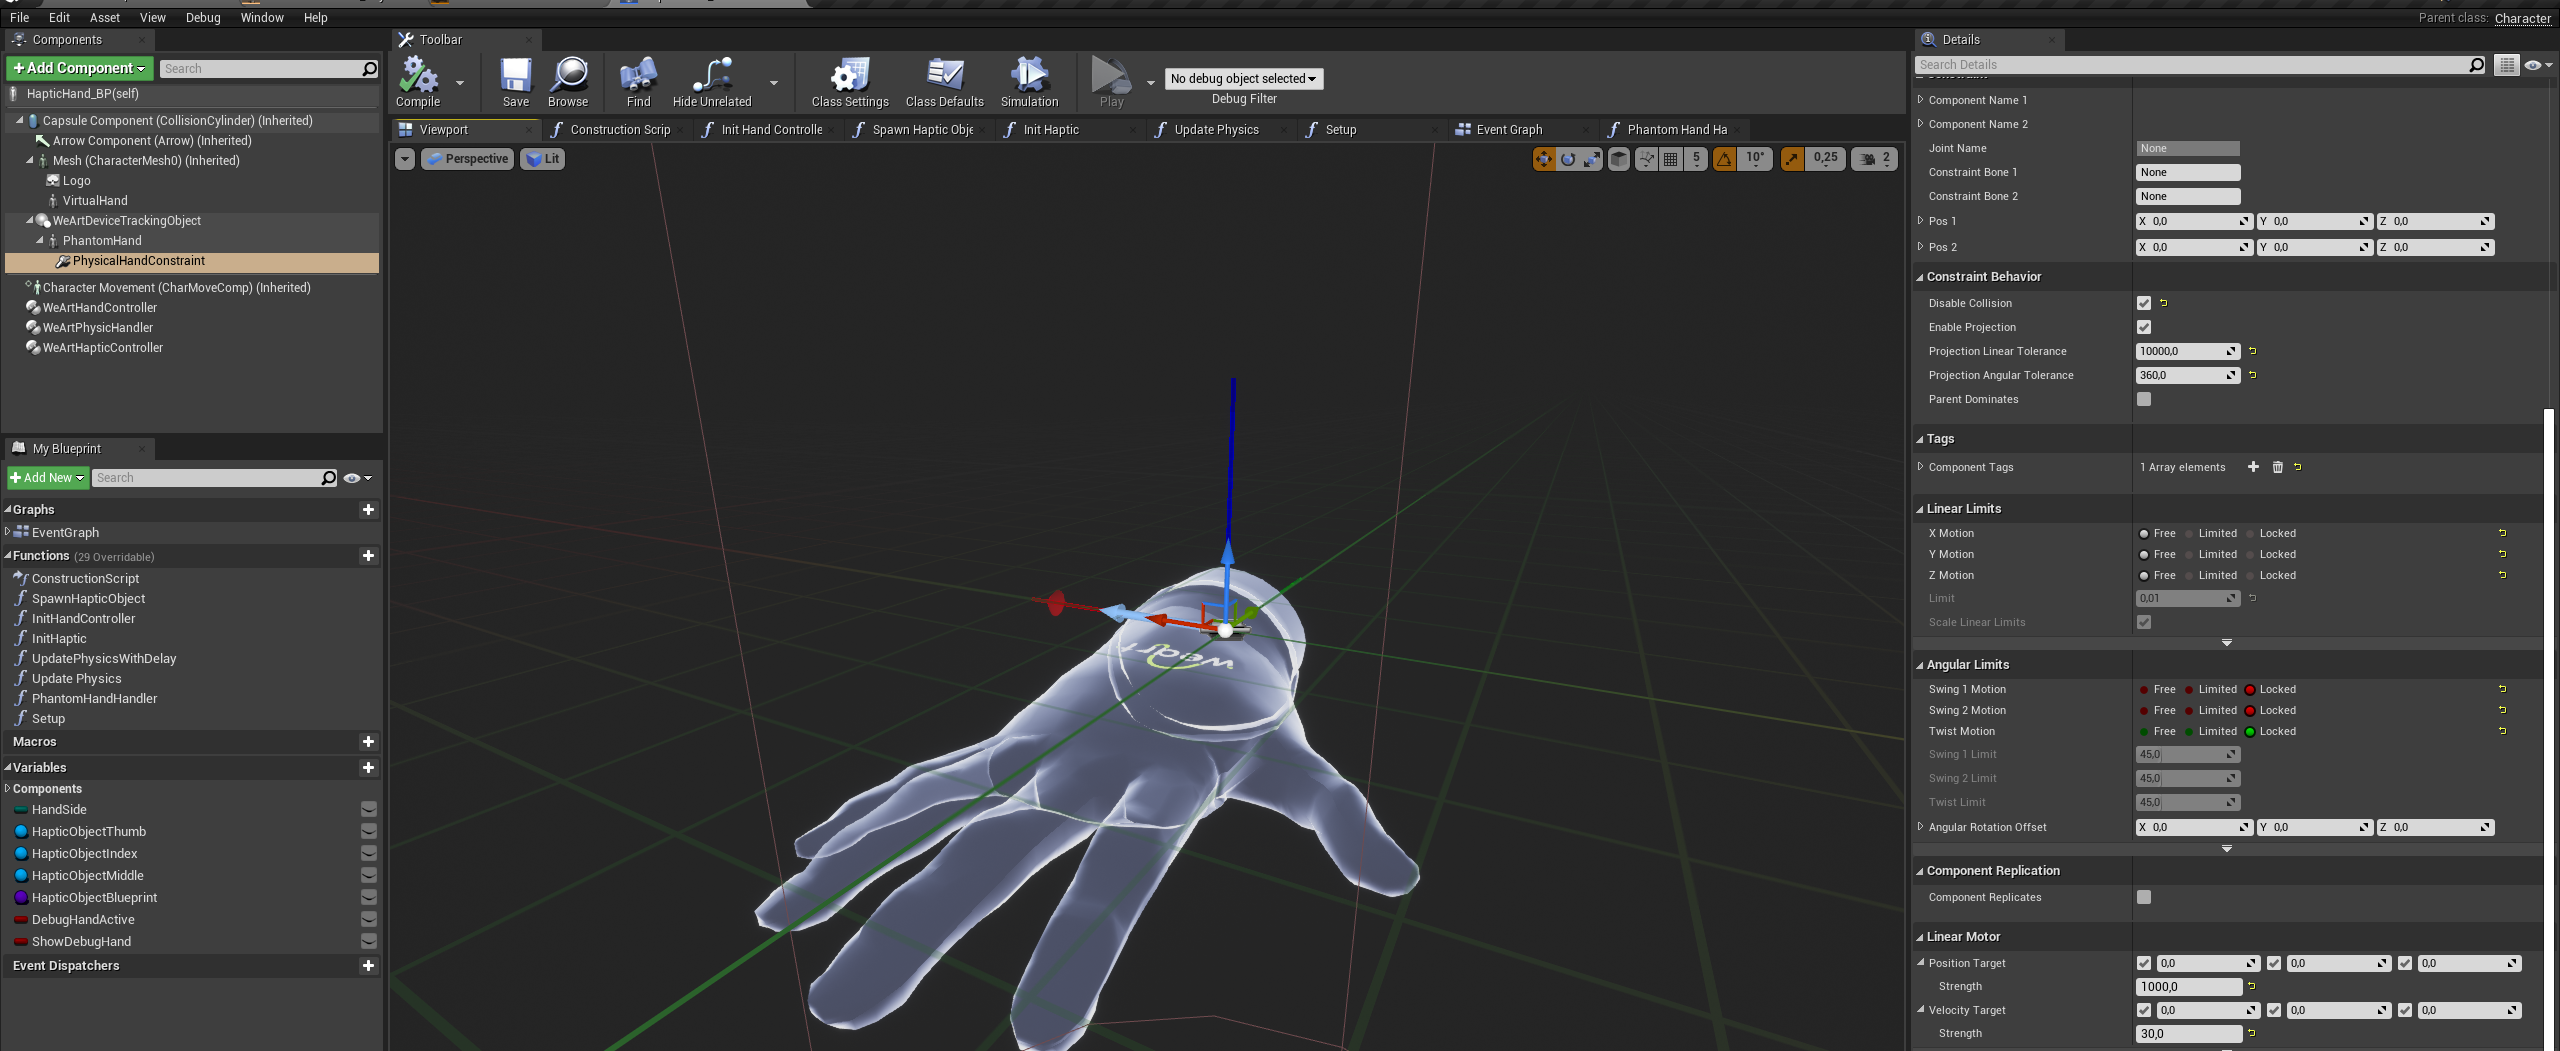
Grabbing and physical interaction is all part of UWeArtPhysicHandler class, which is responsible for managing the physics of a skeletal mesh representing a hand in a virtual reality environment. Physical interaction between touchable objects and hands handled using Physical Assets. Physic assets contains collision data for fingers, and being used during runtime. During grasping, UWeArtPhysicHandler rebuilds collision data from physics asset to create right offsets for each finger part, because of that we can handle precise hit events and support solid grabbing.
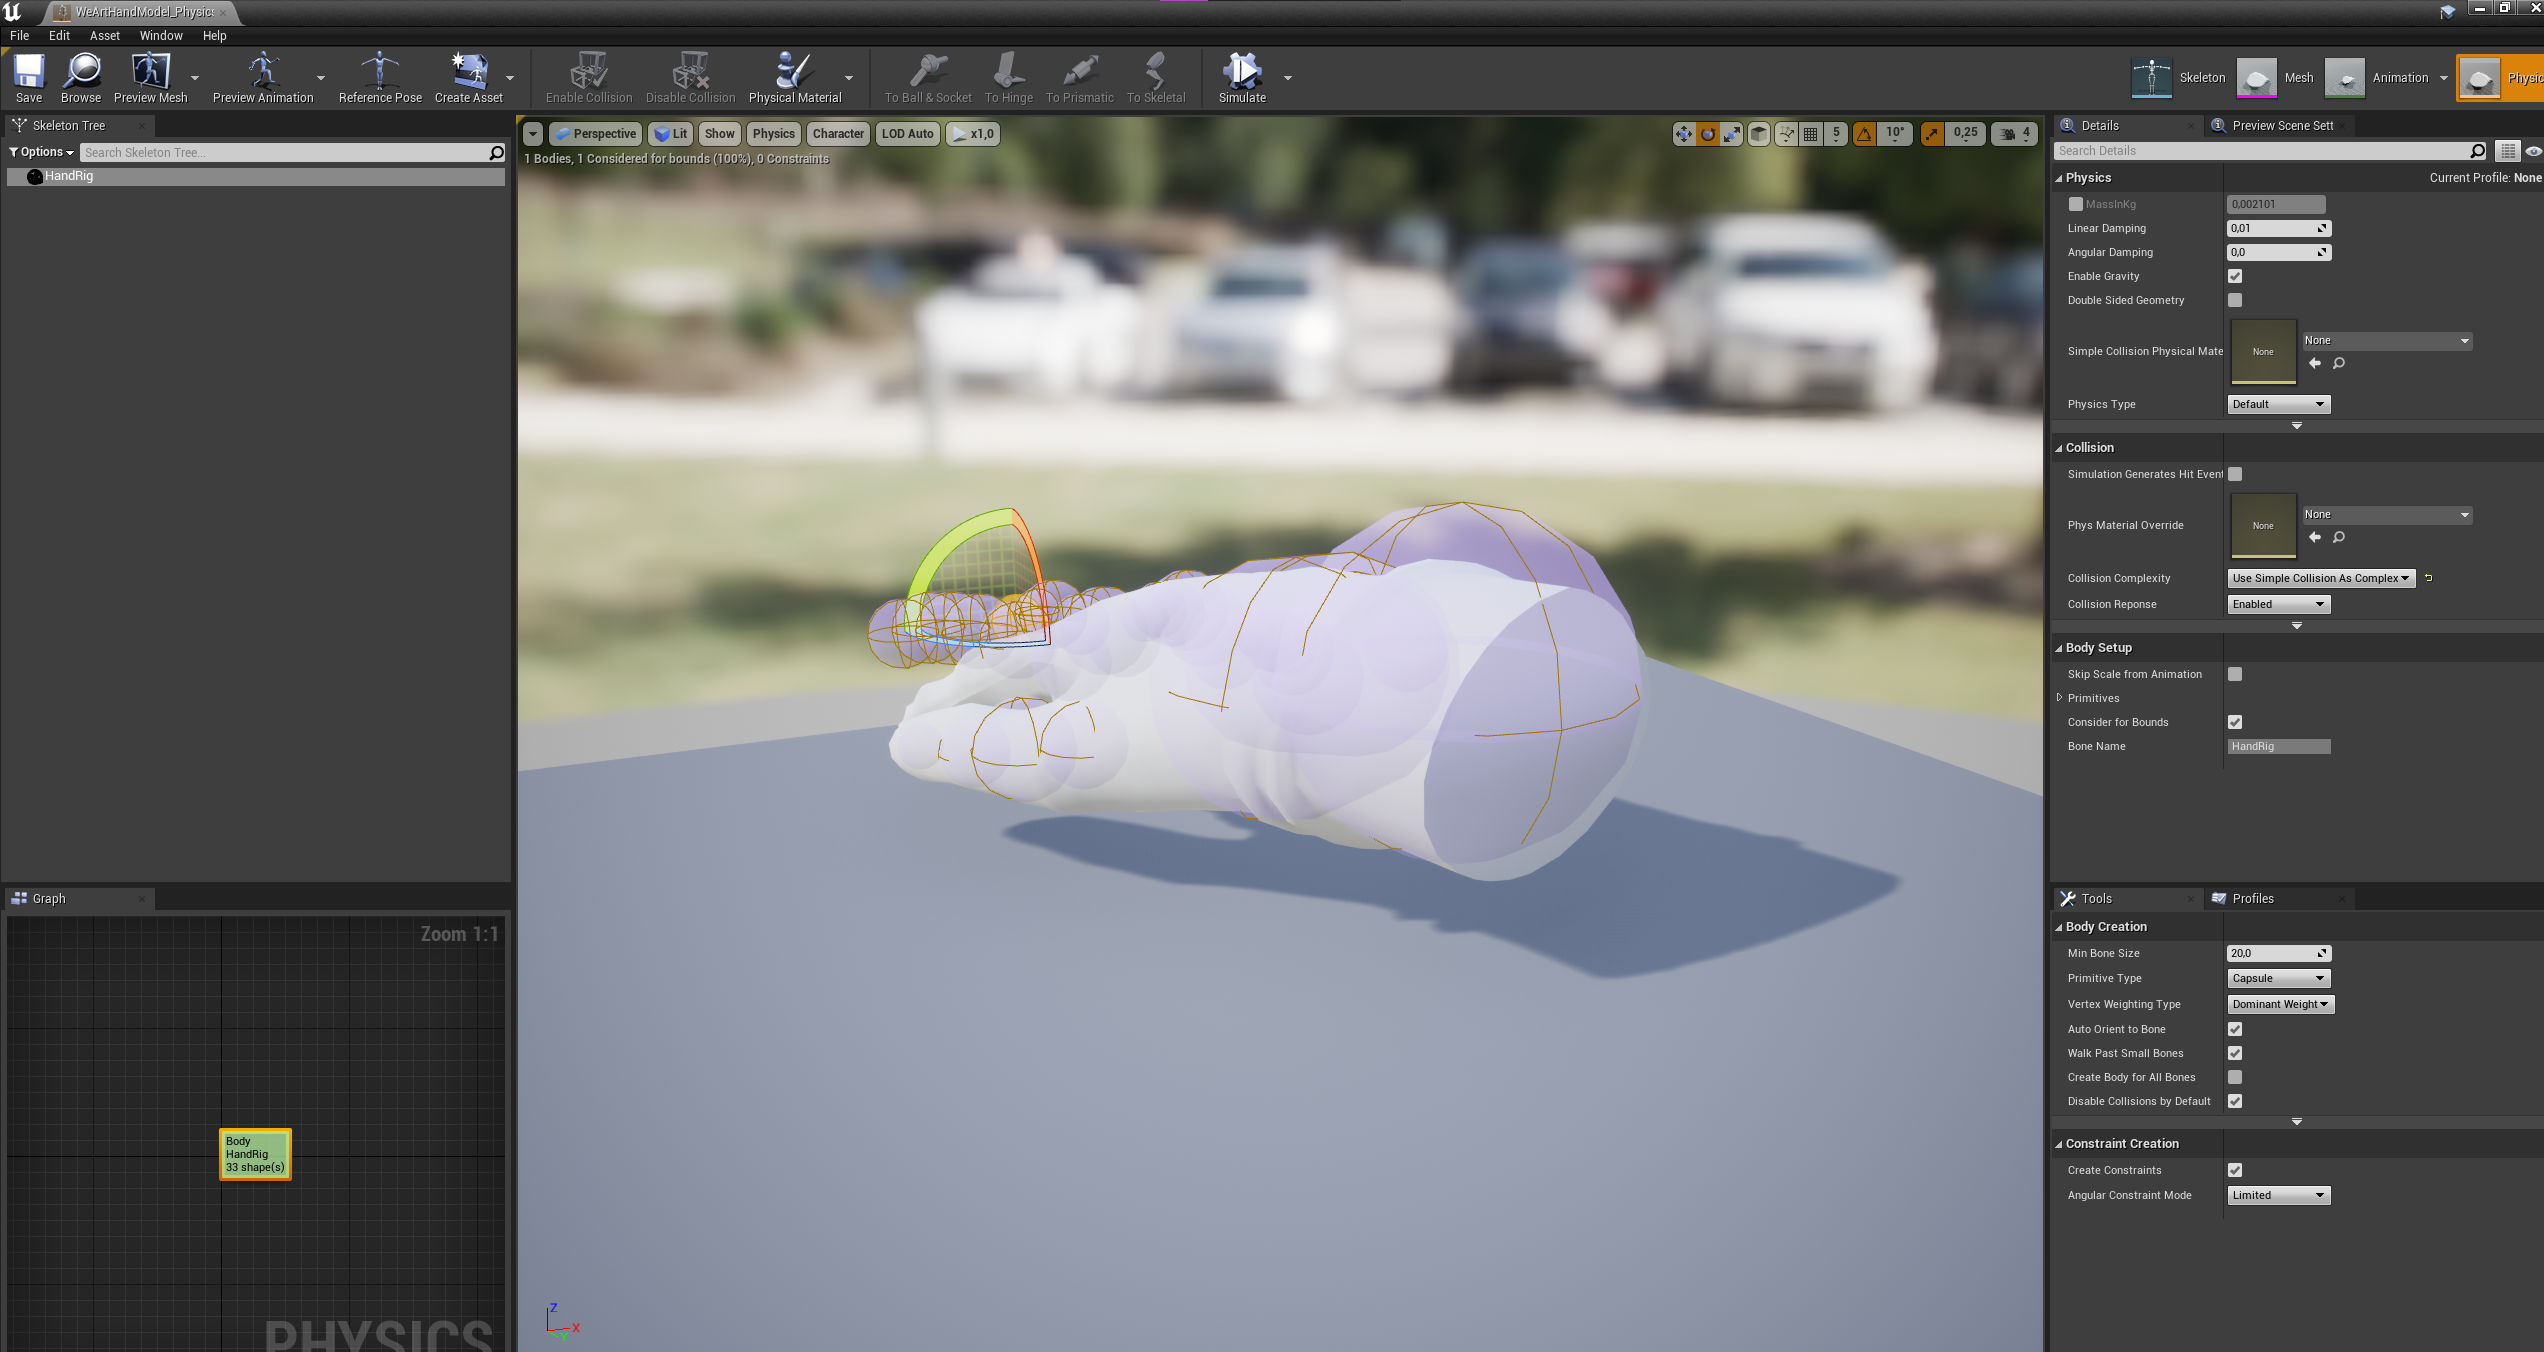
Grasping works as with physics bodies, and with bodies with Block collsion profile.
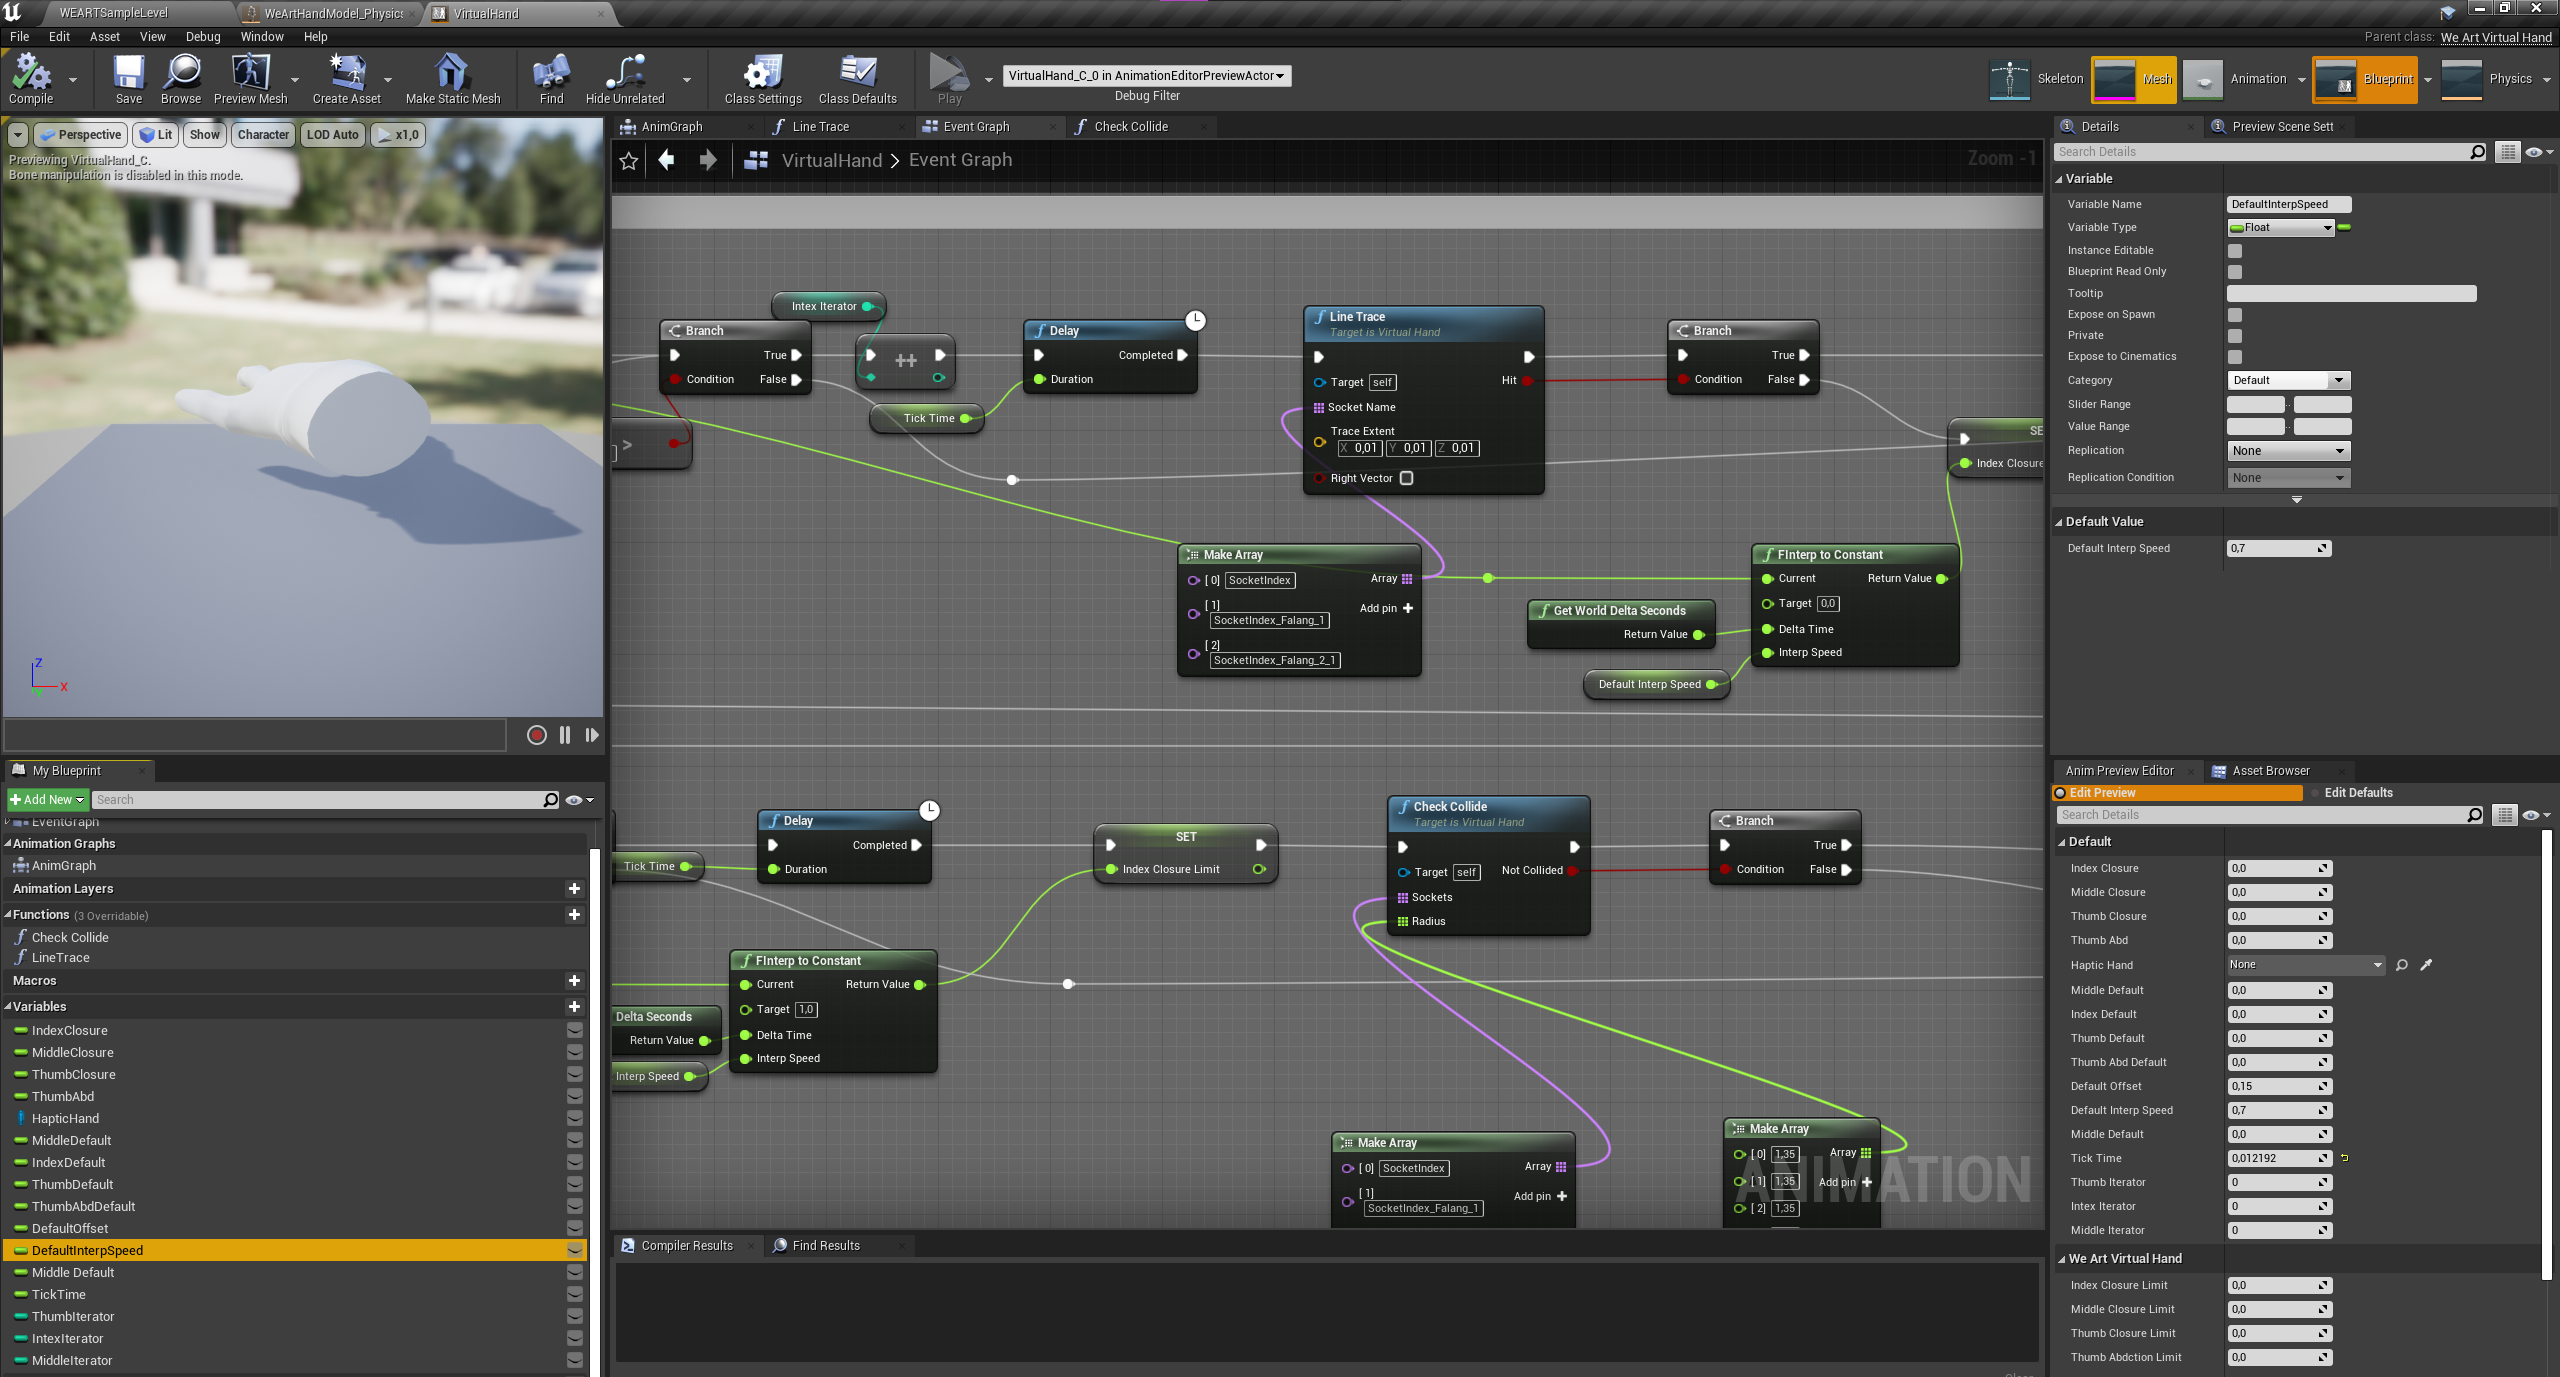
To adjust finger positioning after grab, UVirtualHand calculates maximum and minimum closure values. After interpolation between these values It adjusts current closure of master and salve finger boides. Master have higher priority on grab condition, than slave ones. You can access VirtualHand implementation in code and animation blueprint. Each finger group handles separatly by sequence.
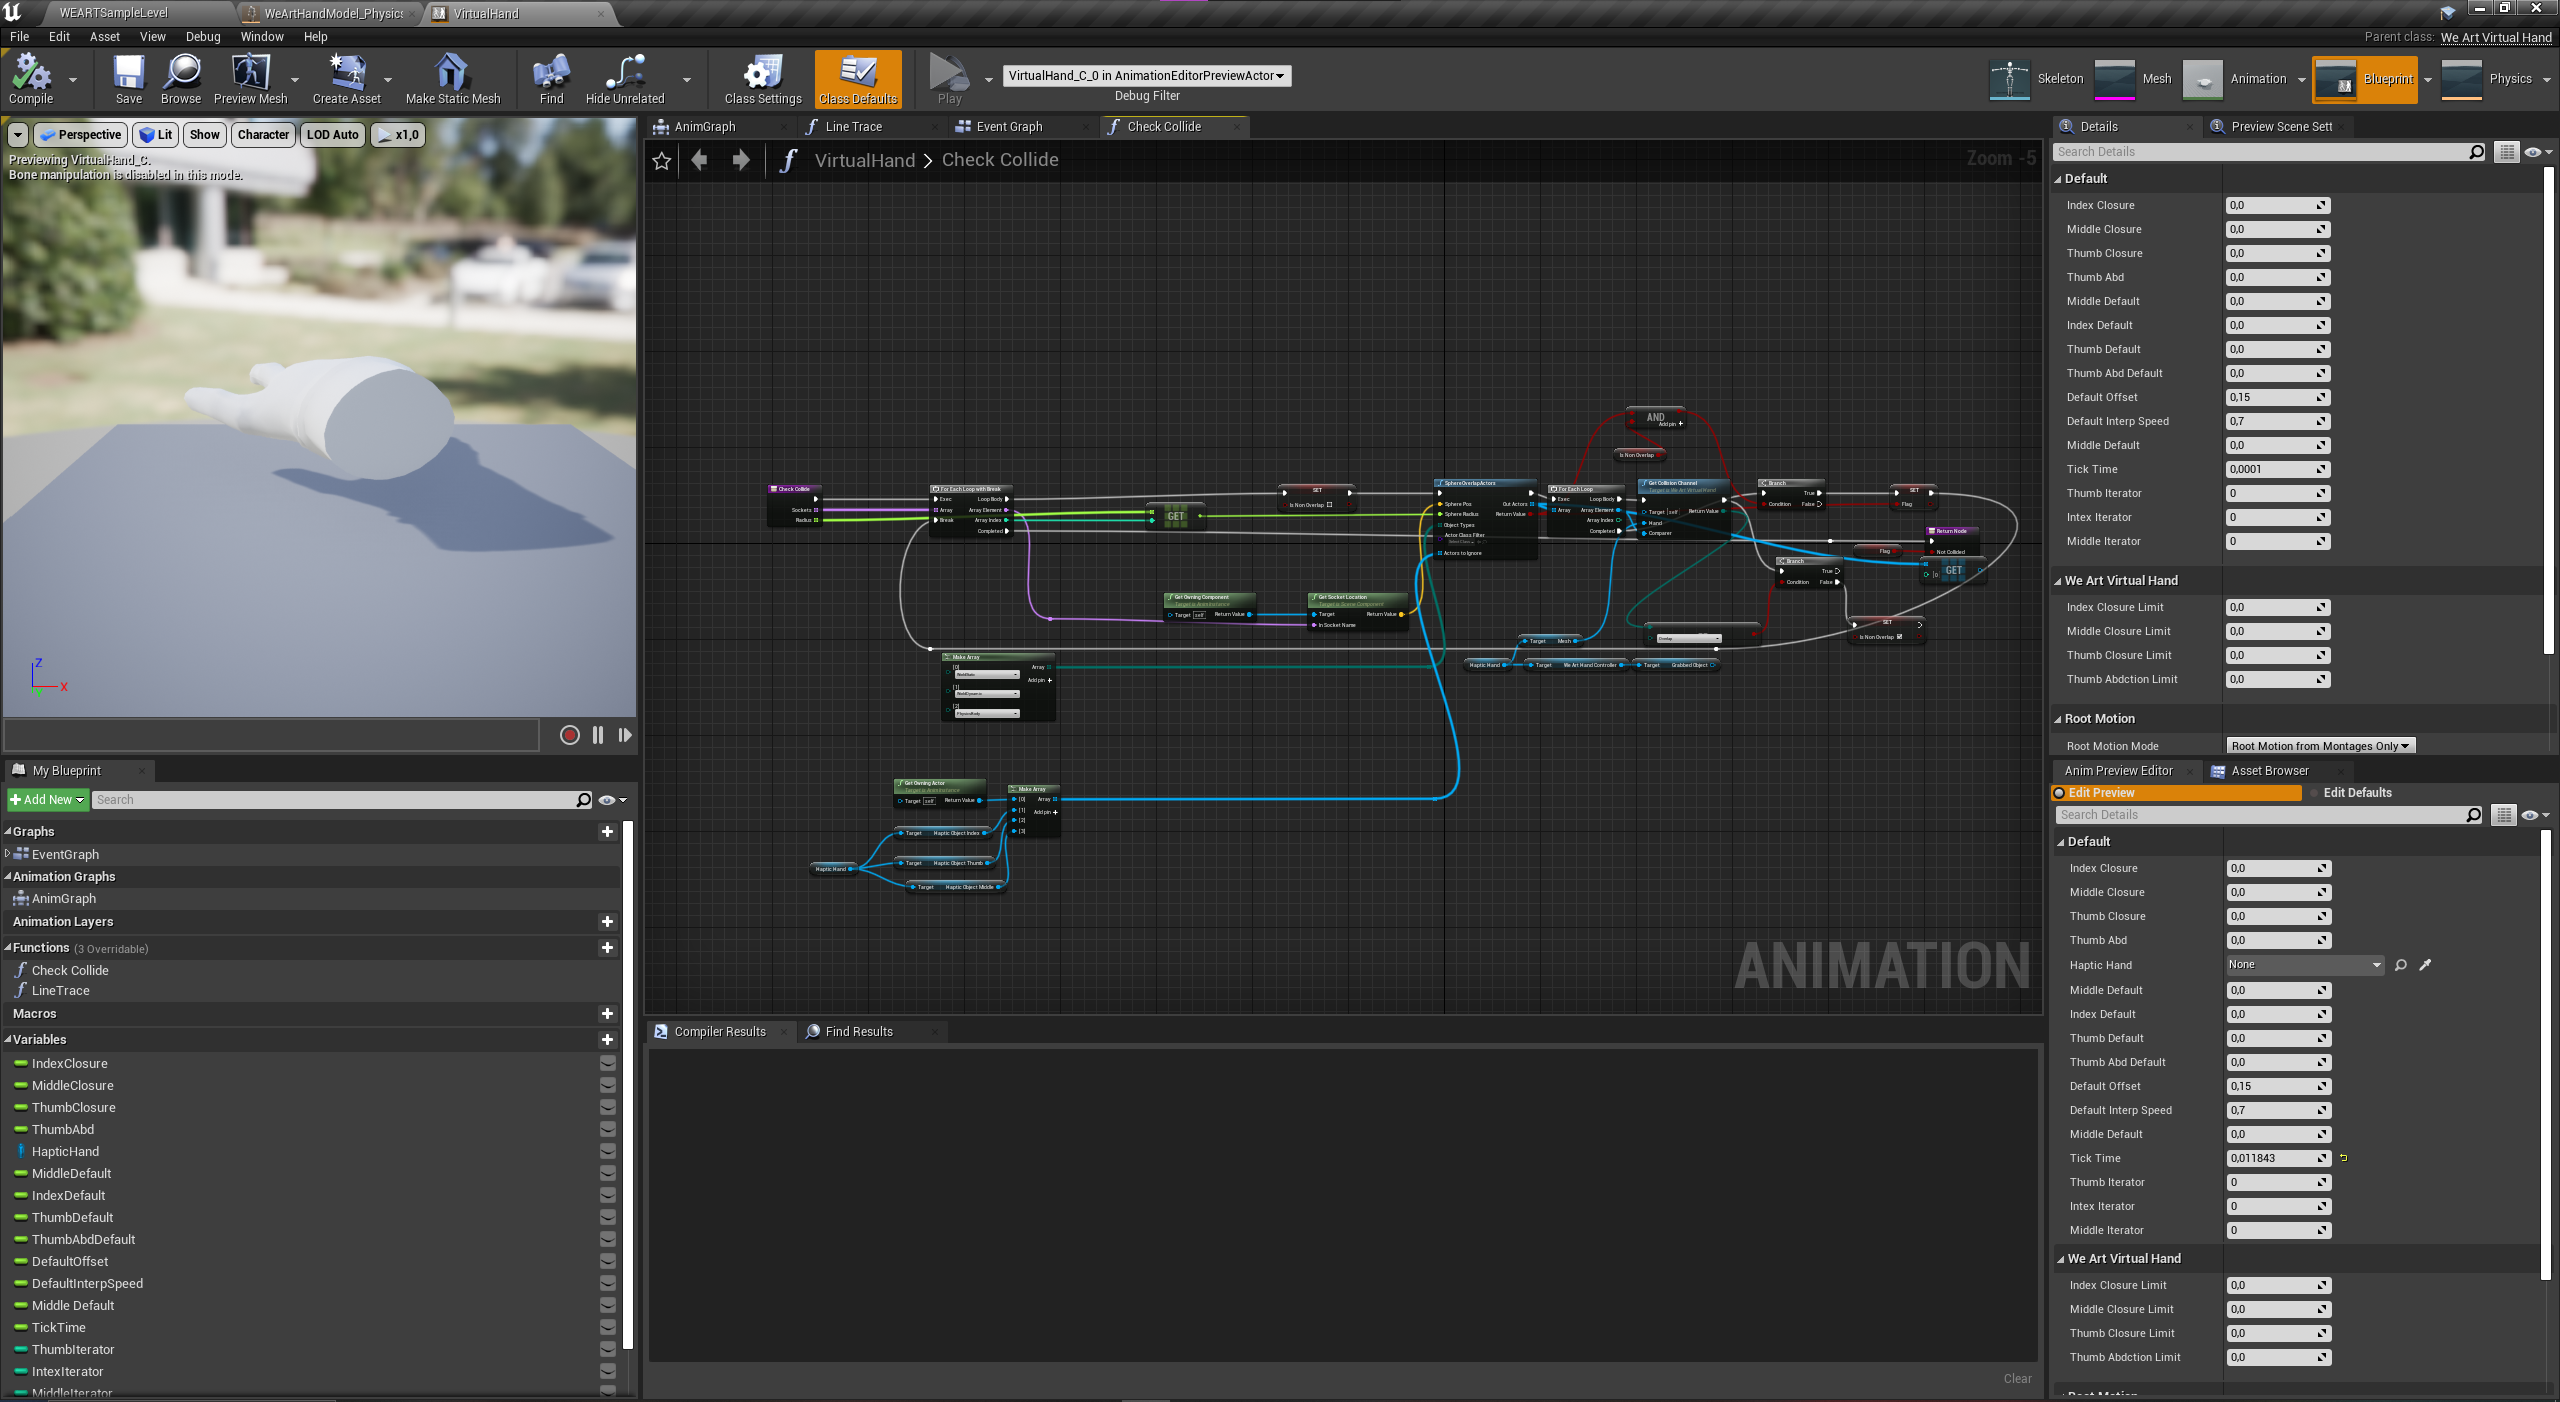
Speed of interpolation can be tweaked, but It also takes fps and delta time values, to make It smoother on different machines.
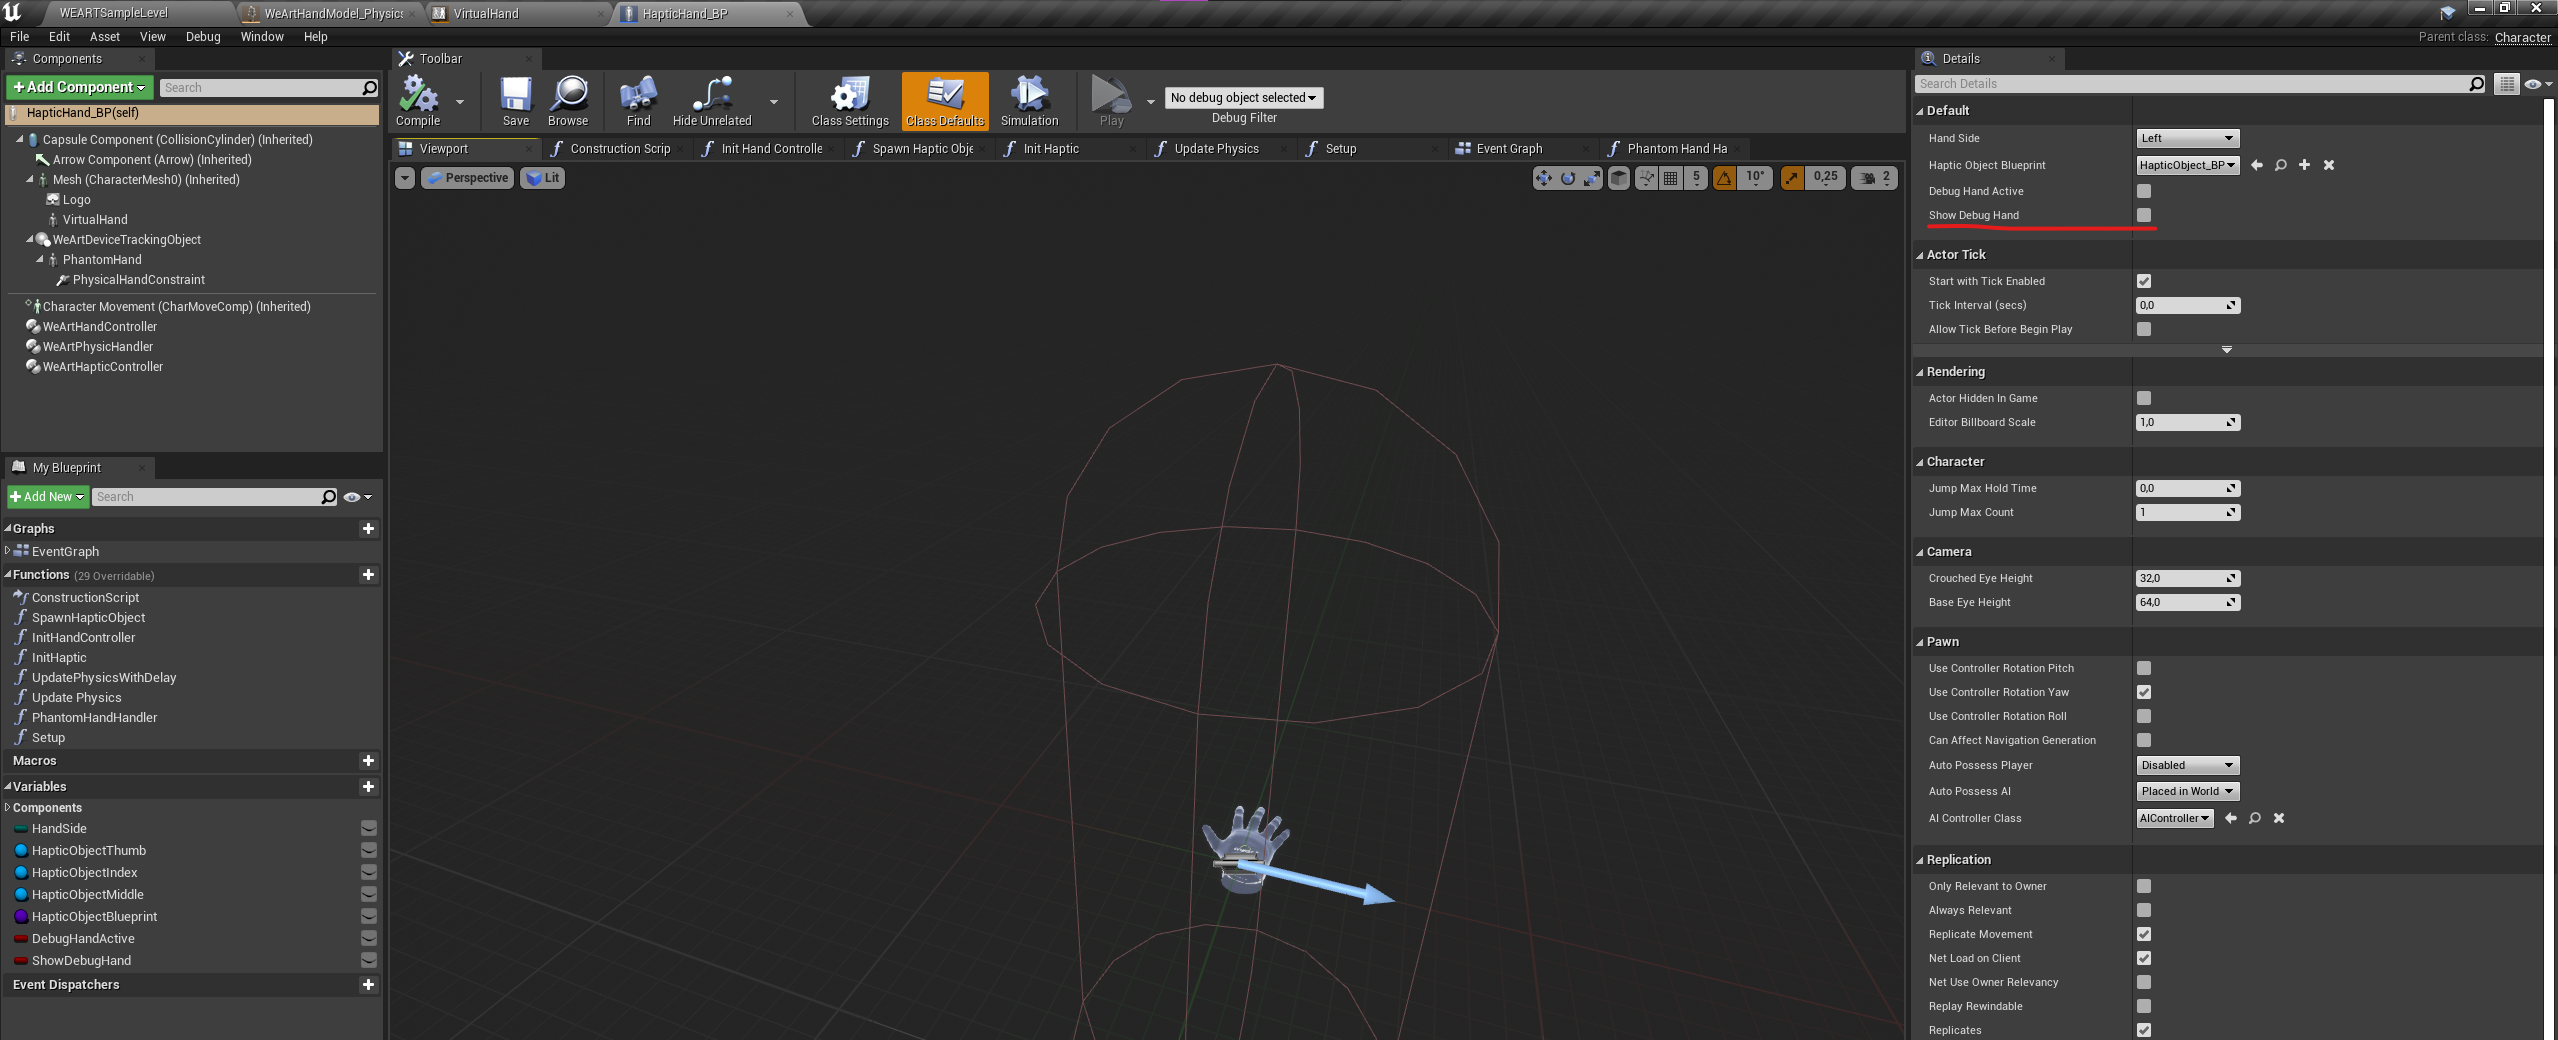
For debugging purposes you can use Phantom Hand, which is in-game representation of current hand in world, It can be useful to check force with which fingers push into collision object. To turn It on, use ShowDebugHand parameter in HapticHand_BP.
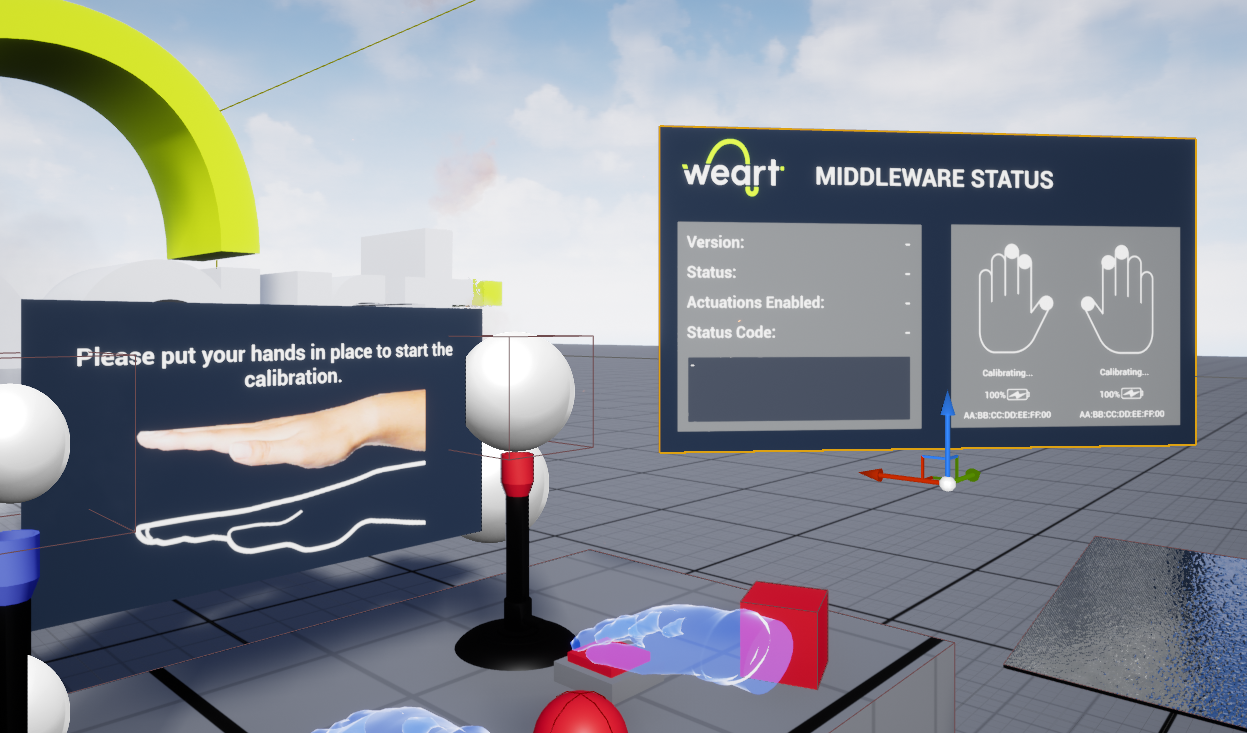
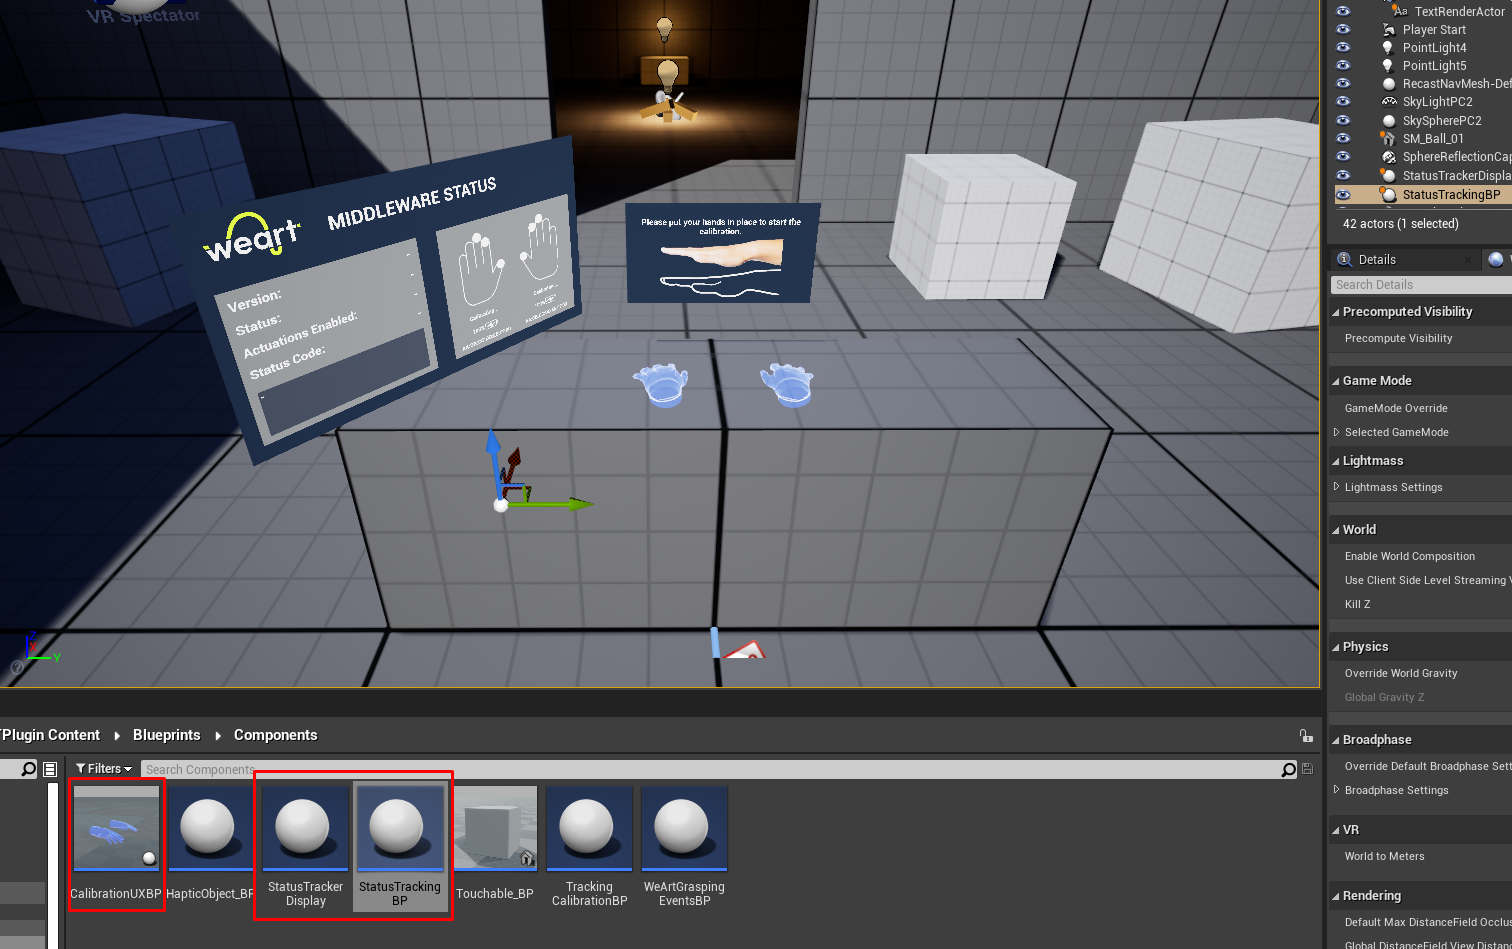
The "StatusTrackerDisplay" blueprint (shown below) is a 2D canvas containing all the status information received by the middleware.
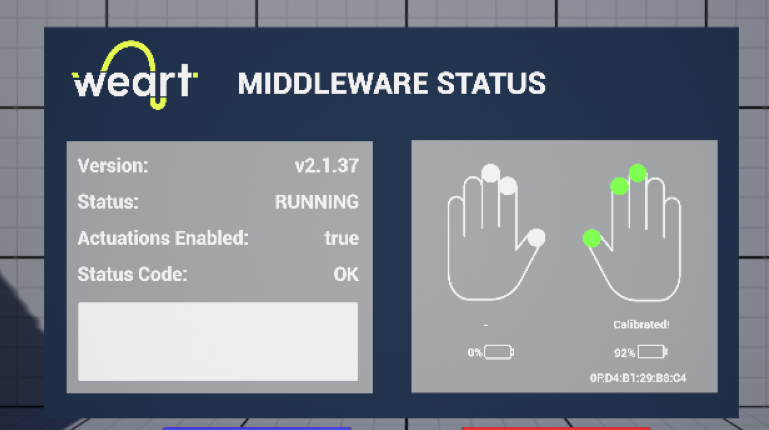
In particular, the object will display:
In order to have the middleware status display working in the scene, add the following components:
The current status codes (along with their description) are:
| Status Code | Description | |
|---|---|---|
| 0 | OK | Ok |
| 100 | START_GENERIC_ERROR | Can't start generic error: Stopping |
| 101 | CONNECT_THIMBLE | Unable to start, connect at least one thimble and retry |
| 102 | WRONG_THIMBLES | Unable to start, connect the right thimbles matched to the bracelet and retry |
| 103 | BATTERY_TOO_LOW | Battery is too low, cannot start |
| 104 | FIRMWARE_COMPATIBILITY | Can't start while the devices are connected to the power supply |
| 105 | SET_IMU_SAMPLE_RATE_ERROR | Error while setting IMU Sample Rate! Device Disconnected! |
| 106 | RUNNING_SENSOR_ON_MASK | Inconsistency on Analog Sensors raw data! Please try again or Restart your device/s! |
| 107 | RUNNING_DEVICE_CHARGING | Can't start while the devices are connected to the power supply |
| 200 | CONSECUTIVE_TRACKING_ERRORS | Too many consecutive running sensor errors, stopping session |
| 201 | DONGLE_DISCONNECT_RUNNING | BLE Dongle disconnected while running, stopping session |
| 202 | TD_DISCONNECT_RUNNING | TouchDIVER disconnected while running, stopping session |
| 203 | DONGLE_CONNECTION_ERROR | Error on Dongle during connection phase! |
| 300 | STOP_GENERIC_ERROR | Generic error occurred while stopping session |
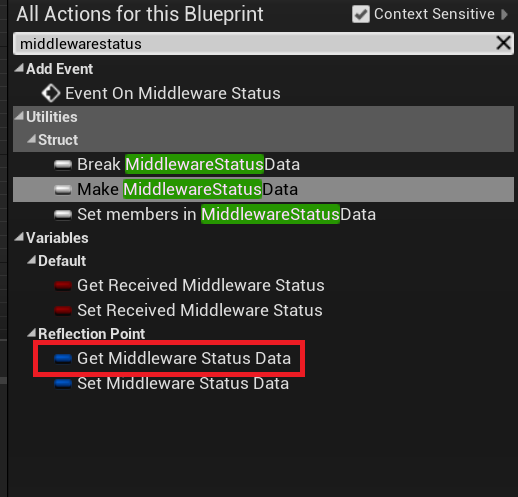
If this blueprint is placed in the scene, it will fire an event for every received middleware message about the middleware status. There are two events that can be fired:
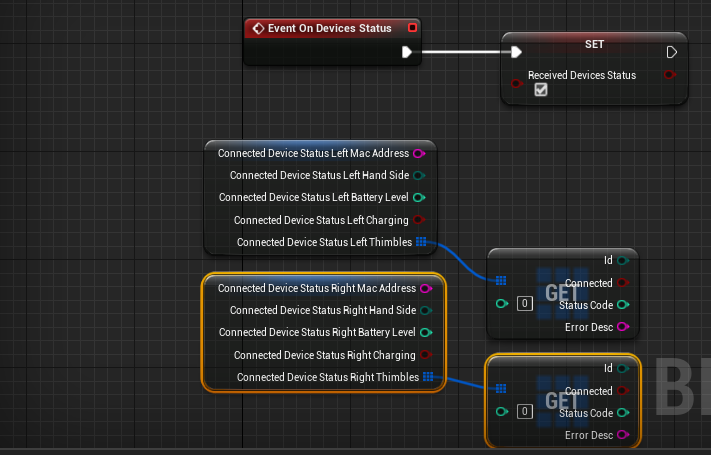
These two events are just signaling when one of the two data types is received. If you want to access them do it in EventTick. Then access the local data. This data gets updated automatically.
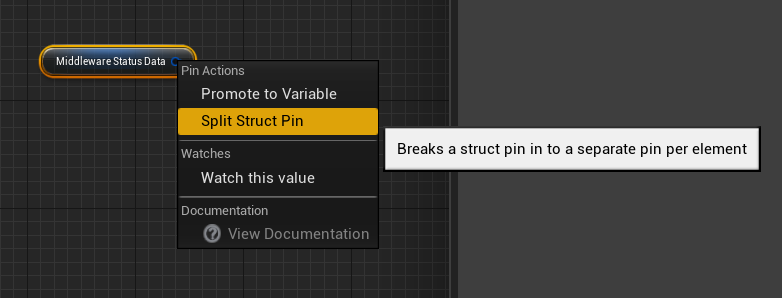
Then split the struct to access the values.
The same can be done for ConnectedDeviceStatusLeft and ConnectedDeviceStatusRight.
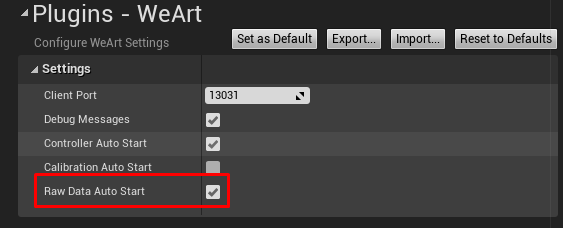
If you want to use this feature, you will have to enable RawDataAutoStart in Project Settings -> WeArt
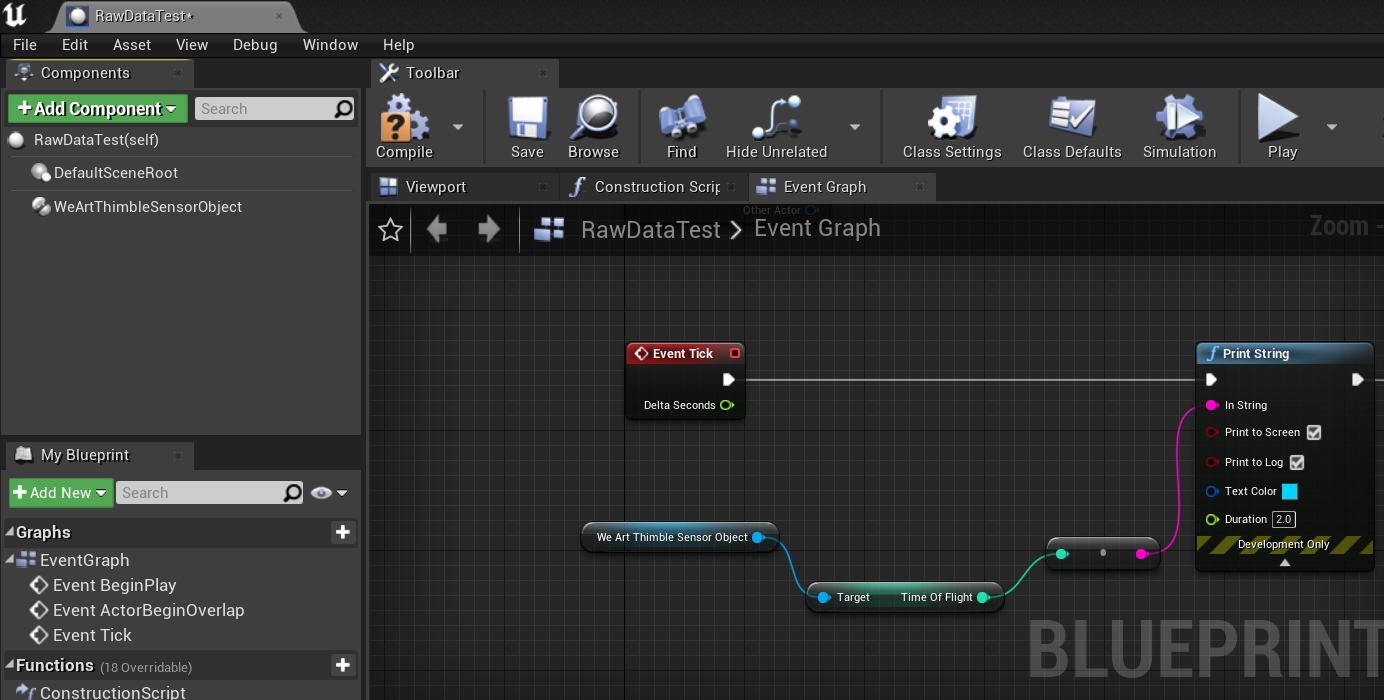
This component can be added to any actor and by accessing it in EventTick, you can get the sensor data of the specified thimble. The component updates the values automatically.
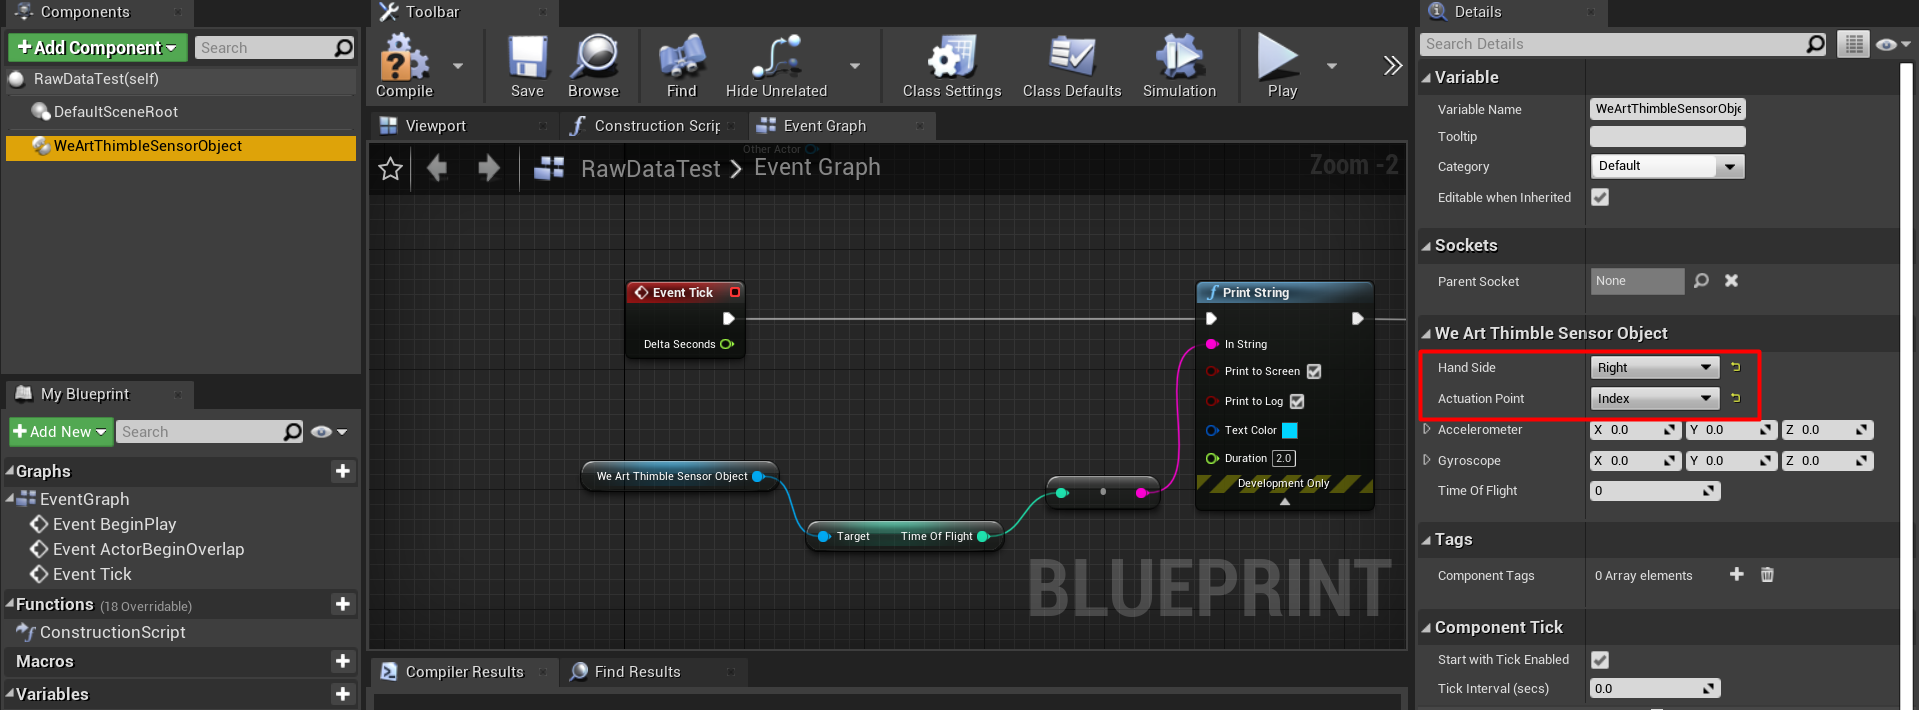
Make sure to set the Hand Side and Actuation Point.
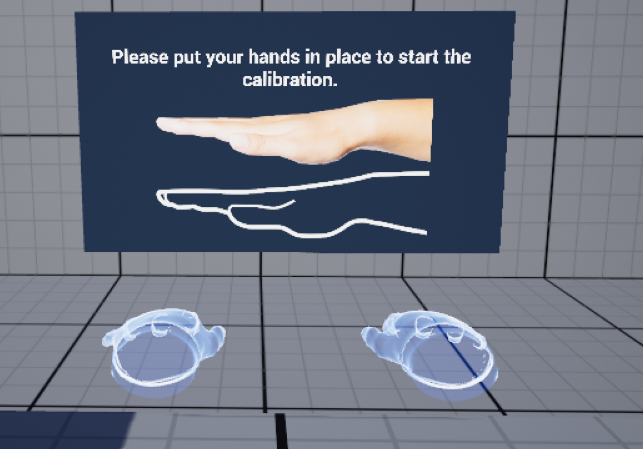
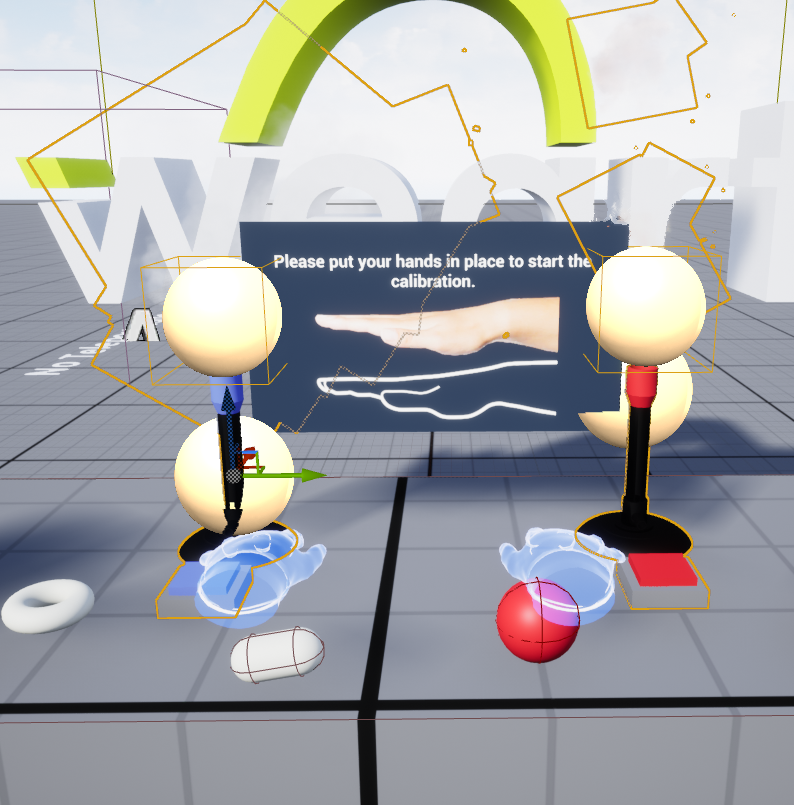
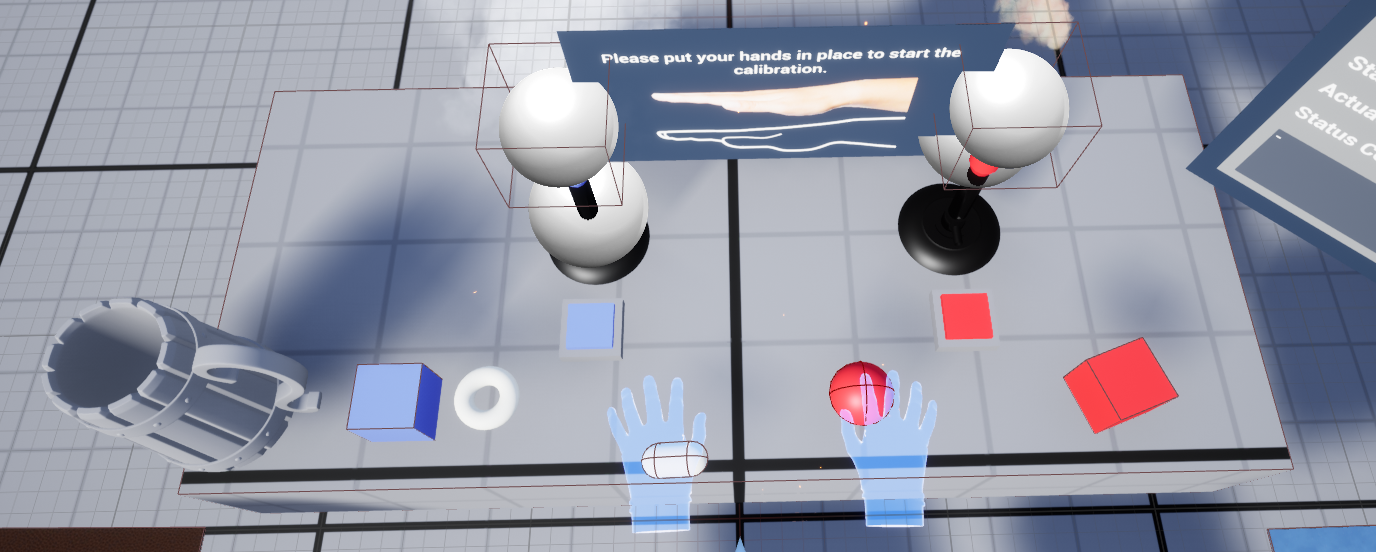
The CalibrationUXBP offers an easy and precise way of calibrating the touch diver at the start of the experience. You need to put your hands in the position specified and it will signal to the middleware that the calibration process is statring.
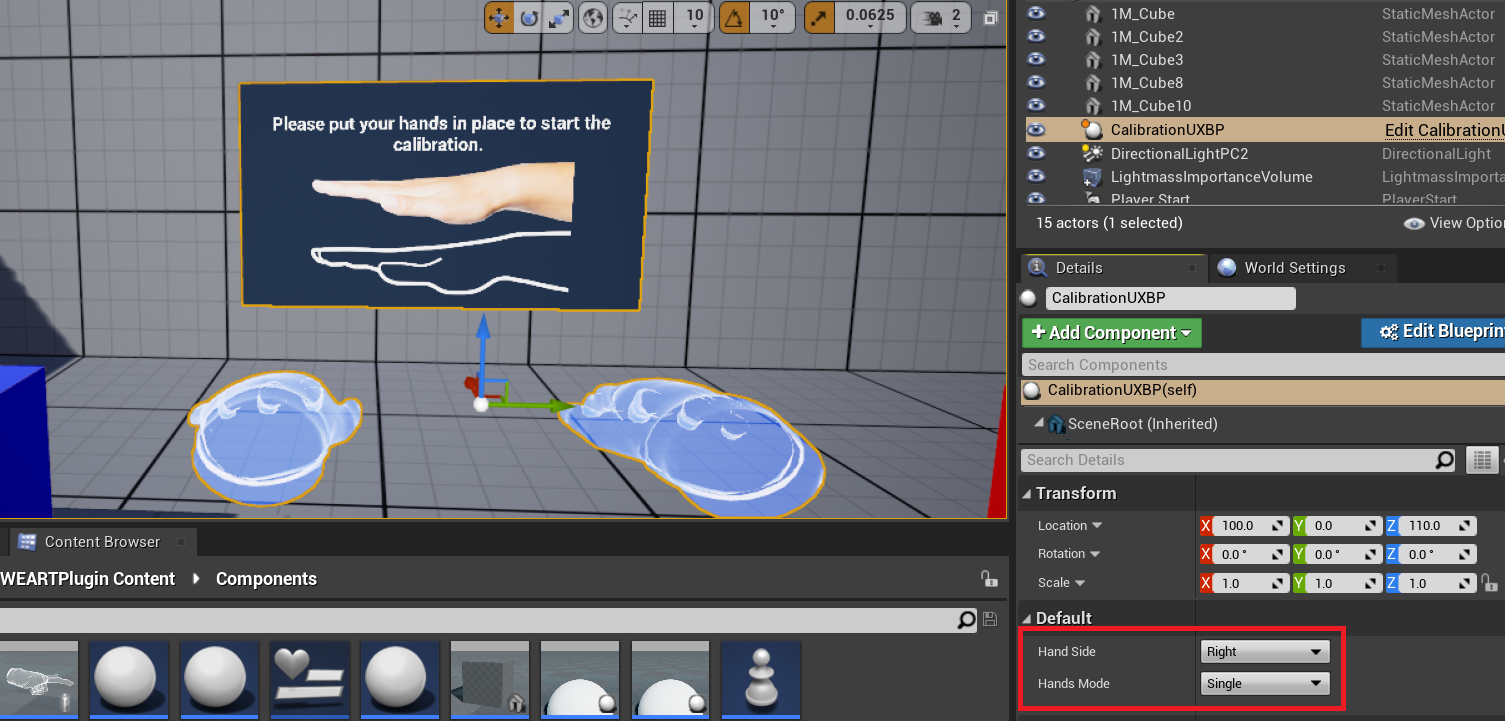
You can drag and drop the following blueprint in the scene:
This is how it should look in the scene:
The blueprint has two fields exposed in the editor:
Here you can change the fields.
Once connected to the middleware, it's still not possible to receive tracking data and send haptic commands to the devices. In order to do so, it's important to start the middleware with the proper command.
From WeArtController GameInstance get Subsystem
From WeArtController GameInstance get Subsystem
Blueprint:
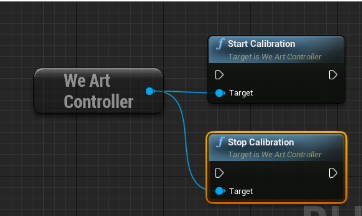
In order to enable the events to be called, drag this blueprint into the level.
Inside this blueprint there are four events that are fired when the calibration starts, finishes, it succeeds or fails. They all return the side of the hand that called the event.
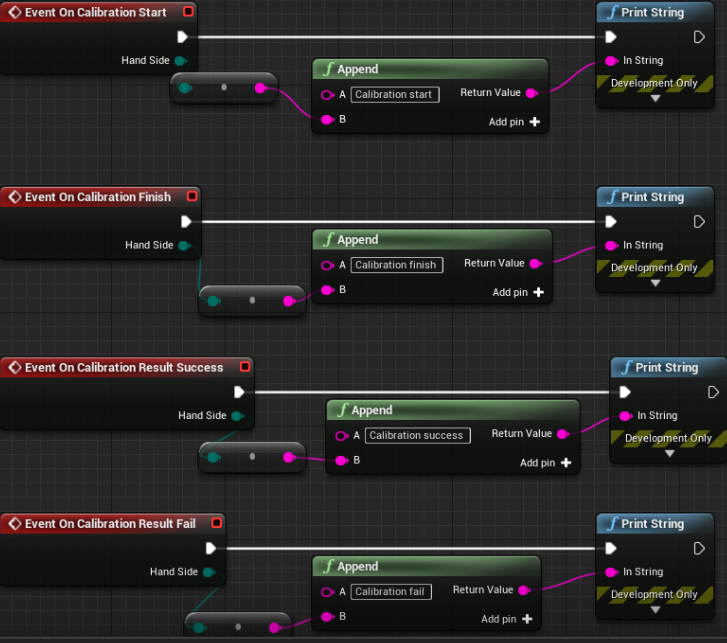
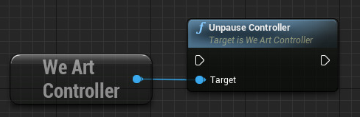
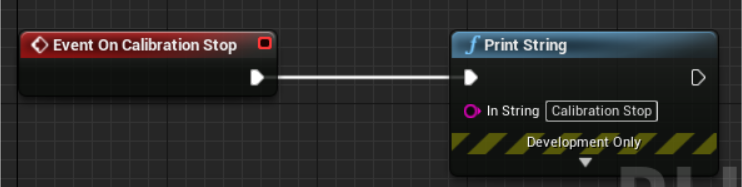
There is another event that fires when the calibration stops and it does not contain a hand side.
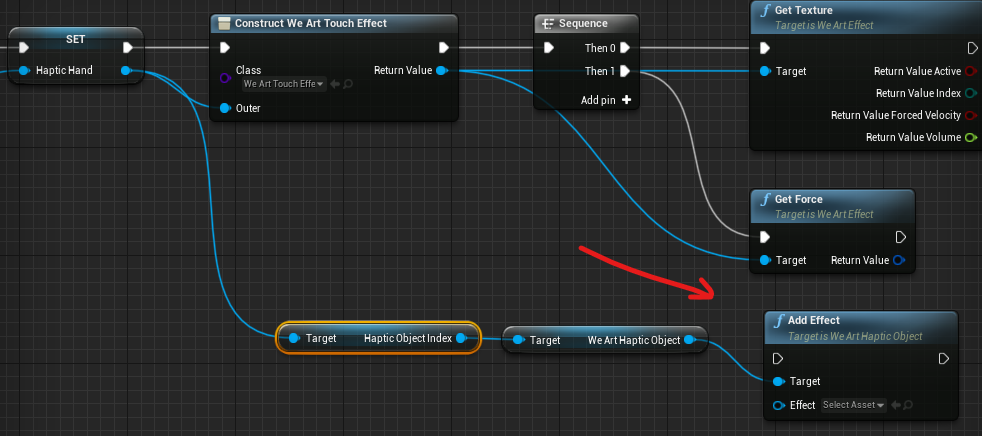
The SDK contains a basic WeArtTouchEffect class to apply effects to the haptic device. The TouchEffect class contains the effects without any processing. For different use cases (e.g. values not directly set, but computed from other parameters), create a different effect class by implementing the WeArtEffect interface.
Blueprints
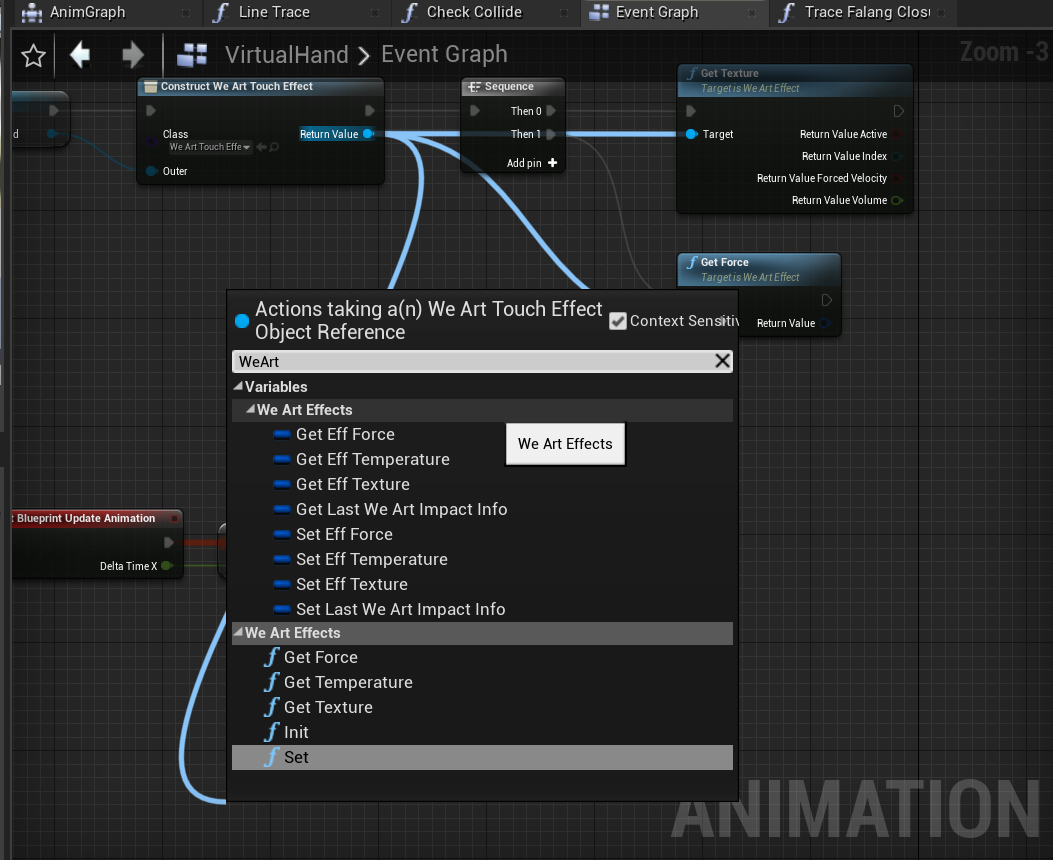
Touch effect can be constructed using Construct Object From Class node. Touch effect is now UCLASS, so It supports engine's reflection. You can see a list of accessed members by typing WeArt, when you drag out of constructed object pin.
C++
Instantiate new effect:
Init used as constructor method, you must call It after allocating effect in memory.
Blueprints
Getters supporting splitting their output pin, so you can use effect's fields in blueprints.
To use constructed effect you can use these methods:
C++
Create and activate actuations
Set actuation to effect:
Blueprints
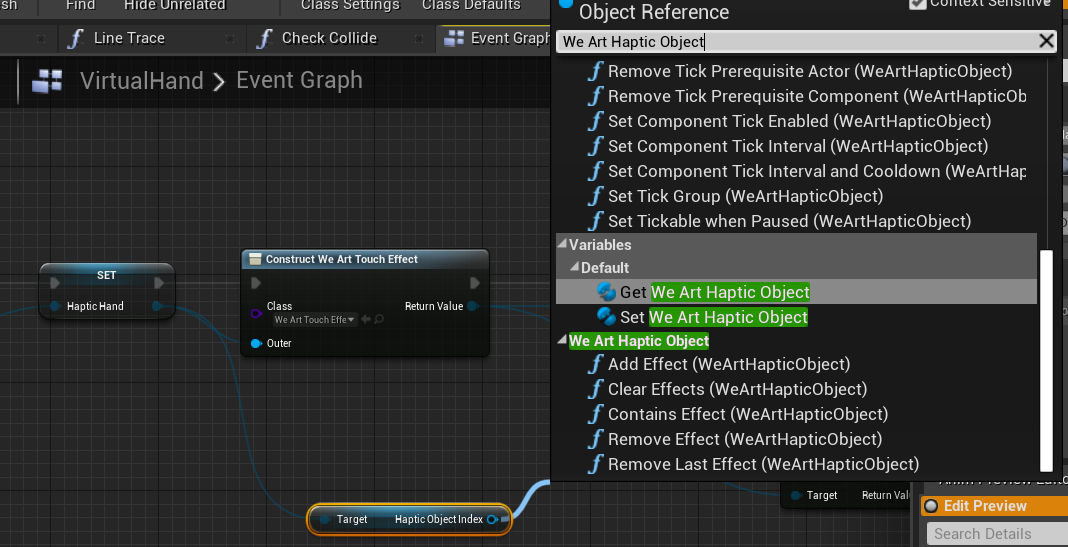
Use AddEffect node WeArtHapticObject.
C++
Apply to your HapticObject (finger/thimble) effect:
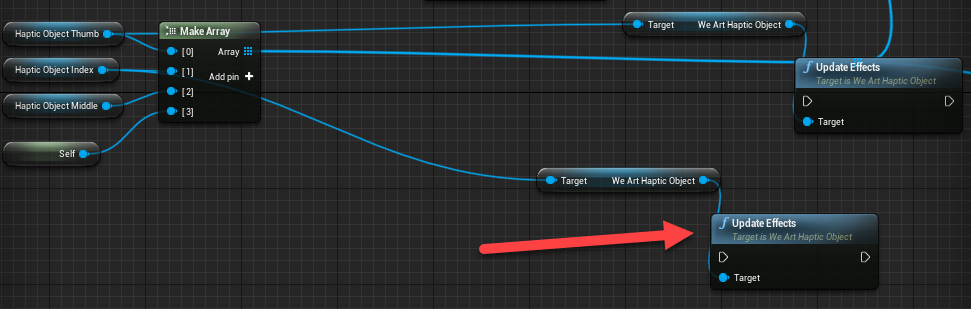
Blueprints
Use UpdateEffects method of WeArtHapticObject to update and actuate haptics effects:
C++
Update effects to your HapticObject:
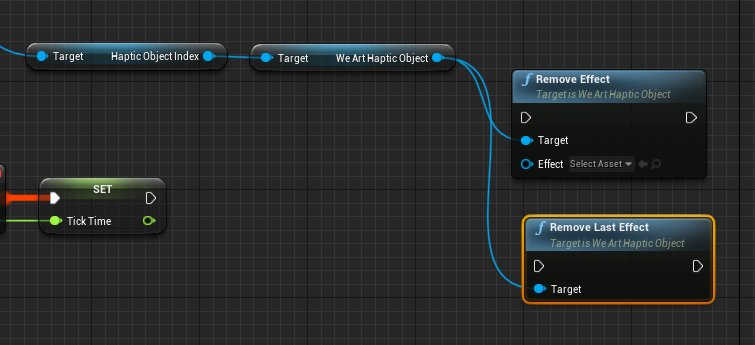
Blueprints
Use Remove Effect for removing specific effect, or Remove Last Effect
C++
To remove effect and restore actuation, get the same instance of effect and call “Remove” for the same HapticObject:
After starting the middleware and performing the device calibration, it's possible to receive tracking data related to the TouchDIVER thimbles.
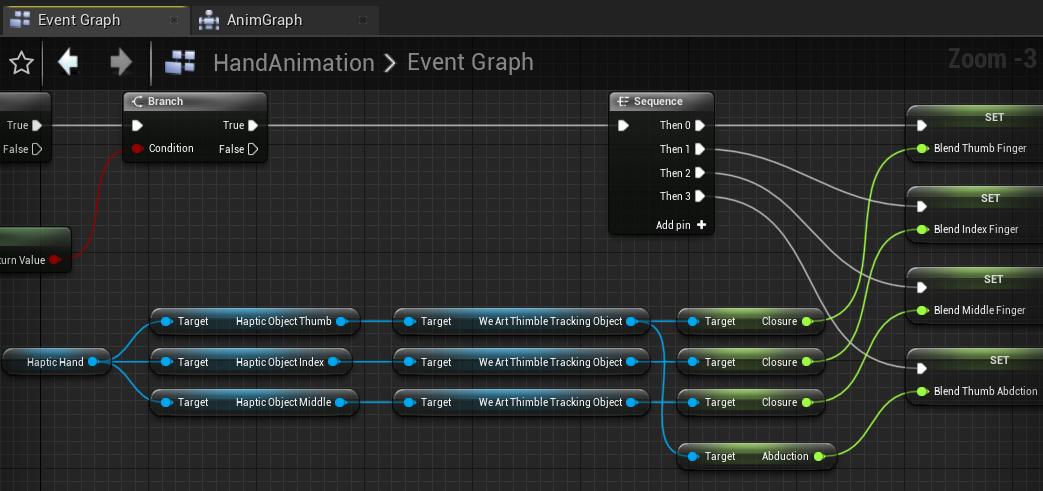
The player pawn contains two UWeArtHandController. One for each hand. Every UWeArtHandController contains three UWeArtThimbleTrackingObject. One for index, middle and thumb. From each UWeArtThimbleTrackingObject we can get the closure and abduction values. The values are from 0 to 1, 0 representing no closure or abduction and the 1 representing the maximum value.
Getting Closure and Abduction:
Here is a blueprint representation of getting the values, in this image the values are used for the animation of the hands.
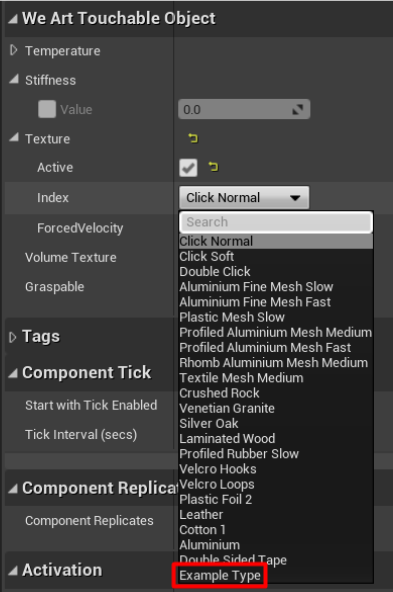
WeArtCommon.h contains an enum called TextureType. We can add a new member here and assign its number. Then inside the code and the editor we can set this member to WeArtTouchableObjects and inside Texture classes.
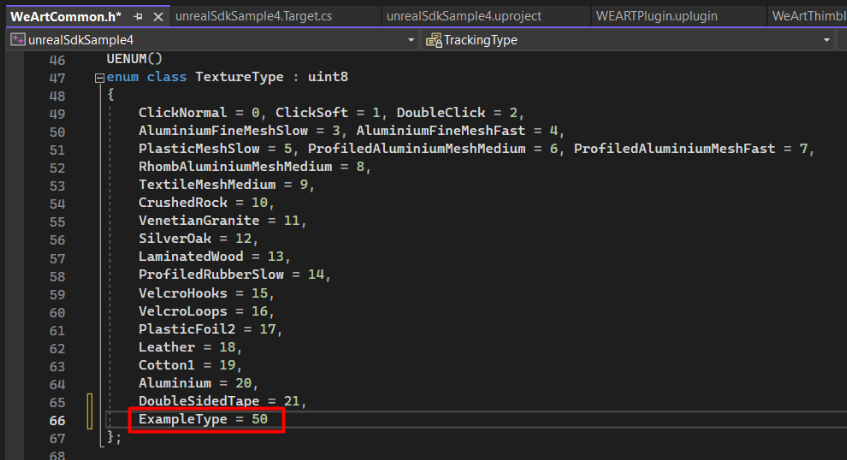
After compiling the code, the member will be available in the editor:
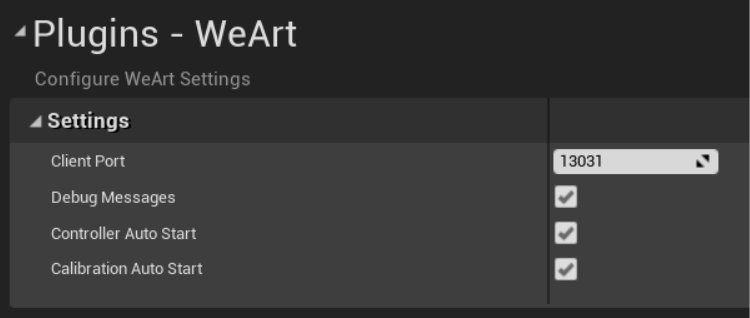
Go to Project Settings, then under the Plugins category you will find the WeArt settings. Here you can edit if you want to start the middleware and the calibration at the beginning of the experience.
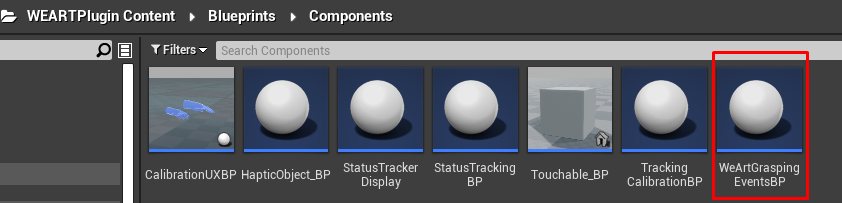
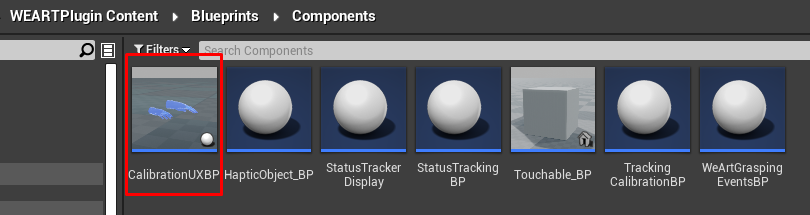
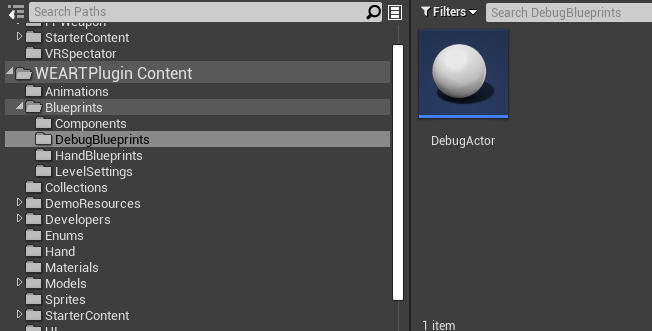
Commonly used blueprint classes stored in Blueprints folder, in components you can find blueprints related to calibration and grasping functionality.

For debugging purpose was created DebugActor, which displays grab conditions on sreen, It can be helpful to check, If you correctly set-up grabable object.
Hands are stored in HandBlueprints folder, Left and Right inhert from HapticHand_BP, If you want to make changes for both hands, you can implement them in HapticHand_BP.
If you did not set callibration on start, you can do that manually by using CalibrationUXBP, located in Blueprints\Components directory.
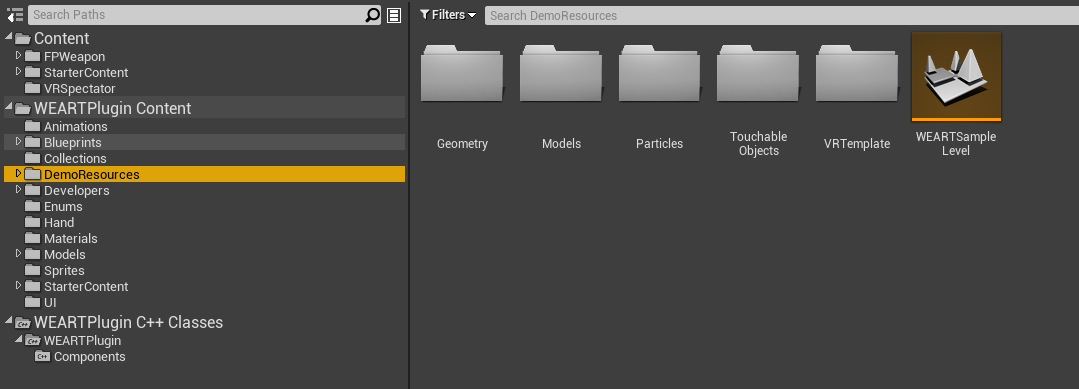
For an example scene ready to use open "WEARTSampleLevel". To find It go to DemoResources folder.
Make sure you have WeArtGamemode blueprint set in WorldSettings tab, after that level is ready to test SDK functionality. If you would like to start from using your own controller classes, you can change them in gamemode blueprint, or in controller class itslef.
To use controller with test hand system make sure you have you WeArtGamemode set in world settings.
This gamemode contains controller and pawn with ready to test hands.
Around the player start placed 4 plates with different touchable surface settings, you can test haptic effects with them.
To test temperature you can use bunsens on the table, red one produces hot particles, blue one - cold. To enable them, press the button, It can be clicked by hand or grabbed object.
On table placed several objects, on which you can test grab system.
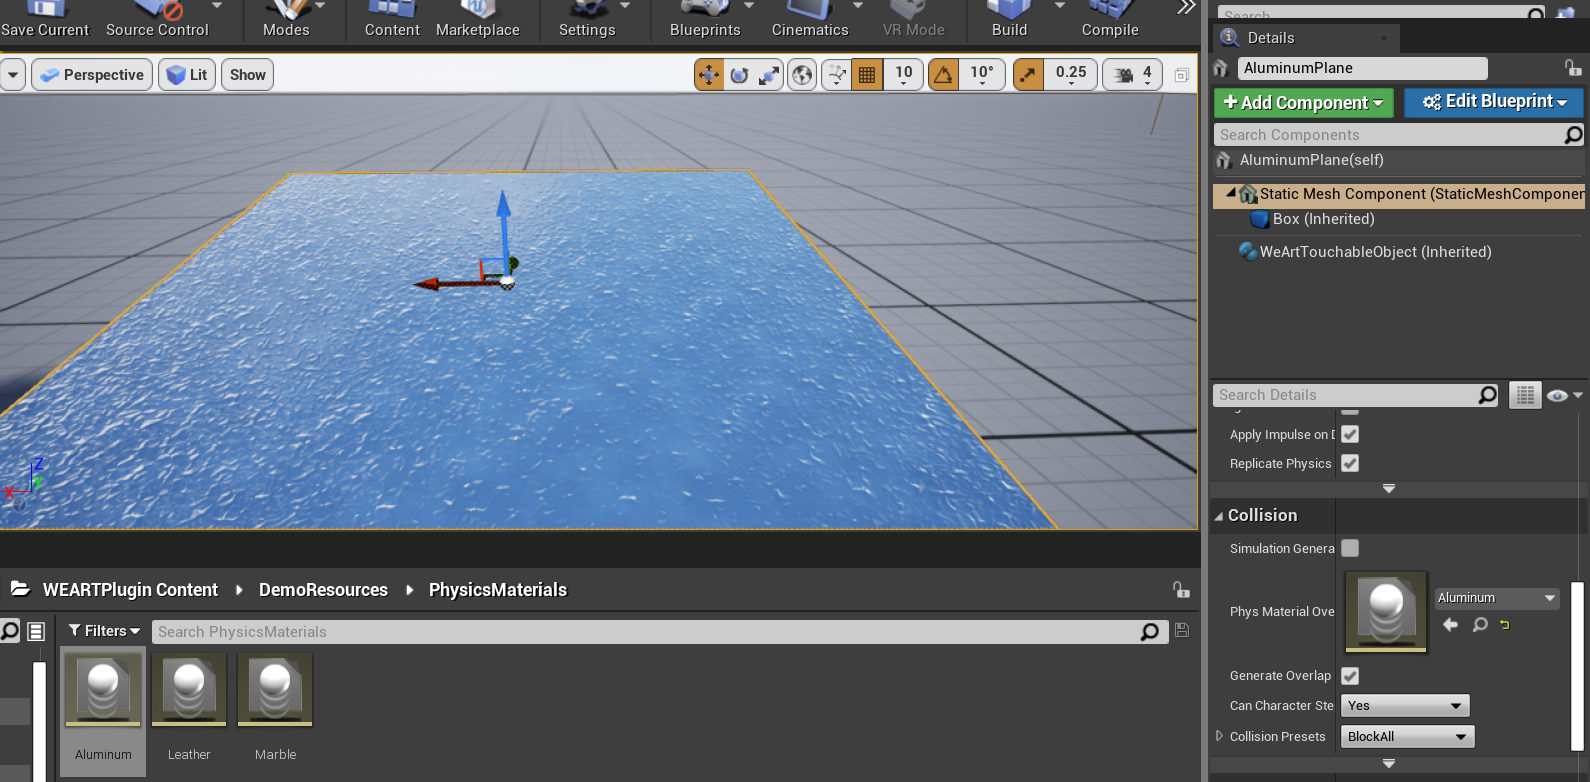
You can use physics materials to achive different behaviour for different surfaces, like friction or bounciness. By default, demo level uses materials for different planes, you can find them in DemoResources/PhysicsMaterials.

To apply them, choose static mesh component of an object and apply your physics material on It.
If you want to provide continuous feedback on surface exploration from touching different surfaces, you can turn on the touchable object Surface Exploration checkbox, which will use a different strategy to explore the object's texture, using additional collisions and ray casts to obtain data about the surface of the touched object.
Make sure, that you have minimum two contact points on the surface, otherwise default strategy will work.
We recommend to create a new project starting with the VR Template. In order to have the project ready for VR. If you have an already existing map, you can follow the same steps.
Take the Player Start actor close to working area. Then go to world settings and set WeArtGamemode at GameMode Override.
If you play the map in VR Preview, you should be able to see your hands.
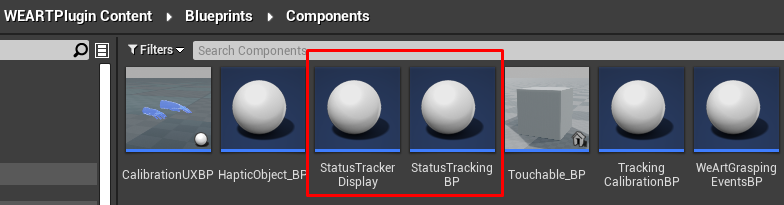
Add to the map "CalibrationUXBP", "StatusTrackingBP" and "StatusTrackerDisplay"
If the VR Priview is not active, refer to "Set-up project and import plugin" at the top of the page.
Grabbing system works on actors, that have WeArtTouchable component attached and proper collison preset. Take care to activate the Graspable property.
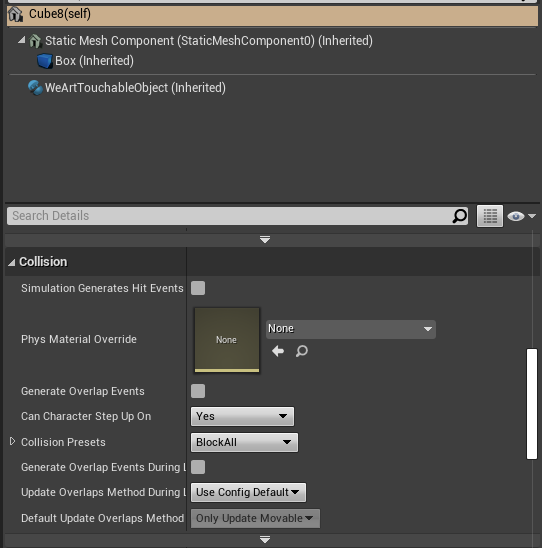
Be sure, that you put static mesh component as root, when you create your touchable object. Better to create blank actor and drag added static mesh component as root. If you don't - grab will not work and you will see log error.

Physical object with grab component must have convex collision or primitive one (sphere, cude e.t.c), physical hand uses convex collision data to attach It to physic constraint. Mesh collsion can lead to physics issue. Constraint attached to tracking object inside HapticHand_BP.
Close the project, clen any refence from the previous WEART SDK plugin and copy the new one on the plugin folder, open the scene and in replace any blueprint with new components provided by the new SDK version.