
|
Unity SDK
v1.2.0
|
|
|
Unity SDK
v1.2.0
|
Welcome to the WEART Unity SDK Standalone documentation.
The SDK Standalone allows to connect directly the applicartion installed on the standalone HMD with the device and perform various actions with the TouchDIVER devices:
The minimum setup to use the weart SDK consists of:
Create a new project or open an existing one.
Go to "Window" and then to "Package Manager".
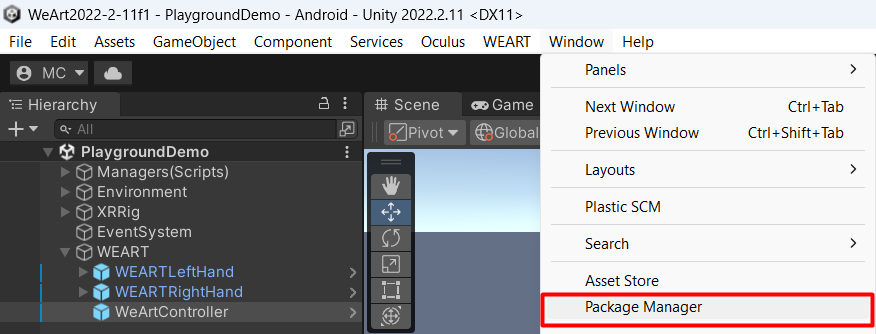
Then press on the "+" and select "Add package from disk".
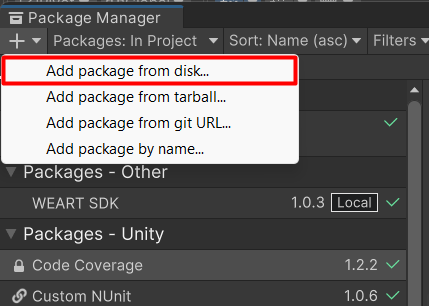
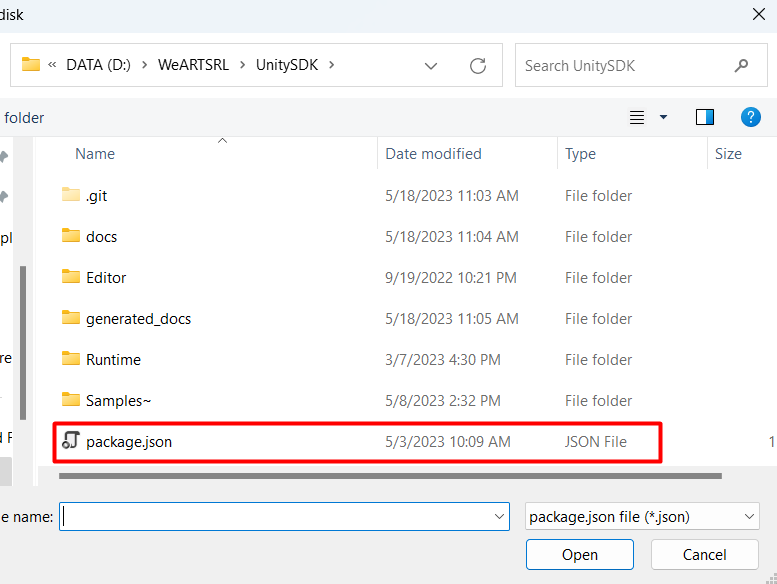
Find the location of the SDK, select package.json and press "Open".
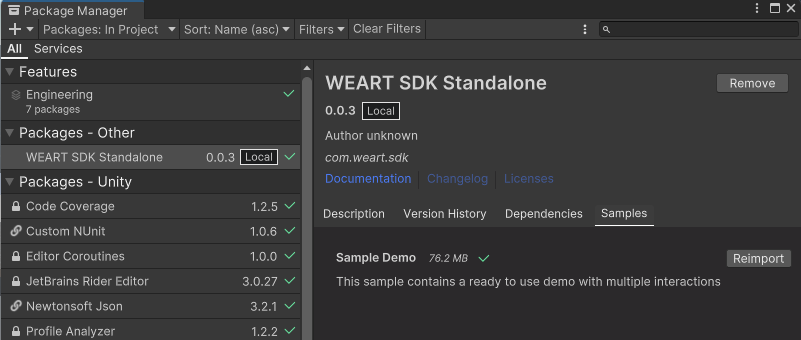
From here it is possible to import samples to the project.
Please, follow these steps to setup your Android Unity Project:
I. Switch the Unity project to the Android platform:
II. Setup the Android API levels and the scrptable backend:
III. Add permissions to the Android Manifest.
Depending from XR device used in the project, its SDK prepares its own custom Android Manifest that will be placed into Assets folder of your project. Add these permissions into this Custom Manifest after </application> tag:
Please, note that the BLUETOOTH_ADVERTISE, BLUETOOTH_CONNECT, and BLUETOOTH_SCAN permissions are runtime permissions and they will be requested before Bluetooth can start its work within application.
More inforamtion you can read from the official Android documentation here.
IV. Create the Custom Gradle Properties Template:
V. Create the Custom Main Gradle Template:
Responsible for communication with the TouchDiver device through dialogue with Middleware Path: Packages🡪 WEART SDK 🡪 Runtime 🡪 Prefabs 🡪 WeArtController.
Inspector Properties:
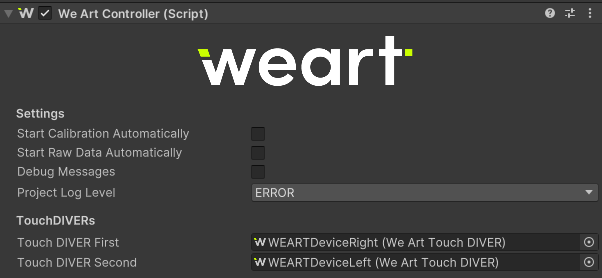
WEARTTrackingCalibration contains Unity events that correspond to the middleware calibration events
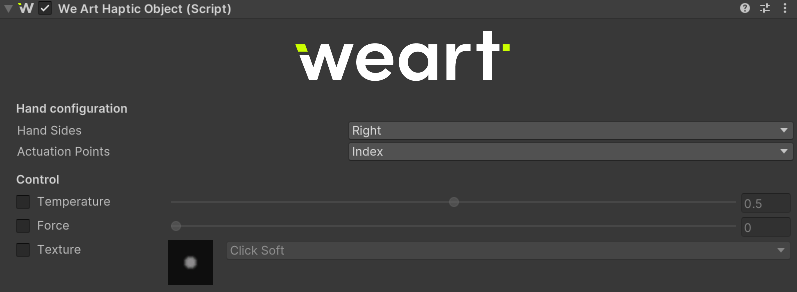
Component responsible for the description of the haptic effect to be applied in the event of a collision with the HapticObject actor Properties:
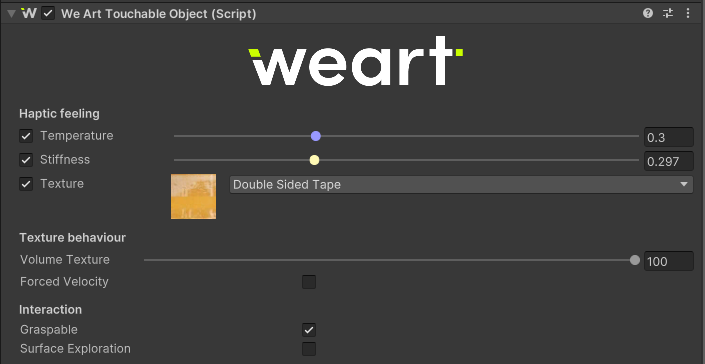
GameObject Requirements:
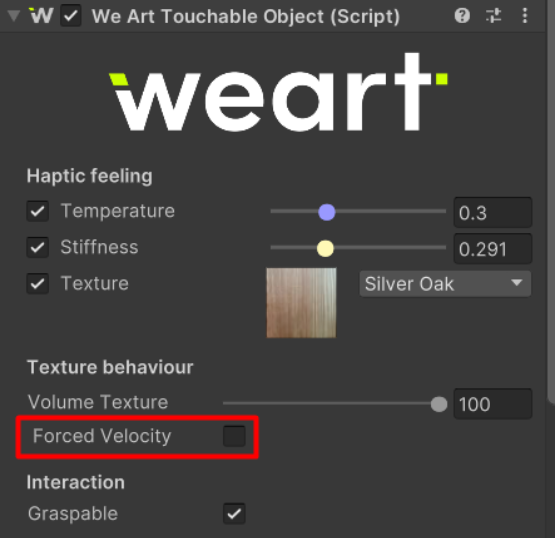
The component WeArtTouchableObject has a flag called Forced velocity, if it is enabled, when the hand enters the touchable object, the texture feeling will run at maximum speed. It will not take in consideration the movement of the hand.
Component responsible for the haptic actuation of the individual digital devices belonging to the TouchDiver device Properties:
GameObject Requirements:
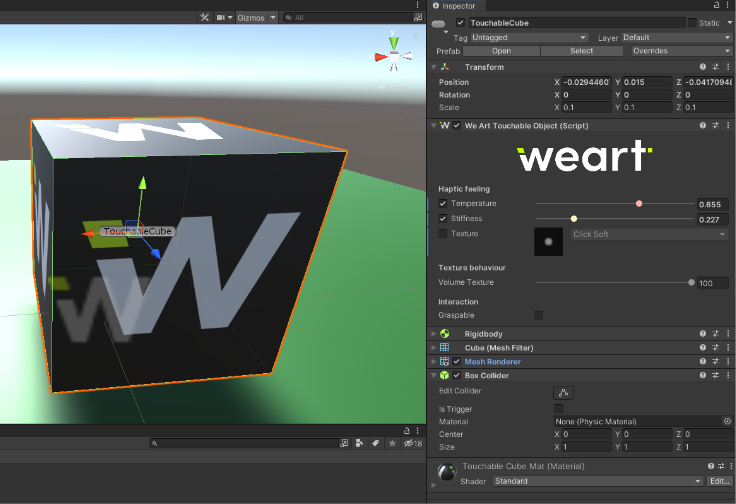
By adding components to existing game objects. Either insert any prefab in the map, and equip it with a Haptic/Touchable component and a collision, or create a prefab which you can then reuse anytime you want. In the inspector panel, you should have access to all the modifiable variables.
Component responsible for tracking of thimble' movements for quantifying its closed state and animating virtual hands Properties:
The WeArtStatusTracker component is responsible for tracking and forwarding middleware status updates to the interested objects.
The interested objects can add a listener to the _OnMiddlewareStatus event, in order to receive the updates whenever the middleware updates its status.
In particular, the event propagates an object of type MiddlewareStatusData, containing:
Component responsible for tracking a given thimble raw sensors values. The raw sensors data includes:
Properties:
At runtime (while the editor is playing), the component will show the values received for the given thimble, as shown in the picture below.
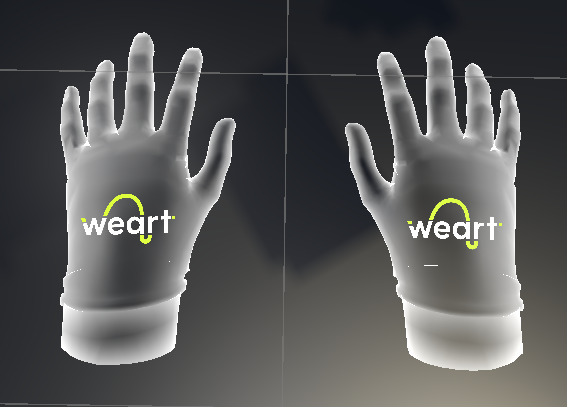
Represents virtual hands in your experience linked to TouchDiver and able to update finger tracking for activation hand animation and haptic for thimbles. In base of the project configuration, the hands can move with your motion controller. Path: Packages🡪WEART SDK 🡪 Runtime 🡪 Prefabs 🡪 WEARTLeftHand | WEARTRightHand
If you are not using a sample scene, you can drag and drop the prefabs in the scene, make sure to apply the transform that it needs to follow of your VR rig contoller. Make sure to add WeArtController to the scene.
Each WEARTHandController has two events. One fires when an object is grasped and the other when it is released.
Create two functions that will be subscribed to the events
And then subscribe them to the hand controller;
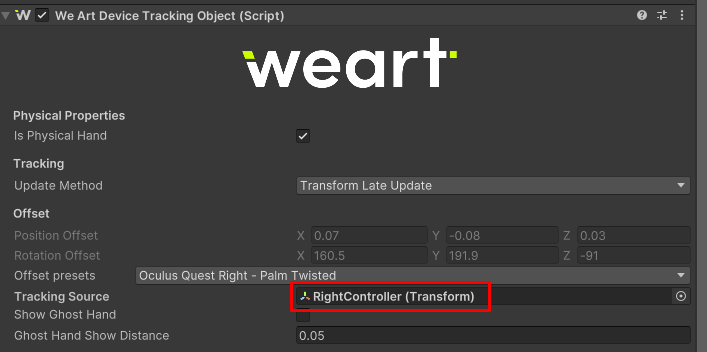
These hand prefabs contain a script called WEARTDeviceTrackingObject.
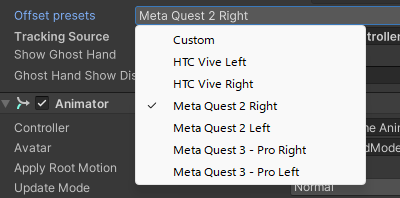
This component has offset presets that can be changed based on the touch diver setup.
Component responsible for the tracking of the wrist on which the TouchDiver device is placed Properties:
Here are the offset presets available:
Inside each hand prefab there is a child game object called GhostHand. This game object must not be deleted as it is essential for the hand grasping system.
This object contains a WEARTHandController and a WEARTDeviceTrackingObject which must always be set to IsPhysicalHand = false. This means that the scripts present on the top parent object, WEARTRightHand, for example, control the ones on WEARTRightGhostHand, and the IsPhysicalHand properties must be disabled on WEARTRightGhostHand.
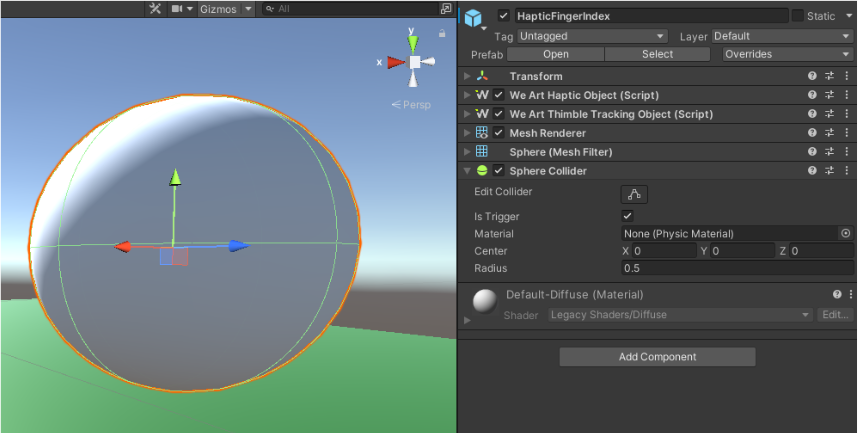
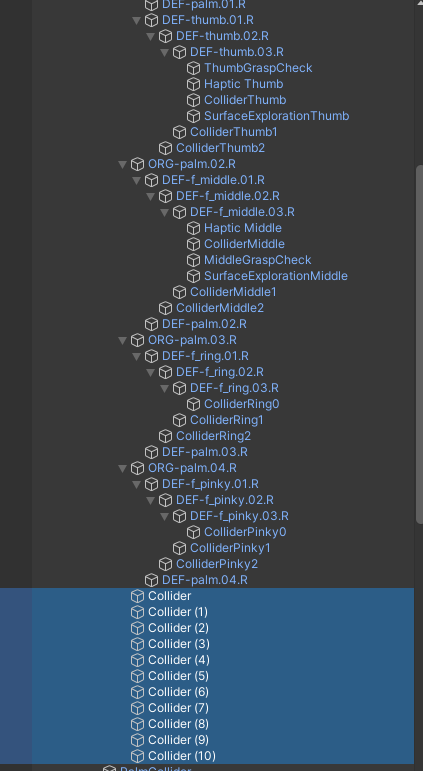
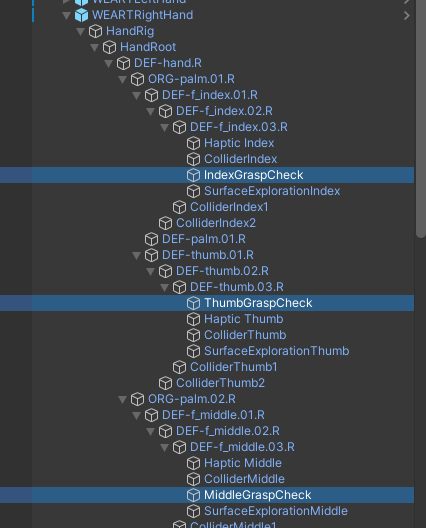
The physical hand is animated using the closure values of the WEARTThimbleTrackingObjects present on the Thumb, Index and Middle fingers. Through out the hand there are colliders, the palm has colliders that never move while the fingers have colliders that move because they are placed on the transfoms of the falangs of the fingers that are moved by the animation. Each Fingertip of thumb, index and middle have a capsule collider with a WeArtHapticObject component. When the hand does not grab anything, the haptic objects interact with the touchable objects in the scene and receive their effects.
Each hand also contains a palm collider(box).
Moreover, each fingertip of thumb, index and middle have box colliders(Collision Checker Collider) that also contain WEARTHapticObjects. These Objects do not affect the effects felt by the Touch Diver. They are only present to check what WeArtTouchableObjects are in contact with them.
Here you can see the "Collision Checker Colliders"

The Unity SDK now integrate a new hand system, ready-to-use, that enables physical interaction with objects, making the experience more realistic and enhancing tactile feedback during the interaction.
With the new hand asset, it is possible to grasp objects naturally, without predefining static poses and speeding up the development of experiences that enable manipulation. Tactile feedback is synchronized precisely with object manipulation, increasing the realism of the feedback.
The new hand integrated into the SDK can be adopted in any project and allows for handling collisions with objects, applying forces, and making interactions more realistic.
For objects that have a single primitive collider (box, sphere or capsule) it will work directly with the system.
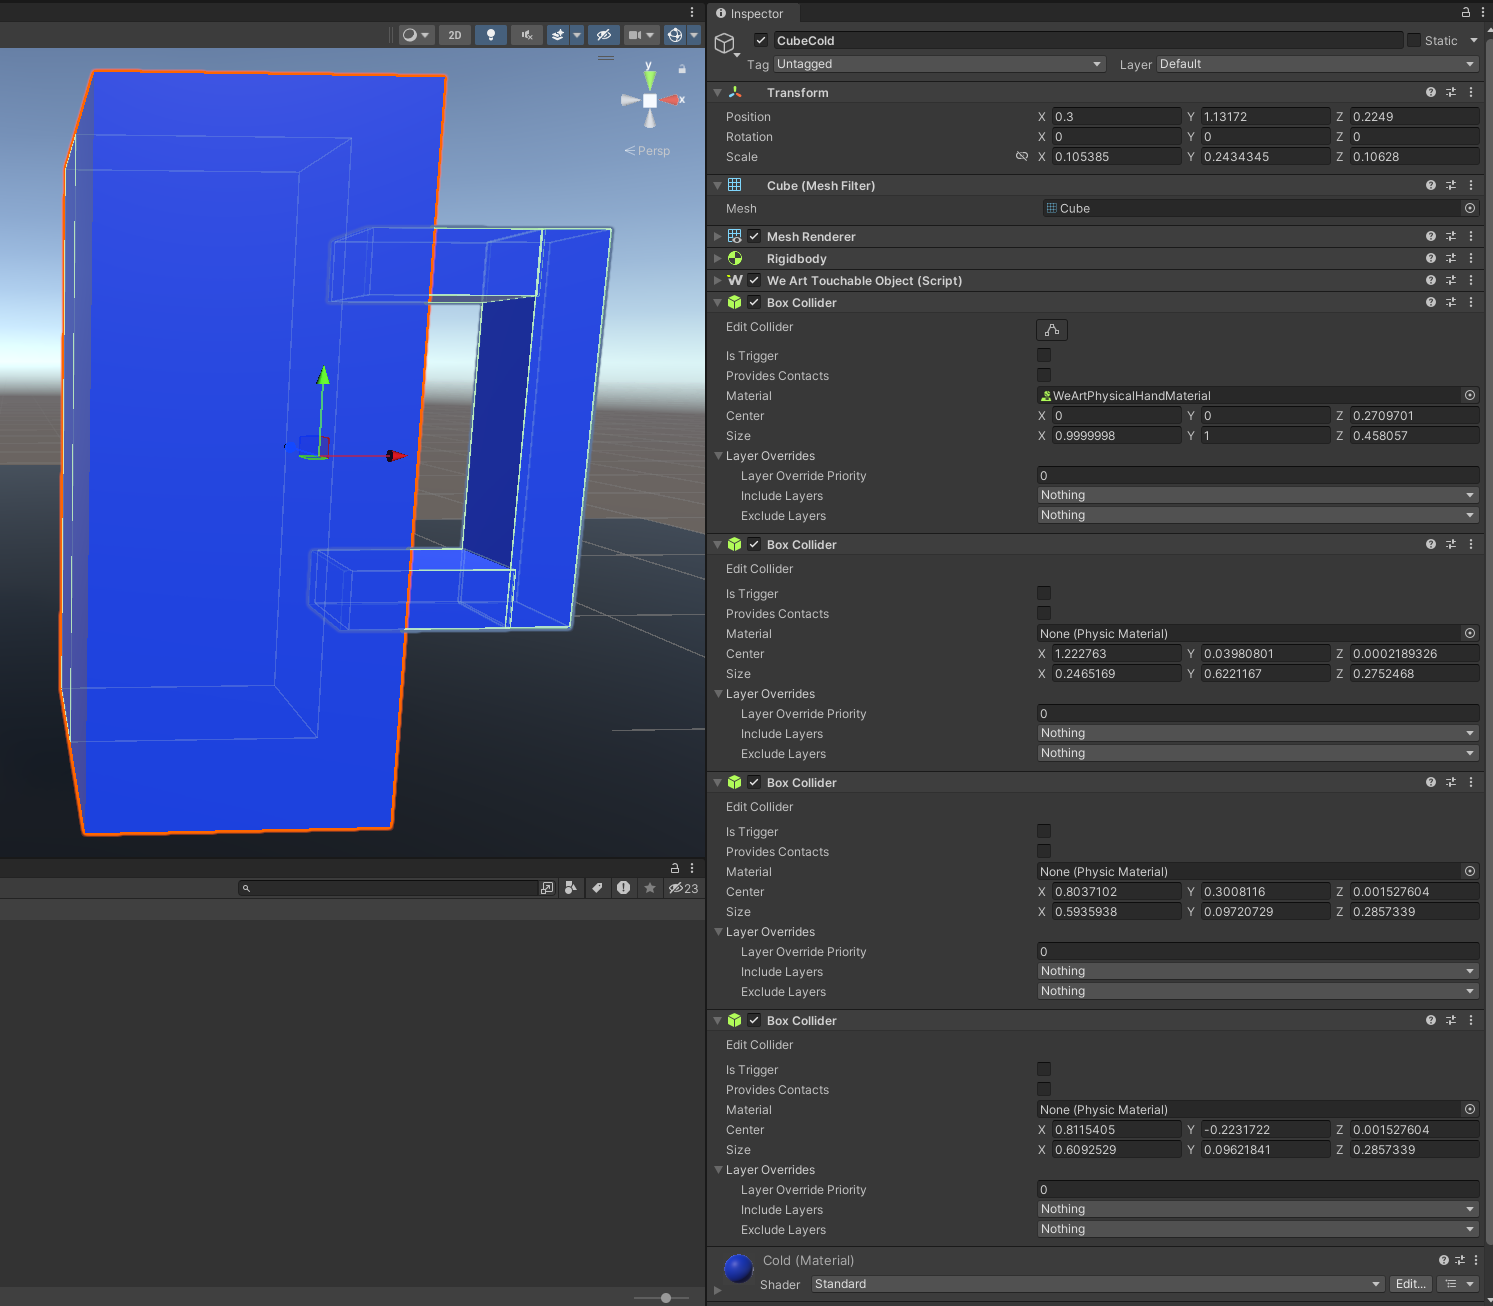
If you want to add more primitives to the same object, you must put the mesh renderers of these objects as children. But the colliders must remain on the main parent object that contains the touchable object. If the colliders are applied to the children objects, the system will not work.
Here is an example of multiple primitives on the same game object.
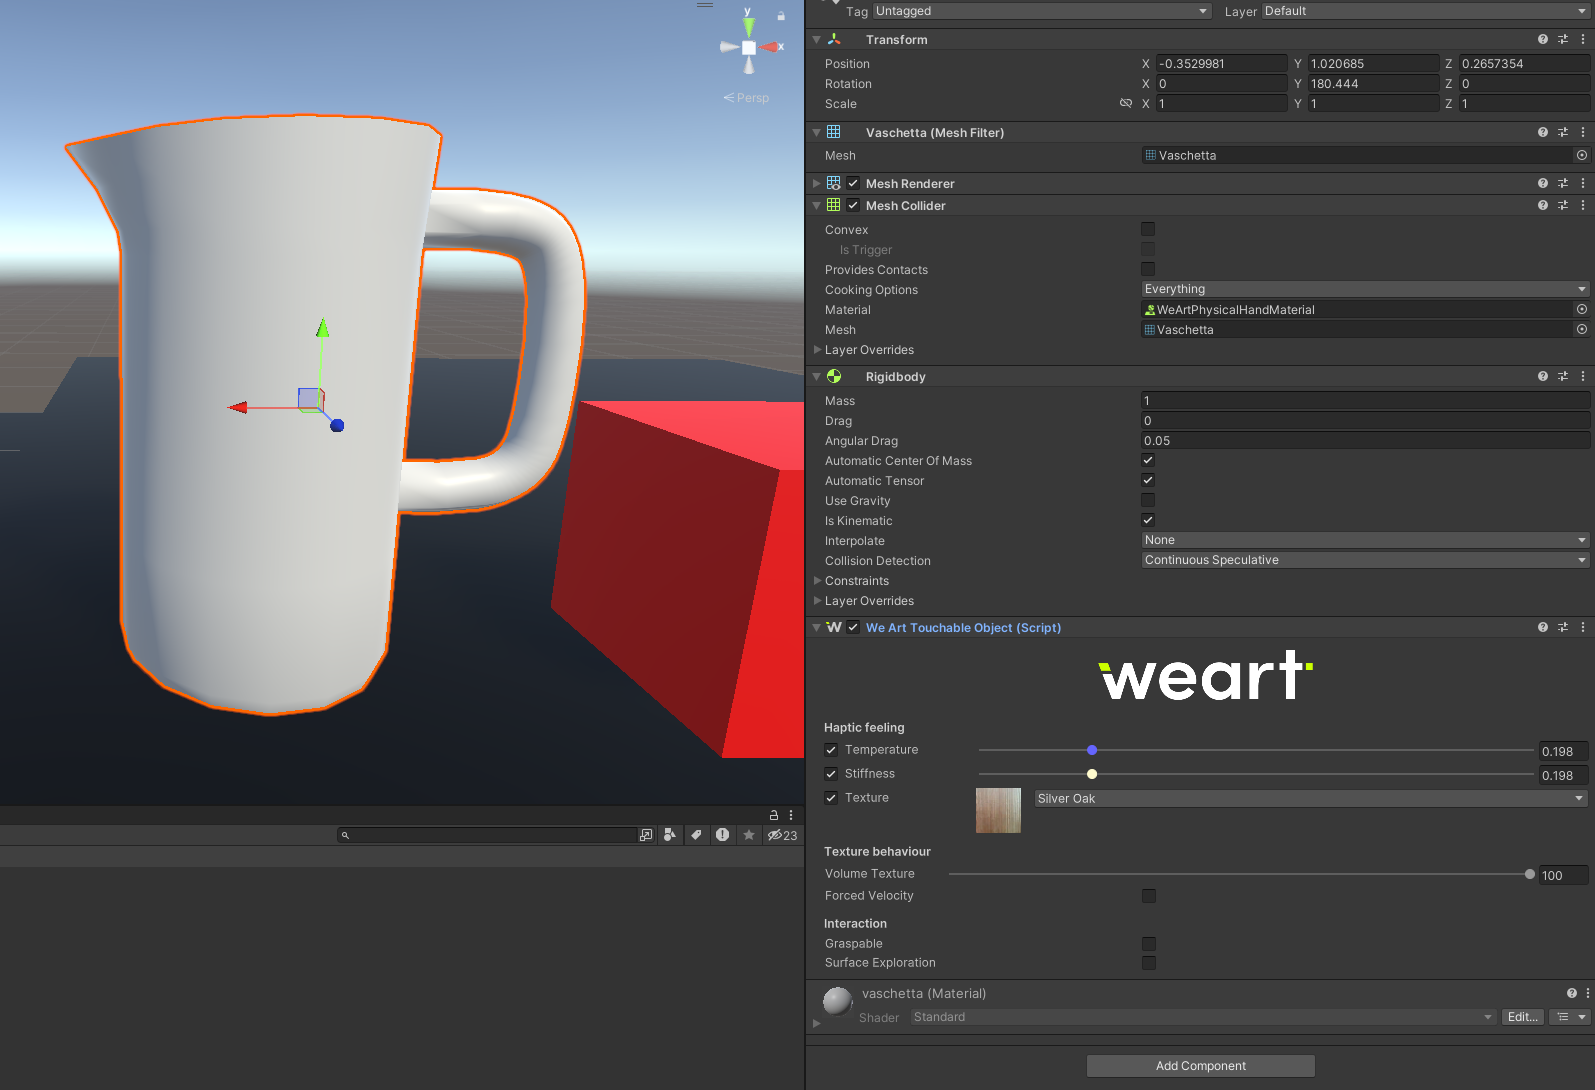
Unity does not allow moving Non Convex Meshes, when the non convex mesh collider is moved, it ignores any kind of collision. The mesh colliders must always be set to "convex".
If you want to have static non convex mesh colliders. you can add them and set their rigidbody to kinematic. This will allow oyu to touch and feel the solid mesh, but you will not be allowed to move(or grab) this object. They will look like this.
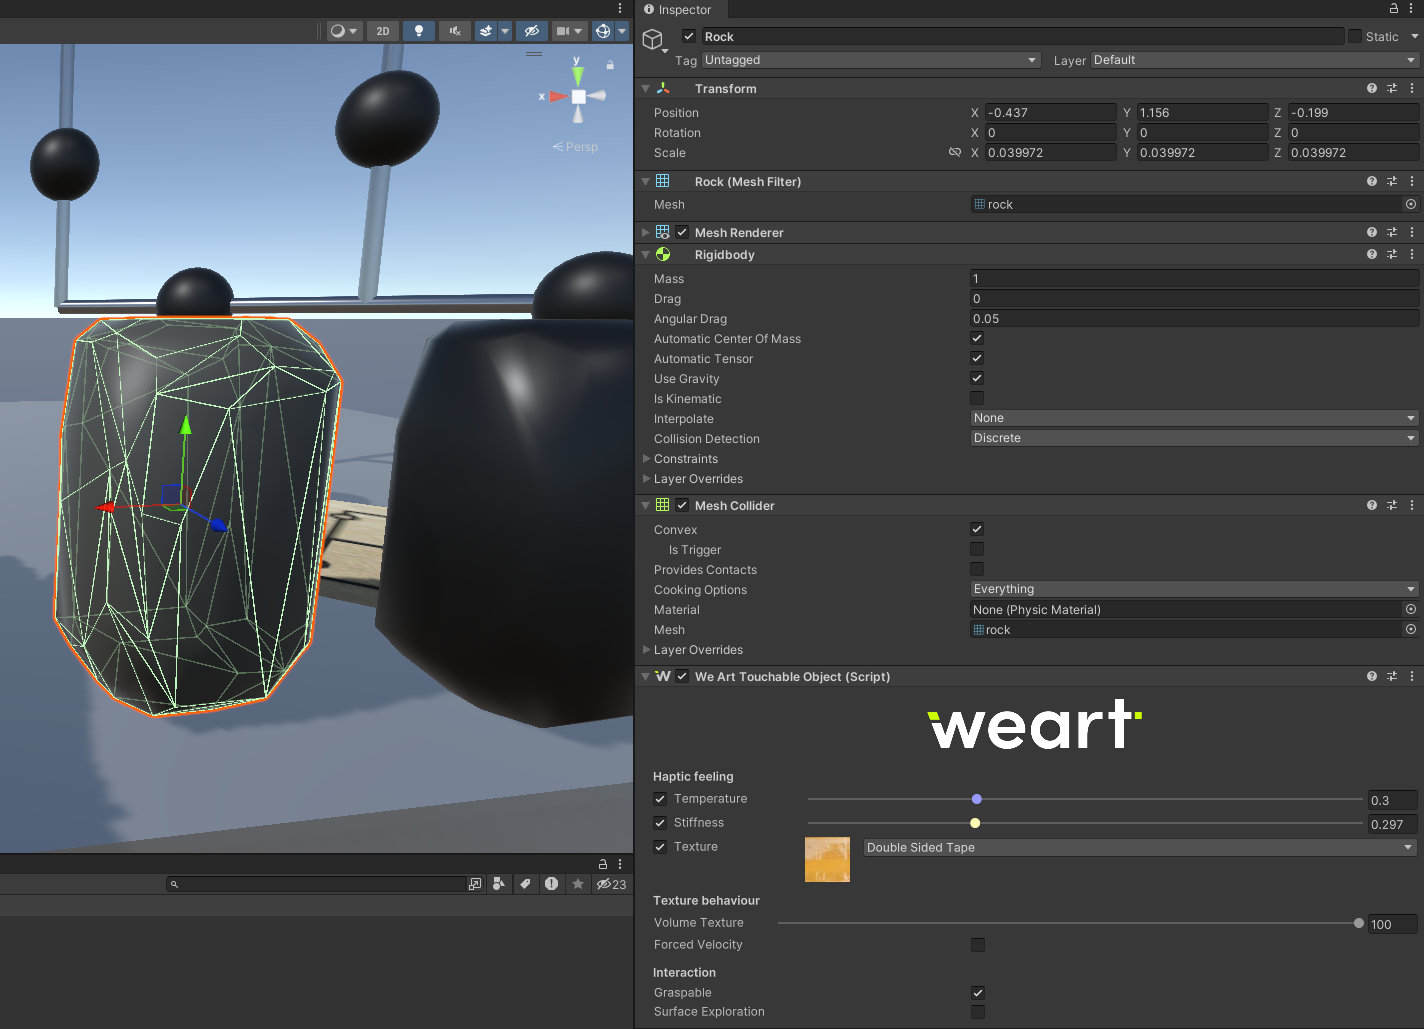
There are situations in which the convex mesh collider works directly, but in most situations with more complex meshes this will not work. Here is an example of a convex mesh collider that works.
This is how the collider looks like if we enable the convex property on the mesh collider that is more complex.
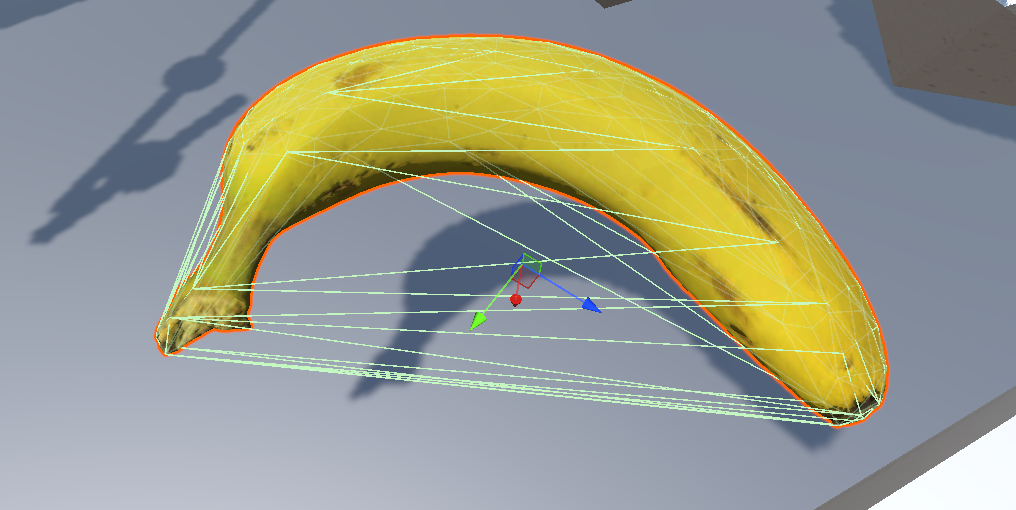
The convex function tries to wrap the whole mesh into a convex shape, and by doing this, the collider will be able to be touched and grabbed in places that the mesh does not exist.
We need to follow the next steps in order to have a good setup for our mesh. Take the mesh that you want to make grabbable into a model edditing software. Devide the mesh into smaller parts that will make the convex shapes acurate.
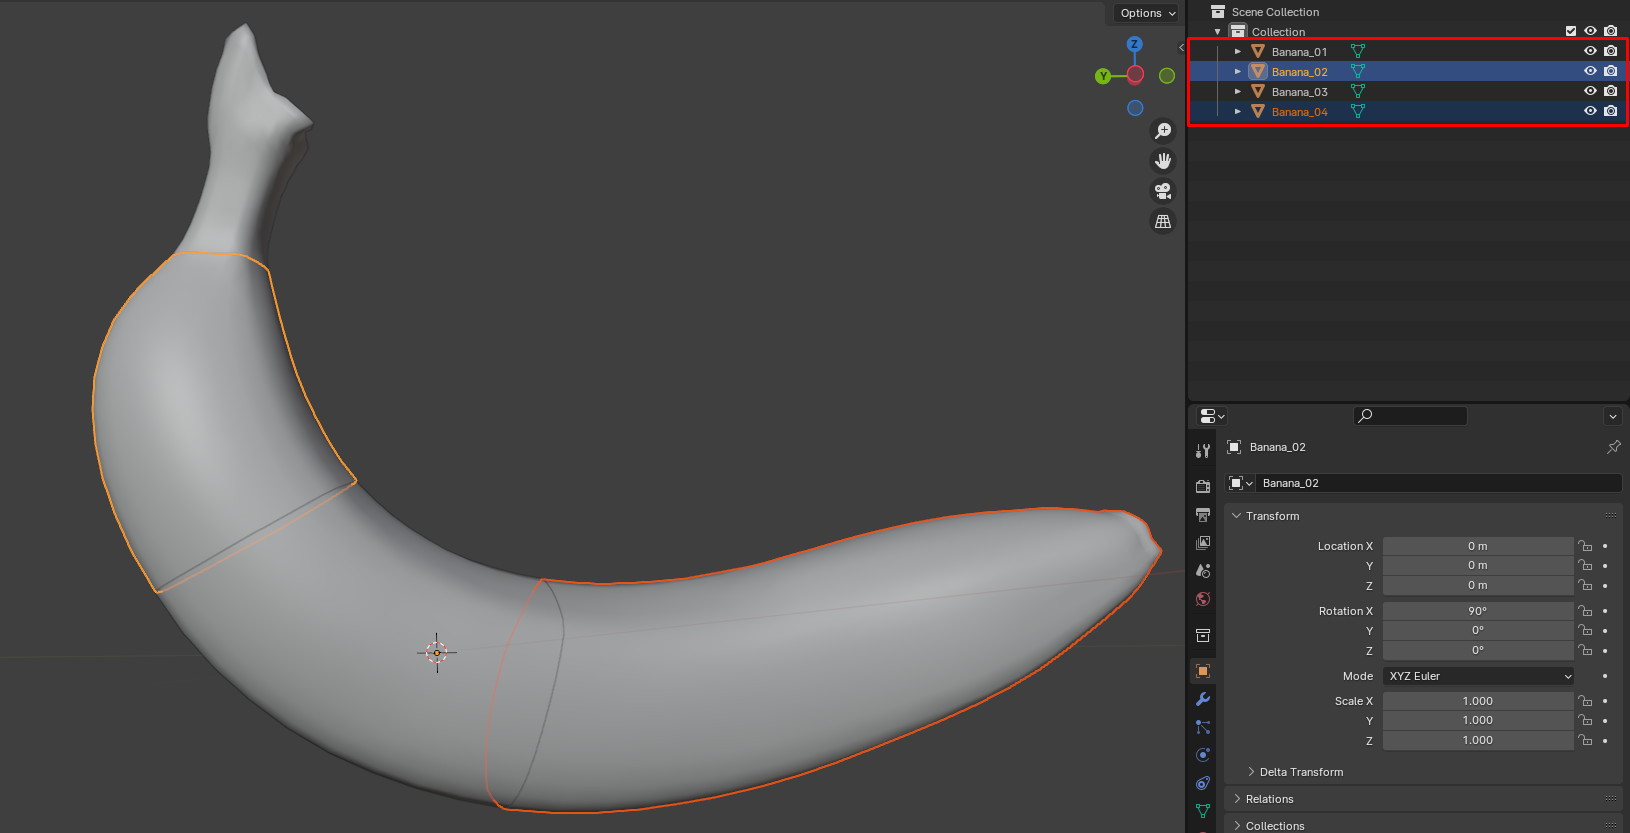
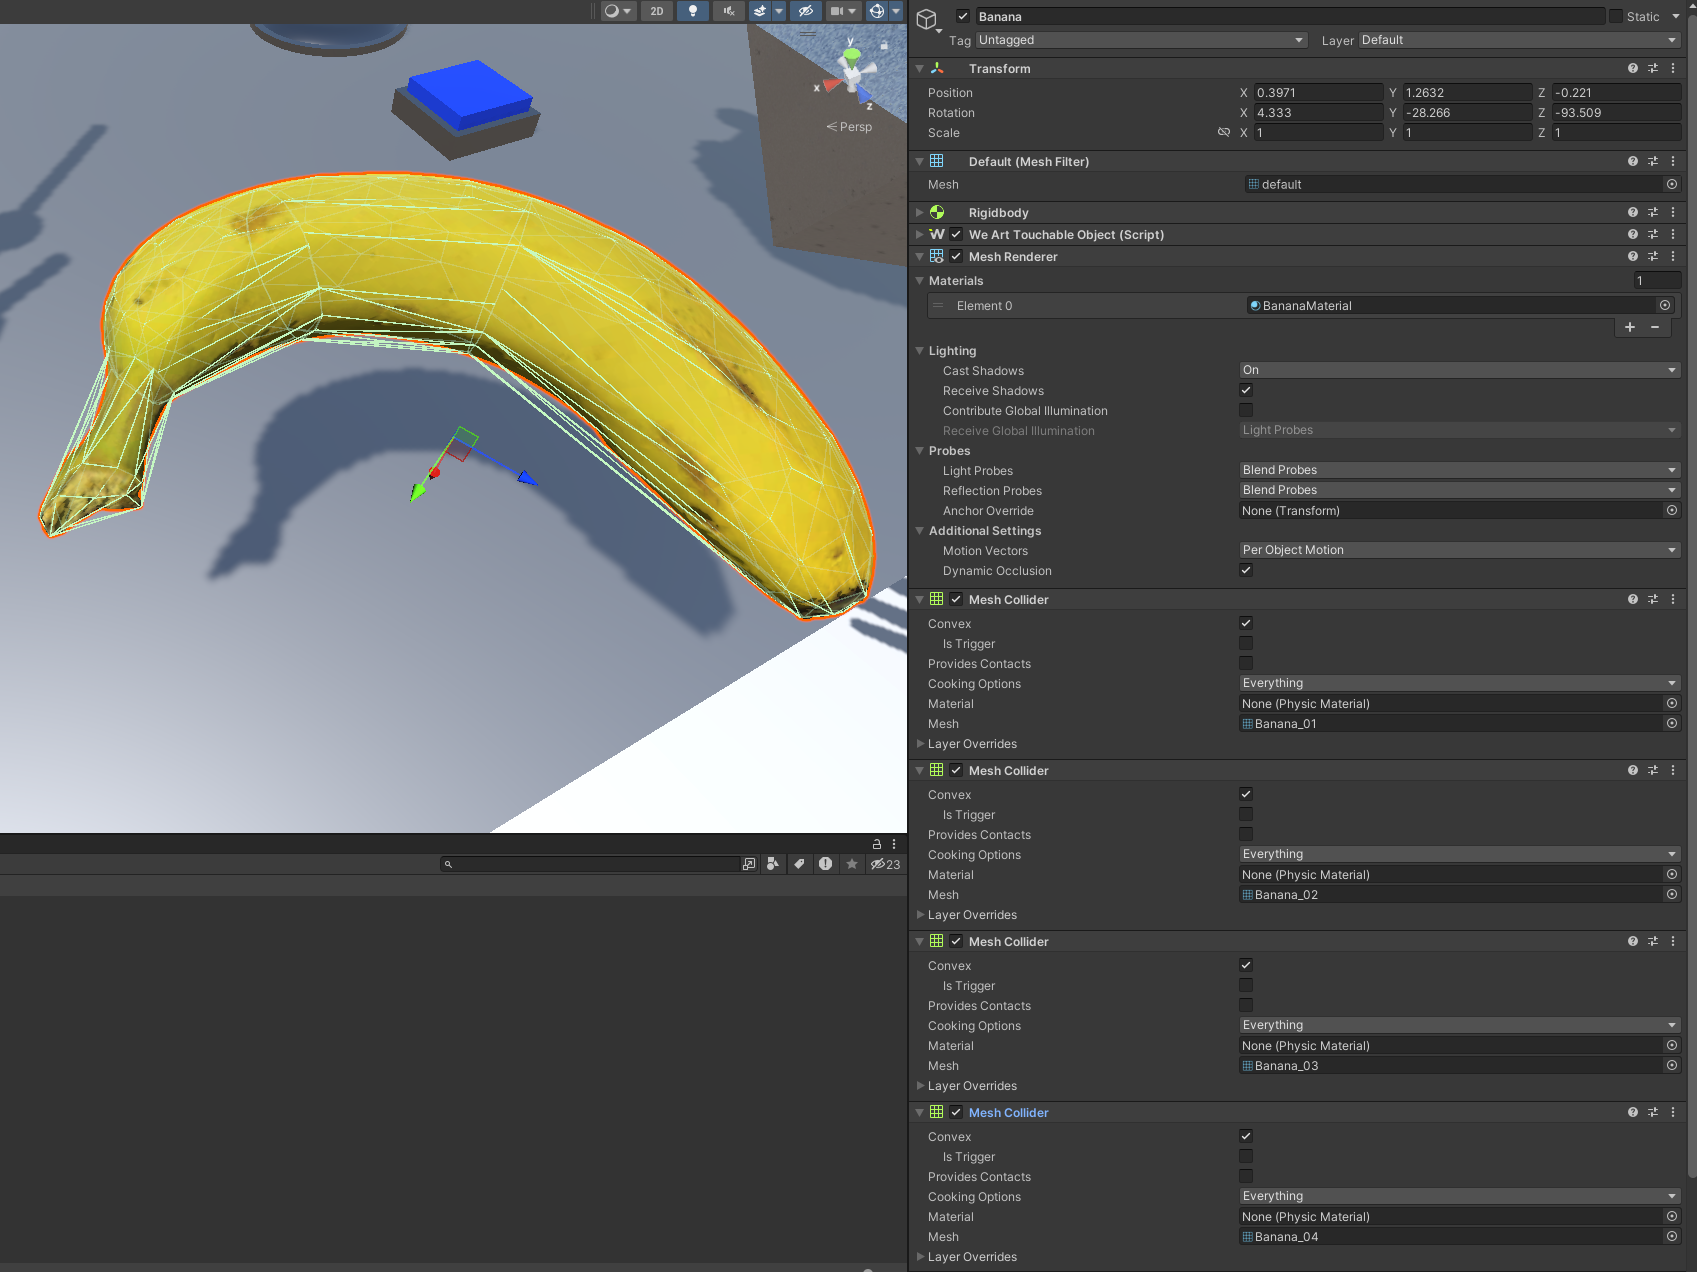
Now in unity, keep the mesh renderer and Mesh filter the same. Add the mesh colliders components to the same game object and add the submeshes of the new model to the colliders' meshes. Make sure that the import size is right, you can check it by clicking on the model inside the project folder. Remember to make them convex.
The final result will look like this.
When a WEARTTouchableObject has the flag "Surface Exploration" enabled, it allows for a better touch experience on a flat surface.
With all the fingers open, if the palm touched a flat surface with the WeArtTouchableObject that has the "Surface Exploration" enabled, the system checks if the palm and two other fingertips are in contact with the surface. If they are in contact the system will increase the haptic objects in order to have a smooth experience exploring the surface.
In order to remove the physics from the hand, select the game objects displayed in the next picture and disable their colliders.
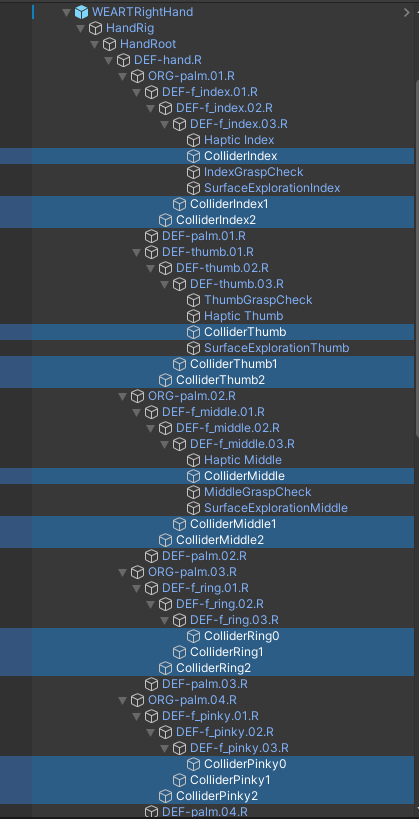
Remember to also disable the colliders from the next image (they are present in the same hand).
If you also want to remove the grabbing capabilities, disable the colliders from these game objects.
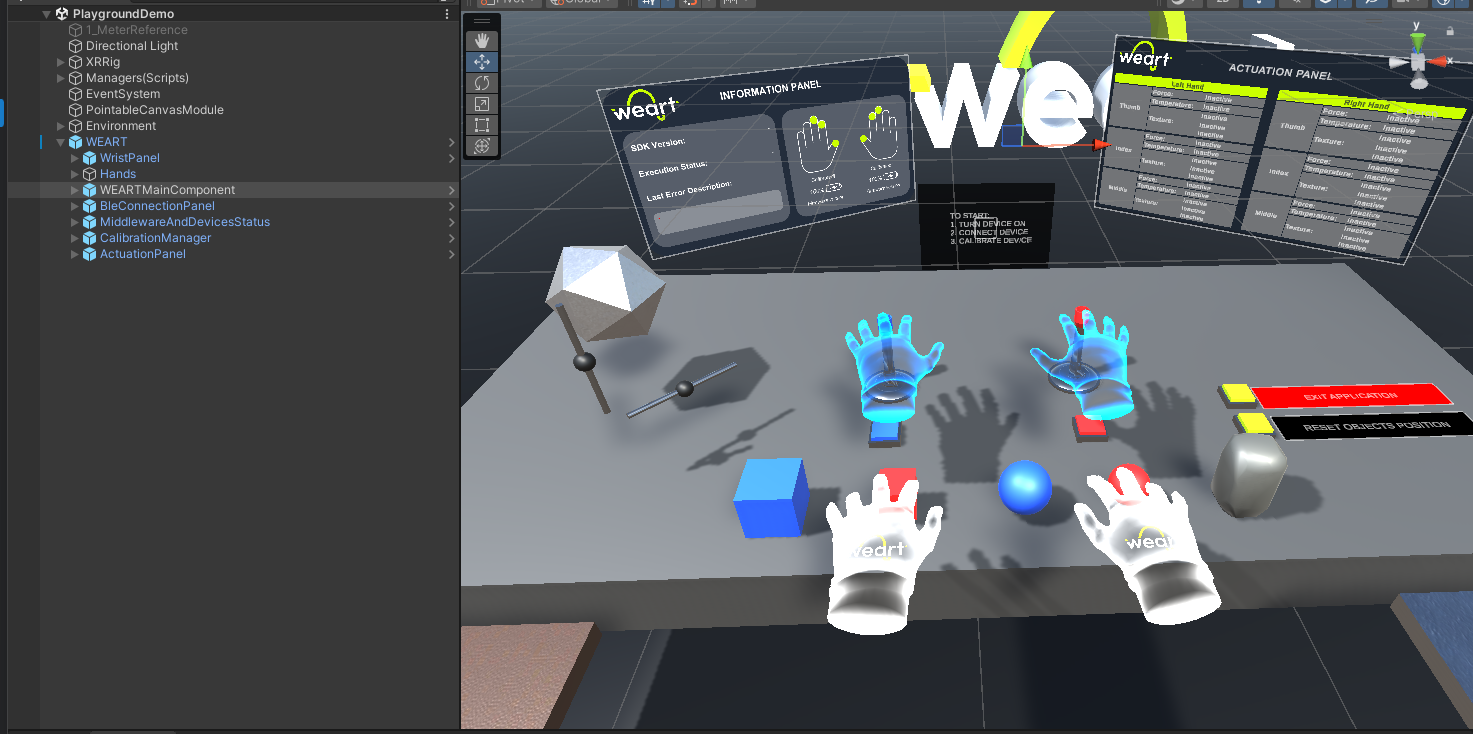
The calibration manager offers an easy and precise way of calibrating the touch diver at the start of the experience. You need to put your hands in the position specified and it will signal to the middleware that the calibration process is statring. The CalibrationManager prefab needs to have in the same scene the WeArtController prefab and the two hands prefabs.
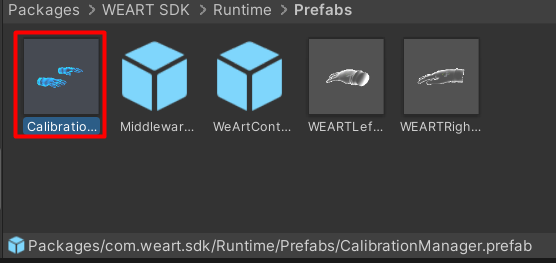
An exaple of this can be found in the PlaygroundDemo scene.
The prefab has two important exposed fields in the script CalibrationManager in the editor:
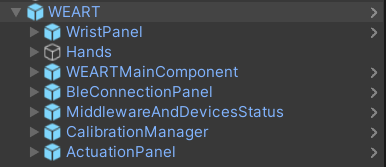
WEART prefab allows for a fast implementation of the system. It contains the WristPanel, ActuationPanel, BLEConnectionPanel, MiddlewareAndDevicesStats and WEARTMainComponent.
This prefab can be found in WeArt SDK Standalone🡪 Runtime🡪 Prefabs 🡪 WEART 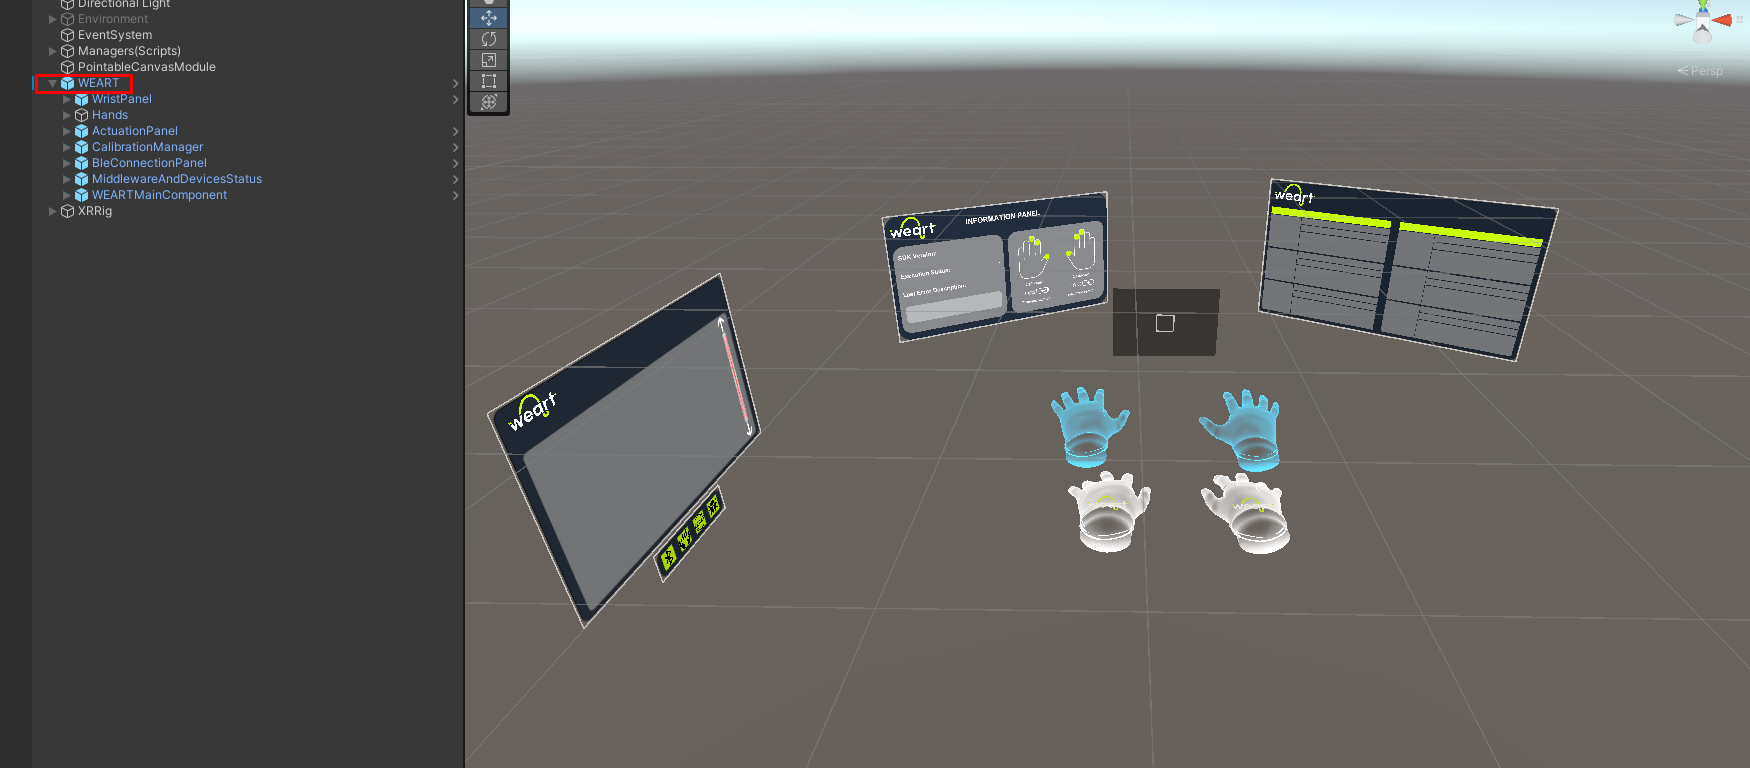
Manage Start and Stop Middleware communication Import in your C# class this namespace:
From WeArtController GameObject get Instance
From WeArtController GameObject get Instance
To start and stop the middleware from sending raw sensors data, use the WeArtController GameObject instance:
After starting the middleware and performing the device calibration, it's possible to receive tracking data related to the TouchDIVER thimbles.
There are two hand prefabs in the scene. Every hand prefab has a WeArtHandController. Every WEARTHandController has three WEARTThimbleTrackingObject references. We can get the closure and abduction from these components. The values are from 0 to 1, 0 representing no closure or abduction and the 1 representing the maximum value.
Getting Closure and Abduction:
The SDK contains a basic WeArtTouchEffect class to apply effects to the haptic device. The TouchEffect class contains the effects without any processing. For different use cases (e.g. values not directly set, but computed from other parameters), create a different effect class by implementing the WeArtEffect interface.
WEARTHandController takes care of the realistic transitions of effects in the scene, custom effects( creating, updating, adding and removing ) are not compatible with the hand prefabs. Haptic objects can be used outside of it as long and their field called IsPhysical is disabled.
Instantiate new effect:
Create and activate actuations
Set actuation to effect:
Apply to your HapticObject (finger/thimble) effect:
To remove effect and restore actuation, get the same instance of effect and call “Remove” for the same HapticObject:
In WeArtCommon.cs we can find enum called TextureType We can add a new texture like this:
And we can access it by index:
We can change the velocity of the texture of an effect by changing its value [0.0 to 0.1] 0.5 is recommended for the normal speed of the texture. This will give the effect a constant speed for the texture without moving the hand
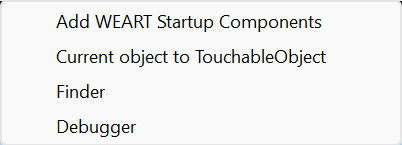
This tool will add the controller, the hands prefabs, calibration manager, Weart Middleware Status Display and Weart TouchDIVER connection panel.
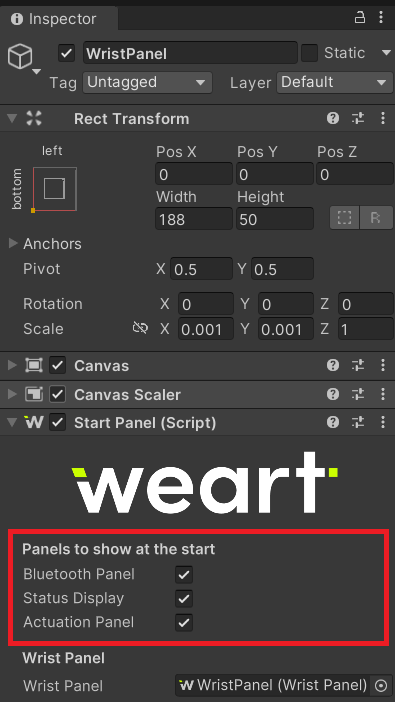
The "WEART Wrist Panel" is a part of TouchUI system with buttons used for:
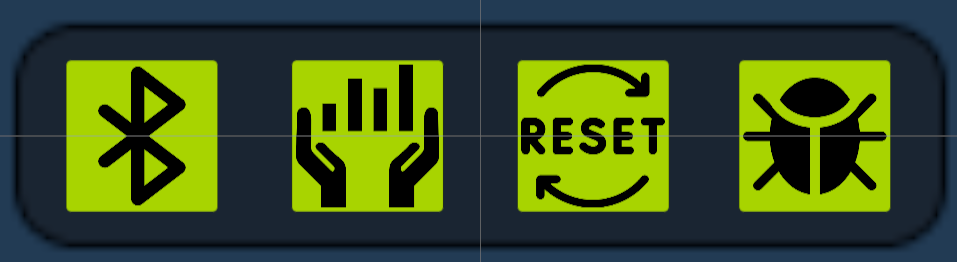
This panel could be placed anywhere at the scene in accordance your project requirements.
If you would like to hide them at the start of your session, just deselect them at the StartPanel component at the WEART Wrist Panel:
The "Weart TouchDIVER Connection Panel" is a 2D canvas provided all information about scanned Weart TouchDIVER devices with possibility to connect them, set the hand side and remeber them for auto connection within next sessions.
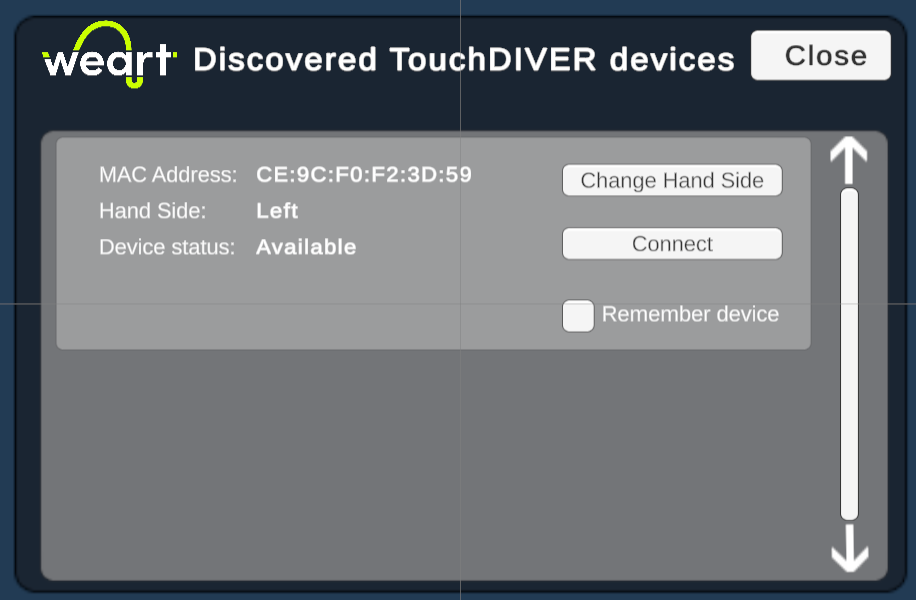
Panel contains:
All buttons and toggle at this panel are touchable, to press them just poke them by your virtual hand.
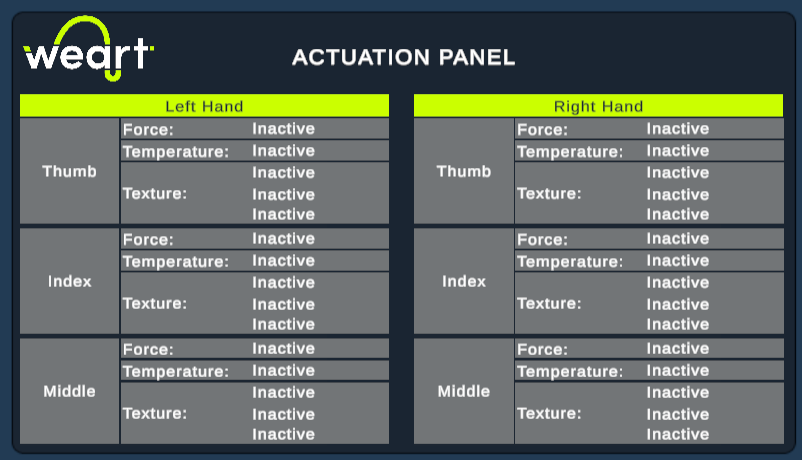
The "WEART Actuation Debug Panel" is a 2D canvas provided the runtime actuation data from haptic objects at WEARTHands: for thumb, middle and index fingers (Righ hand and Left hand).
This tool will transform the selected game object into a touchable object and it will apply the necessary components.
This tool will add the status display item prefab to the current scene.
The "WEART Middleware Status Display" (shown below) is a 2D canvas containing all the status information received by the middleware.
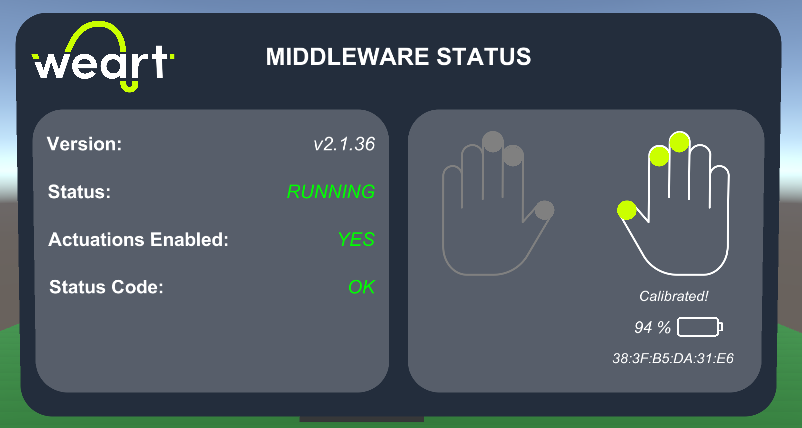
In particular, the object will display:
The current status codes (along with their description) are:
| Status Code | Description | |
|---|---|---|
| 0 | OK | Ok |
| 100 | START_GENERIC_ERROR | Can't start generic error: Stopping |
| 101 | CONNECT_THIMBLE | Unable to start, connect at least one thimble and retry |
| 102 | WRONG_THIMBLES | Unable to start, connect the right thimbles matched to the bracelet and retry |
| 103 | BATTERY_TOO_LOW | Battery is too low, cannot start |
| 104 | FIRMWARE_COMPATIBILITY | Can't start while the devices are connected to the power supply |
| 105 | SET_IMU_SAMPLE_RATE_ERROR | Error while setting IMU Sample Rate! Device Disconnected! |
| 106 | RUNNING_SENSOR_ON_MASK | Inconsistency on Analog Sensors raw data! Please try again or Restart your device/s! |
| 107 | RUNNING_DEVICE_CHARGING | Can't start while the devices are connected to the power supply |
| 200 | CONSECUTIVE_TRACKING_ERRORS | Too many consecutive running sensor errors, stopping session |
| 201 | DONGLE_DISCONNECT_RUNNING | BLE Dongle disconnected while running, stopping session |
| 202 | TD_DISCONNECT_RUNNING | TouchDIVER disconnected while running, stopping session |
| 203 | DONGLE_CONNECTION_ERROR | Error on Dongle during connection phase! |
| 300 | STOP_GENERIC_ERROR | Generic error occurred while stopping session |
This tool will open a window that will show the touchable objects present in the scene
This tool will open a window that will show the haptic objects in the scene and its parameters
You could import a sample scene to understand SDK components and simplify your test using ready scenes with any components you need.
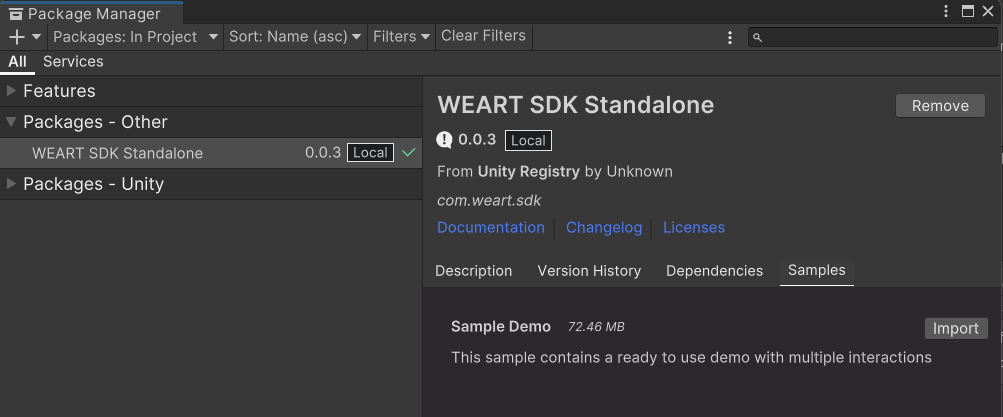
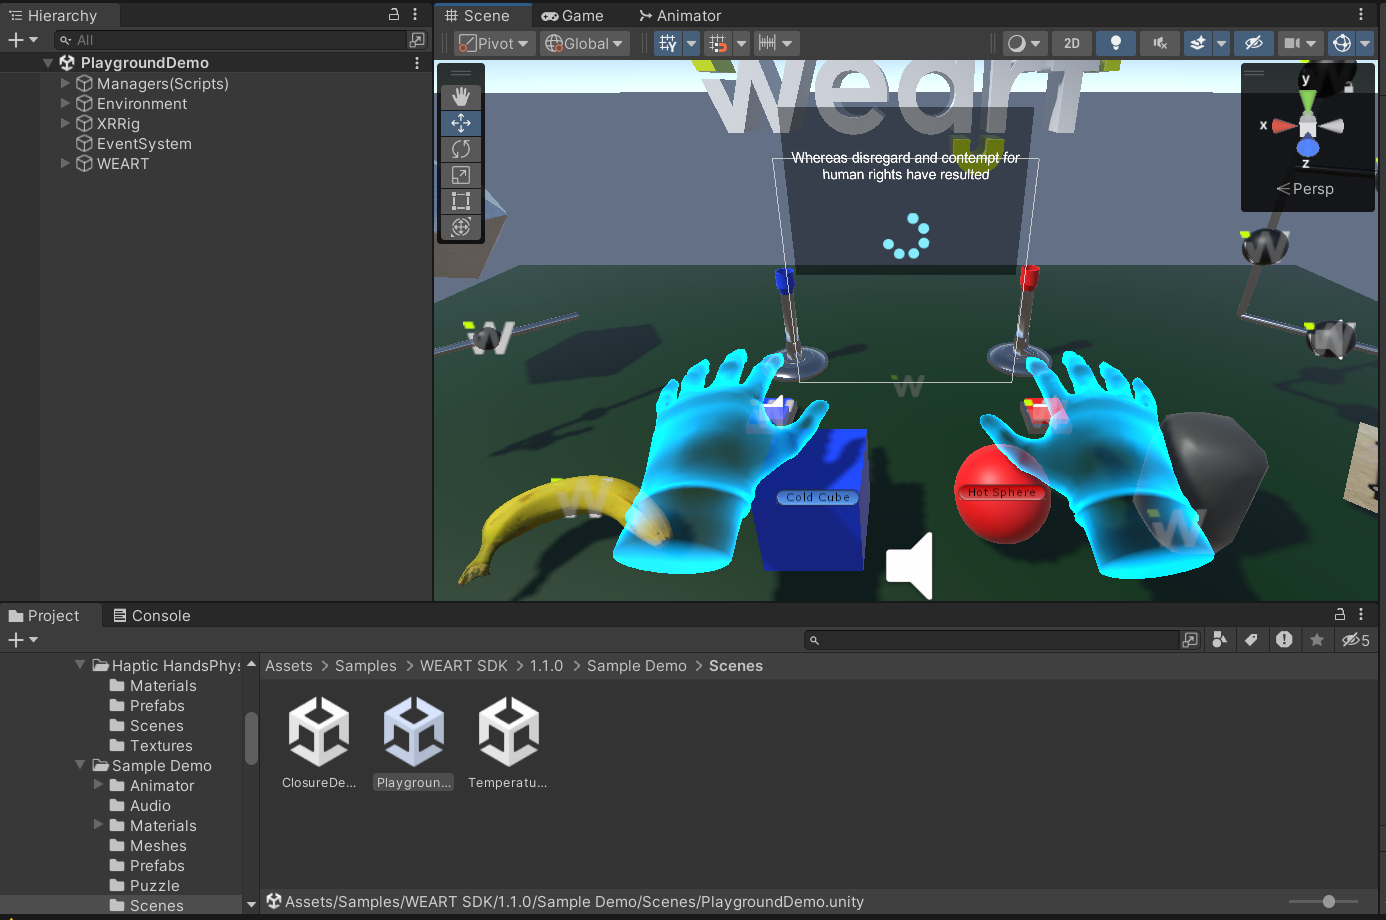
This sample contains a ready-to-use scene which shows the capabilities of the sdk.
This scene contains four material plates that have different textures, four objects on the table that can be grabbed and have different temperatures and two burners that when activated by buttons will create temperature zones above them.
Here you can find the URP Materials 
Remember to follow the steps for both hands.
If you are having a project that uses URP or want to create a new project with it, and you want to use the sample scene make sure to upgrade the materials present in:
WeArt SDK Standalone🡪 Runtime🡪 Materials
Assets🡪 Samples🡪 WEART SDK Standalone🡪 0.0.3🡪 Sample Demo🡪 Materials
Make sure to upgrade also the "Plates" folder from the location above.
Starting from now we will use only the materials from WEART SDK Standalone🡪 Runtime🡪 Materials🡪 URPMaterials
Switch the material of "Logo" game object with URPLogo 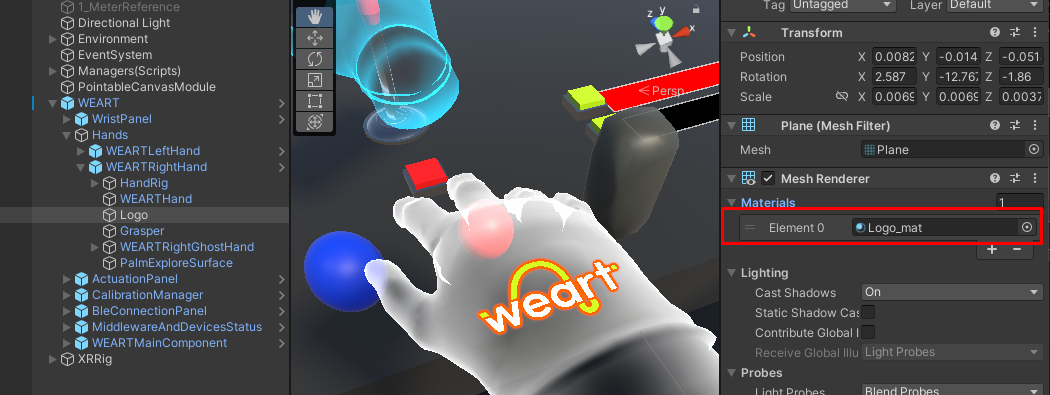
Switch the material of WEARTHand to URPHandMaterial 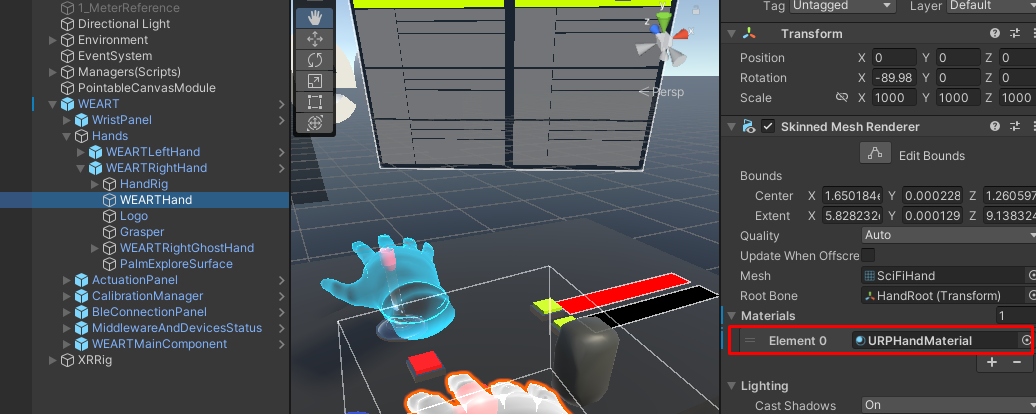
In WEARTRightHand in the component WEARTHandController replace the GhostHandInvisibleMaterial with URPInvisible and then GhostHandTransparentMaterial with URPGhost. 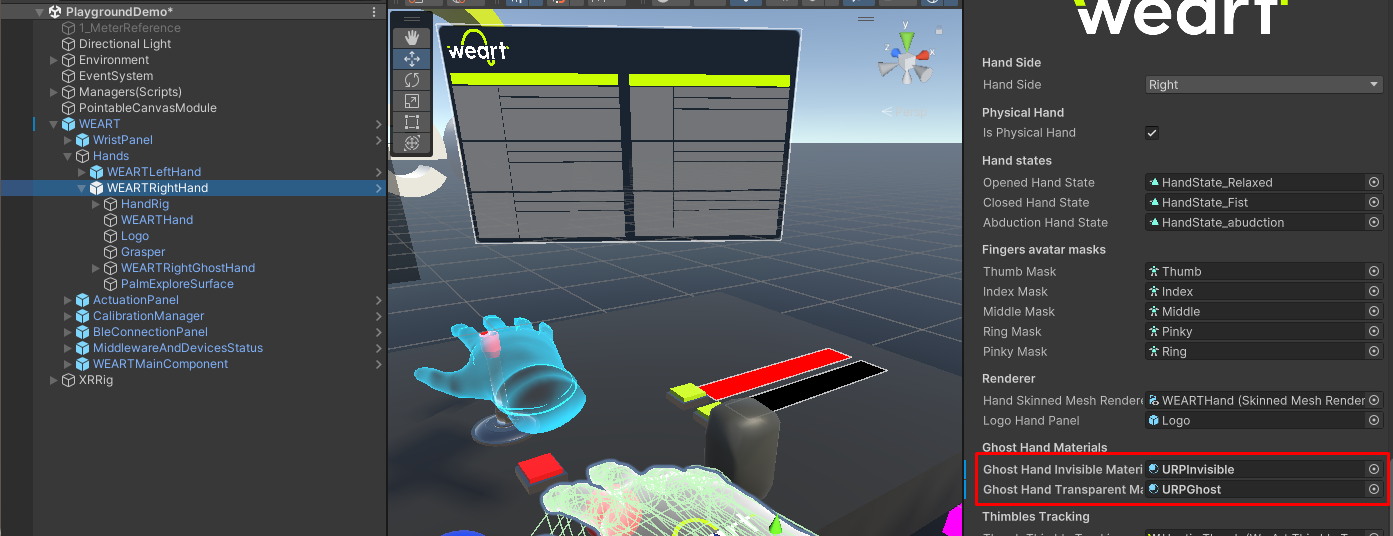
Inside WEARTRightGhostHand there is a child called WEARTHand. Replace its material with URPInvisible 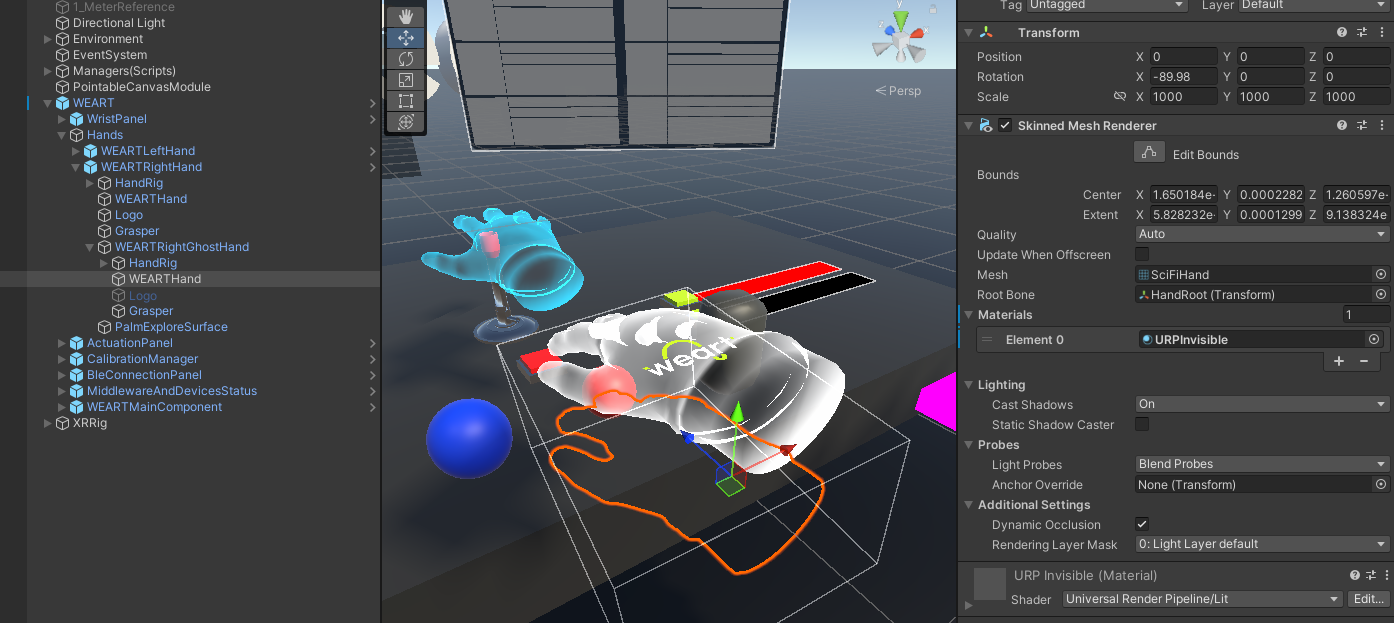
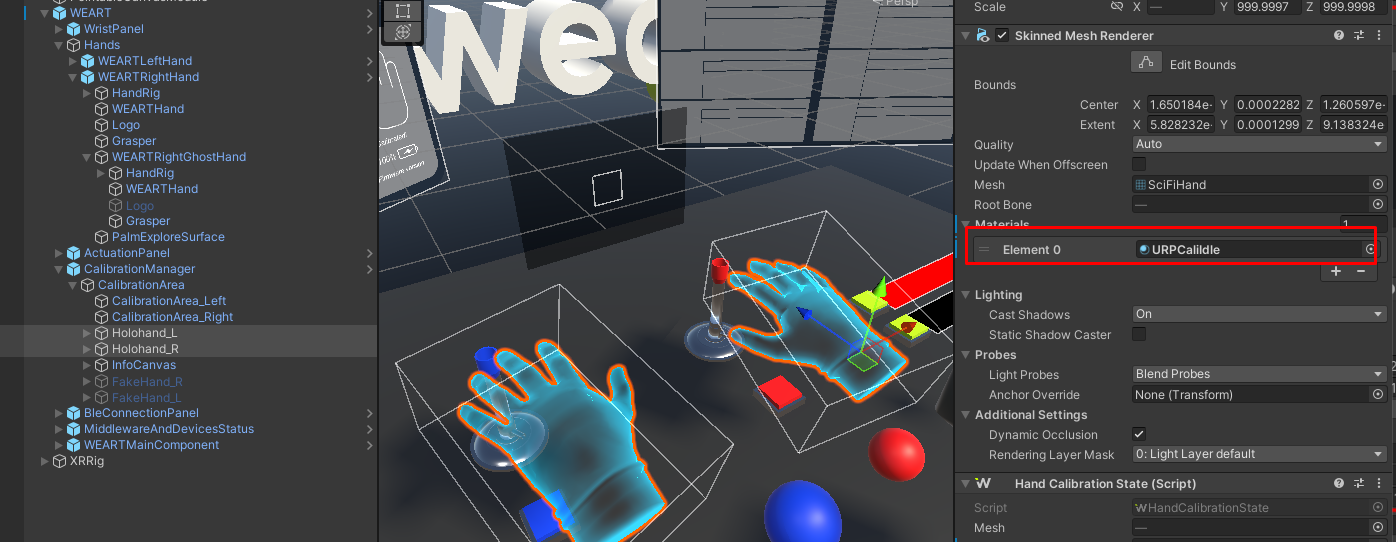
For both Holohand_L and Holohand_R, replace their material to URPCaliIdle
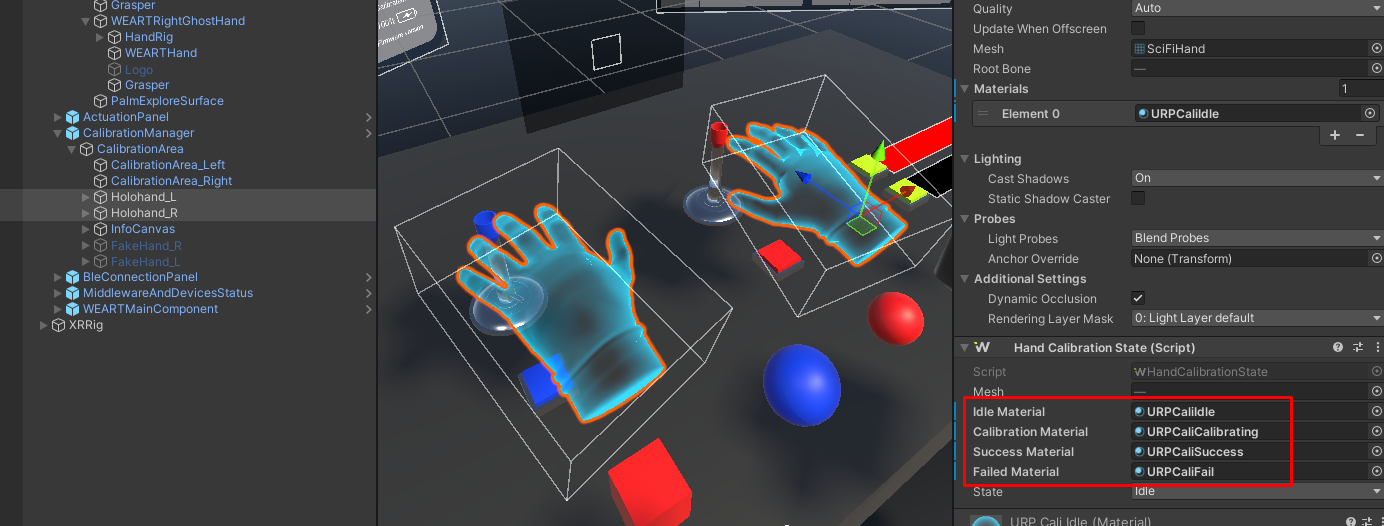
For both Holohand_L and Holohand_R, inside the component HandCalibrationState, replace IdleMaterial with URPCaliIdle, CalibrationMaterial with URPCaliCalibrating, SuccessMaterial with URPCaliSuccess and FailedMaterial with URPCaliFail.
To update your application to the latest SDK, download and extract the Unity SDK archive, then copy the files in the same place as the older SDK version.
The new version includes additional files, so it's necessary to add them to the project in order to avoid linking errors.
This can be done on Visual Studio by right-clicking on the solution, then clicking on Add -> Existing Item and selecting all the SDK files. On other systems (e.g. cmake) the procedure might be different.
The SDK is retro-compatible with older versions, so there's no need to update the application code. To see the new feature and fixes added to each version, refer to the Changelog section.
After the update of the SDK the prefabs will be broken in the scene. Replace them with the new WEART prefab from the sdk.